
Notifications for Confluent Cloud
You can manage notifications for account, billing, and service events with the Confluent Cloud Console or with a REST API. Service events are conditions or incidents related to the operation or status of a Confluent Cloud service that triggers a notification. Examples of service events include cluster shrink failures, service outages, upgrades, scaling activities, or other operational statuses that might impact your Apache Kafka® clusters or managed services.
You can configure notifications in two ways:
Organization level: Accessible to organization administrators, or if using RBAC, users with the OrganizationAdmin role.
Resource level: Accessible to users with write access to a resource such as a cluster or connector.
Users assigned the OrganizationAdmin role can also make bulk changes across all notifications, including resource-level ones.
Organization administrator users always receive required notifications by email, and can configure additional users and channels for a notification. If your organization uses RBAC, notifications are sent to users directly assigned the OrganizationAdmin role. Users granted the OrganizationAdmin role through group mappings are not sent notifications. All other RBAC roles have read-only access to notifications.
Anyone with write-level access to a resource can configure resource-level notifications for that resource. This includes resource managers and administrator-level users.
For notifications, you should understand the following terms:
Notification type: The type of notification based on the Confluent Cloud event that has occurred. Each notification type defines a condition that must be met, and they are categorized by account, billing and licensing, and service, and they can be filtered by severity level. For example, a Dedicated cluster shrink failure is a warning-level service notification type.
Integration: Describes the configured notification channel for sending a notification event: Email, Microsoft Teams, Slack, or a generic webhook. The default integration is email, and notifications are sent to the organization’s administrator or if using RBAC, users that have the OrganizationAdmin role.
Subscription: Represents the association of a notification type to an integration channel. A user creates subscriptions for a particular notification type and as a result is notified through the integration channels they have configured for that subscription.
You can view the current notification subscriptions and configure additional integrations and subscriptions to those integrations using the Cloud Console or a REST API. For example, you can configure a Slack integration, and then subscribe to this integration for a Kafka cluster shrink failure notification type.
Manage notifications at the organization level
If you are an organization administrator, or if using RBAC, you have OrganizationAdmin access to the Confluent Cloud account, you can manage notifications for your organization in the Cloud Console or with the REST API.
See a list of subscriptions
If you are an organization administrator, you can view your notification integrations and subscriptions in the Cloud Console or by making a GET call to the REST API.
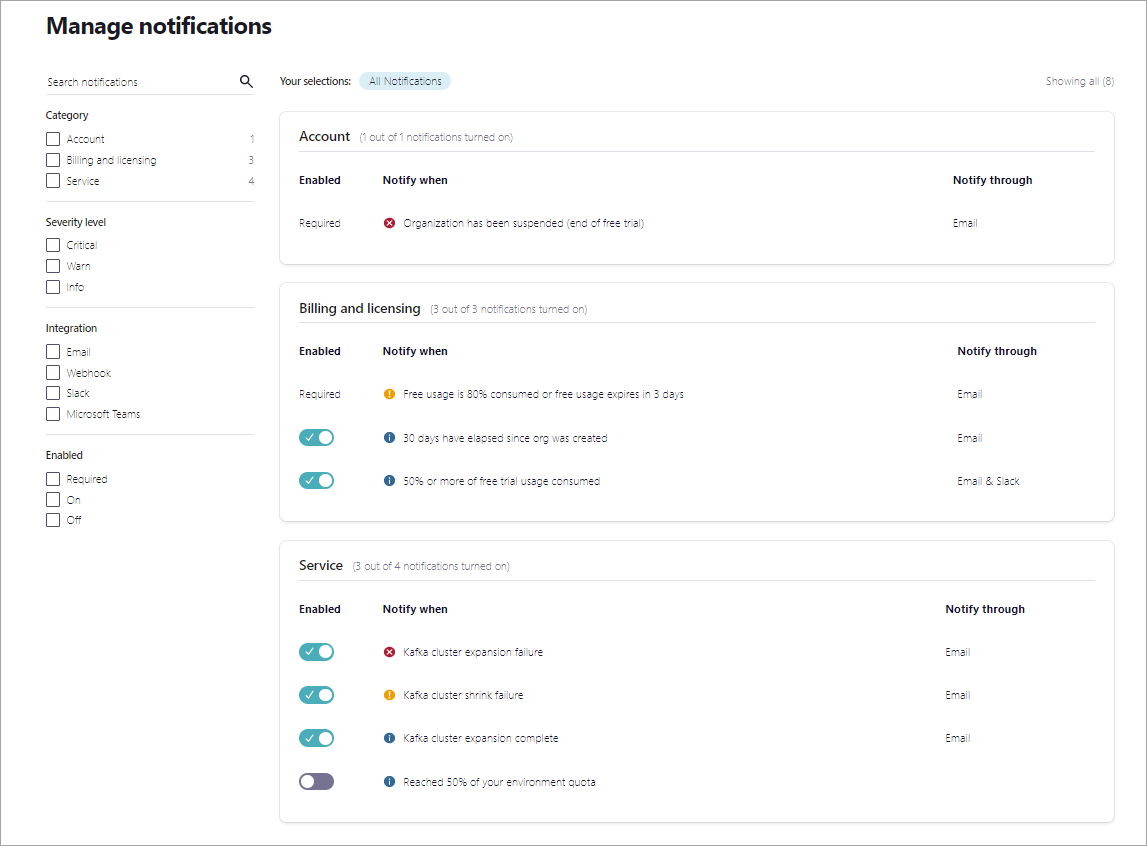
To see a list of notification subscriptions and integrations you currently have configured, access the Manage notifications page by clicking the Alert bell icon in the upper right of the Cloud Console. A notification panel slides open from the right side. You can only access this panel if you are an organization administrator, otherwise, you should access notifications at the resource level for resources you have write access to, as described in Resource-level notifications section.
Subscriptions can be filtered by:
Severity level
Category
Channel
Type
Status
To list all of the subscriptions associated with that subscription, make a GET call to the subscriptions endpoint. The request should include an authentication header that contains an API key and secret scoped for resource management, Base64 encoded. For more about authentication, see Authentication. This retrieves a filtered and paginated list of all subscriptions along with integration details associated with them. For a full list of APIs, see Confluent Cloud APIs.
GET /notifications/v1/subscriptions HTTP/1.1
Host: api.confluent.cloud
A successful response is 200 OK with a JSON payload that contains a subscription list for that organization. The example response that follows has been shortened for brevity.
HTTP/1.1 200 OK
{
   "api_version": "notifications/v1",
   "kind": "SubscriptionList",
   "metadata": {
      "first": "https://api.confluent.cloud/notifications/v1/subscriptions"
   },
   "data": [
      {
            "notification_type": {
               "resource_name": "crn://confluent.cloud/notification-type=nt-12JlG",
               "api_version": "notifications/v1",
               "id": "nt-l2JlG",
               "kind": "notification-type",
               "related": "https://api.confluent.cloud/notifications/v1/notification-types/nt-12JlG"
            },
            "integrations": [
               {
                  "resource_name": "crn://confluent.cloud/integration=i-e0KAB",
                  "api_version": "notifications/v1",
                  "id": "i-e0KAB",
                  "kind": "integration",
                  "related": "https://api.confluent.cloud/notifications/v1/integrations/i-e0KAB"
               }
            ],
            "current_state": "ENABLED",
            "api_version": "notifications/v1",
            "kind": "Subscription",
            "id": "s-56R4y",
            "metadata": {
               "self": "https://api.confluent.cloud/notifications/v1/subscriptions/s-56R4y",
               "resource_name": "crn://confluent.cloud/subscription=s-56R4y",
               "created_at": "2022-08-23T23:02:18.455Z",
               "updated_at": "2022-08-23T23:02:18.455Z"
            }
      },
      {
            "notification_type": {
               "resource_name": "crn://confluent.cloud/notification-type=nt-DbPQ9",
               "api_version": "notifications/v1",
               "id": "nt-DbPQ9",
               "kind": "notification-type",
               "related": "https://api.confluent.cloud/notifications/v1/notification-types/nt-DbPQ9"
            },
            "integrations": [
               {
                  "resource_name": "crn://confluent.cloud/integration=i-e0KAB",
                  "api_version": "notifications/v1",
                  "id": "i-e0KAB",
                  "kind": "integration",
                  "related": "https://api.confluent.cloud/notifications/v1/integrations/i-e0KAB"
               },
            {
            "resource_name": "crn://confluent.cloud/integration=i-jYa83",
            "api_version": "notifications/v1",
            "id": "i-jYa83",
            "kind": "integration",
            "related": "https://api.confluent.cloud/notifications/v1/integrations/i-jYa83"
         }
            ],
            "current_state": "ENABLED",
            "api_version": "notifications/v1",
            "kind": "Subscription",
            "id": "s-rZ9yx",
            "metadata": {
               "self": "https://api.confluent.cloud/notifications/v1/subscriptions/s-rZ9yx",
               "resource_name": "crn://confluent.cloud/subscription=s-rZ9yx",
               "created_at": "2022-08-23T23:03:19.328Z",
               "updated_at": "2022-09-15T23:49:00.422Z"
            }
      }
   ]
}
Configure integrations and subscriptions
You can configure Slack, Microsoft Teams, or generic webhook integrations for some notification types if you are an organization administrator, or if using RBAC, you have OrganizationAdmin access to the Confluent Cloud account.
Microsoft retired Office 365 connector-based webhooks for Microsoft Teams in May 2026. If you configured a Microsoft Teams integration before then, recreate it using a Workflows-based webhook, as described in the following steps. For more information, see Retirement of Office 365 connectors within Microsoft Teams and Update connectors URL.
To configure an integration and subscribe to a notification type for that integration:
Sign in to Confluent Cloud, and click the Alert bell icon to display the Manage notifications page.
Click the edit icon for the notification type you want to configure.

You can configure a new integration by entering a URL or recipient. The following image shows how to configure a new Slack integration.
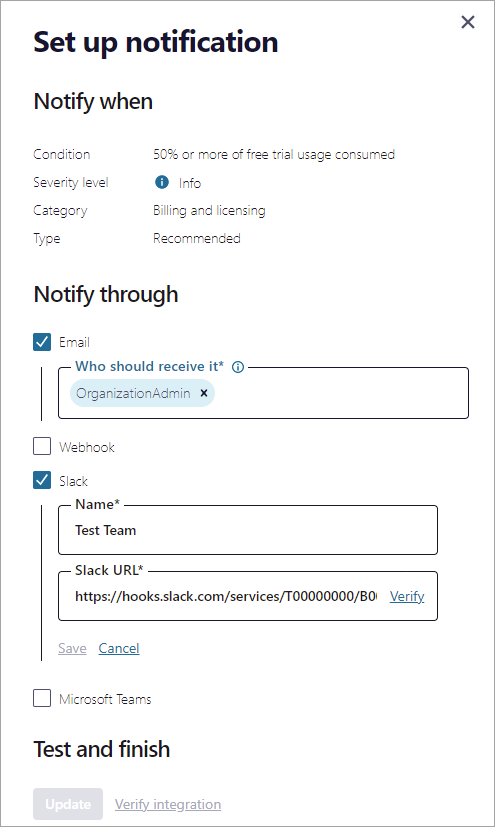
Email - Click Add recipients and enter one or more roles or users to receive notification emails. Email is checked by default for recommended and required notification types, and the OrganizationAdmin role configured by default to receive emails.
Slack - To add a new integration, click add a Slack URL and enter a Name for the integration, such as the channel or team name that receives the notification, and the Slack URL. For more information, see Slack incoming webhooks.
Microsoft Teams - To add a new integration, click add a Microsoft Teams URL and enter a Name for the integration, such as the channel or team name that receives the notification, and the Microsoft Teams URL. For more information, see Microsoft Teams incoming webhooks.
Webhook - To add a new integration, click Add Webhook URL and enter a Name for the integration.
The webhook receives messages in the following format:
{
   id: string [required]
   title: string
   message: string
   created_at: string
}
Click Verify for each URL you enter, and Confluent Cloud sends a test message to the URL. After a URL is verified, you can click Save to save the integration, and check it to add a subscription using that integration.
If the URL cannot be verified, you cannot save your changes.
To configure a subscription with the REST API, you first create an integration, then retrieve a list of notification types, and specify an integration and notification type to add a subscription. For a full list of APIs, see Confluent Cloud APIs.
To create the integration, send a POST request to the
integrationsendpoint, and include the description of the integration as a JSON payload. The request should include an authentication header that contains an API key and secret scoped for resource management, Base64 encoded. For more about authentication, see Authentication.The payload should include the name, description, and URL for a Slack, Microsoft Teams, or generic webhook integration.
POST /notifications/v1/integrations HTTP/1.1
Host: api.confluent.cloud
{
"display_name": "Slack integration",
"description": "A Slack channel integration",
"target": {
  "kind": "Slack",
  "webhook_url": "https://hooks.slack.com/services/T03QJN0HR12/B123QDZTG3W/abczdb"
 }
}
A successful response is a
201 Createdmessage with a JSON payload that resembles the following:HTTP/1.1 201 Created { "api_version": "notifications/v1", "kind": "Integration", "id": "i-a1KrA", "metadata": { "self": "https://api.confluent.cloud/notifications/v1/integrations/i-a1KrA", "resource_name": "crn://confluent.cloud/integration=i-e0KrA", "created_at": "2022-09-15T23:52:20.884Z", "updated_at": "2022-09-15T23:52:20.884Z" }, "display_name": "Slack integration", "description": "A Slack channel integration", "target": { "kind": "Slack", "webhook_url": "https://hooks.slack.com/services/T03QJN0HR12/B123QDZTG3W/abczdb" } }Next, make a GET call to the
notification-typesendpoint to retrieve a list of notifications you can subscribe to. The request should include an authentication header that contains an API key and secret scoped for resource management, Base64 encoded. For more about authentication, see Authentication. For a full list of APIs, see Confluent Cloud APIs.GET /notifications/v1/notification-types HTTP/1.1 Host: api.confluent.cloud
A successful response looks like the following (returned list shortened for brevity):
HTTP/1.1 200 OK
{
"api_version": "notifications/v1",
"kind": "NotificationTypeList",
"metadata": {
   "first": "https://api.confluent.cloud/notifications/v1/notification-types"
},
"data": [
   {
         "api_version": "notifications/v1",
         "kind": "NotificationType",
         "id": "nt-DbPQ9",
         "metadata": {
            "self": "https://api.confluent.cloud/notifications/v1/notification-types/nt-DbPQ9",
            "resource_name": "crn://confluent.cloud/notification-type=nt-DbPQ9",
            "created_at": "2022-04-11T13:56:58.817769Z",
            "updated_at": "2022-04-11T13:56:58.817769Z"
         },
         "display_name": "30 days have elapsed since org was created",
         "description": "30 days have elapsed since org was created",
         "category": "BILLING_LICENSING",
         "subscription_priority": "RECOMMENDED",
         "is_included_in_plan": true,
         "severity": "INFO"
   },
   {
         "api_version": "notifications/v1",
         "kind": "NotificationType",
         "id": "nt-abc123",
         "metadata": {
            "self": "https://api.confluent.cloud/notifications/v1/notification-types/nt-abc123",
            "resource_name": "crn://confluent.cloud/notification-type=nt-abc123",
            "created_at": "2022-04-21T12:15:44.503490Z",
            "updated_at": "2022-04-21T12:15:44.503490Z"
         },
         "display_name": "Reached 50% of your environment quota",
         "description": "Confluent Cloud Service Quota usage > 50%.",
         "category": "SERVICE",
         "subscription_priority": "OPTIONAL",
         "is_included_in_plan": true,
         "severity": "INFO"
   }
   ]
}
Next you create a subscription by sending a POST request to the
subscriptionsendpoint with a JSON payload that denotes the current state of the subscription, identifies the notification type you want to subscribe to, the integration ID for the integration you want to configure, and the environment where it was created. You can only create one subscription per notification type. Omittingcurrent_stateor attempts to create more than one subscription result in an error. The request should include an authentication header that contains an API key and secret scoped for resource management, Base64 encoded. For more about authentication, see Authentication. For a full list of APIs, see Confluent Cloud APIs.POST /notifications/v1/subscriptions HTTP/1.1 { "current_state": "ENABLED", "notification_type": { "resource_name": "crn://confluent.cloud/notification-type=nt-abc123", "api_version": "notifications/v1", "id": "nt-abc123", "kind": "notification-type", "related": "https://api.confluent.cloud/notifications/v1/notification-types/nt-abc123" }, "integrations": [ { "id": "i-e0KrA", "environment": "env-0xovp6" } ] }A successful response resembles the following:
 201 ACCEPTED
 {
 "notification_type": {
    "resource_name": "crn://confluent.cloud/notification-type=nt-abc123",
    "api_version": "notifications/v1",
    "id": "nt-abc123",
    "kind": "notification-type",
    "related": "https://api.confluent.cloud/notifications/v1/notification-types/nt-abc123"
 },
 "integrations": [
    {
          "resource_name": "crn://confluent.cloud/integration=i-e0KrA",
          "api_version": "notifications/v1",
          "id": "i-e0KrA",
          "kind": "integration",
          "related": "https://api.confluent.cloud/notifications/v1/integrations/i-e0KrA"
    }
 ],
 "current_state": "ENABLED",
 "api_version": "notifications/v1",
 "kind": "Subscription",
 "id": "s-3GRE9",
 "metadata": {
    "self": "https://api.confluent.cloud/notifications/v1/subscriptions/s-3GRE9",
    "resource_name": "crn://confluent.cloud/subscription=s-3GRE9",
    "created_at": "2022-09-21T18:14:20.952Z",
    "updated_at": "2022-09-21T18:14:20.952Z"
 }
}
Manage notifications at the resource level
If you are a resource owner, you can view and configure notifications for that specific resource in the Cloud Console or using the REST API. Resources that support this feature include:
Environments
Clusters
Connectors
In the Cloud Console, if Manage notifications does not appear or is grayed out, you do not have write access and cannot manage notifications for that resource. The next few sections provide some examples of using the REST API for resources. For a full list of REST APIs, see Confluent Cloud APIs.
Mute notifications
You can mute all notifications for a resource. This feature is useful for test or development environments, where notifications are not required or useful. When you mute notifications at the environment level, the mute is cascading, meaning notifications are muted for every resource in the environment. If you mute notifications for a lower-level resource such as a connector, the mute is only applied to that resource.
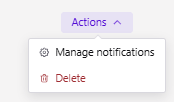
To mute notifications for an environment, on the environment overview page, select the Actions menu, and click the Manage notifications option.
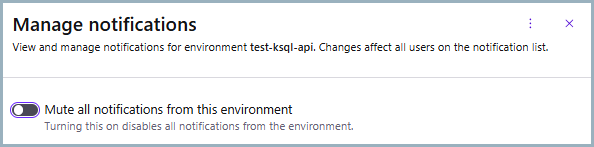
When you click Manage notifications, a side panel opens where you can mute notifications for that environment.
To set whether notifications are muted for a resource using the REST API the first time, you send a POST request to the environment endpoint (/notifications/v1/resource-preferences), to change the mute setting after it has been set, you send a PATCH request to the same endpoint.
The request must include an authentication header that contains an API key and secret scoped for resource management, Base64 encoded. For more about authentication, see Authentication.
The following example shows how to mute notifications for an environment.
POST /notifications/v1/resource-preferences HTTP/1.1
Host: api.confluent.cloud
{
  "resource": "environment=env-abc123",
  "resource_type": "ENVIRONMENT",
  "current_state": "DISABLED"
 }
A successful response is 201 Created with a JSON payload containing the updated environment:
HTTP/1.1 201 Created
{
   "api_version": "notifications/v1",
   "kind": "ResourcePreference",
   "id": "dlx-abc1234",
   "metadata": {
      "self": "https://api.confluent.cloud/notifications/v1/resource-preferences/rp-12345",
      "resource_name": "crn://confluent.cloud/environment=env-abc123",
      "created_at": "2022-08-23T23:02:18.455Z",
      "updated_at": "2022-08-23T23:02:18.455Z"
   },
   "resource": "environment=env-abc123",
   "resource_type": "ENVIRONMENT",
   "current_state": "DISABLED"
}
The following example shows how to unmute notifications for an environment.
PATCH /notifications/v1/resource-preferences HTTP/1.1
Host: api.confluent.cloud
{
  "resource": "environment=env-abc123",
  "resource_type": "ENVIRONMENT",
  "current_state": "ENABLED"
}
Clusters
You can manage notifications for a cluster resource using the Cloud Console or REST API.
To manage notifications for a cluster, on the cluster overview page, select the Settings tab, and access the Notifications section to manage notifications for that cluster.
The following image shows Manage notifications for the cluster grayed out, meaning the user does not have permissions to manage notifications for that cluster.
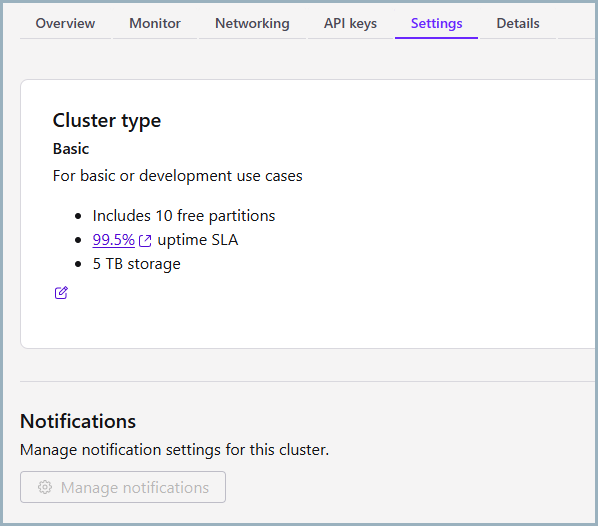
To learn more about configuring integrations for cluster notifications, see Configure integrations and subscriptions.
To manage notifications for a cluster, you make calls to the /notifications/v1/resource-subscriptions endpoint, specifying CLUSTER as the resource_type in the request. You can create, update, and delete resource subscriptions for cluster notifications using the REST API.
The request must include an authentication header that contains an API key and secret scoped for resource management, Base64 encoded. For more about authentication, see Authentication.
The following example shows how to create a resource subscription for cluster notifications by sending a POST request to the resource-subscriptions endpoint with a JSON payload that specifies the cluster resource and the integration ID.
To learn how to create an integration, see Configure integrations and subscriptions.
POST /notifications/v1/resource-subscriptions HTTP/1.1
Host: api.confluent.cloud
{
   "resource": "cloud-cluster=lkc-abc123",
   "resource_type": "CLUSTER",
   "current_state": "ENABLED",
   "notification_type": {
      "id": "nt-abc123"
   },
   "integrations": [
      {
         "id": "i-e0KrA"
      }
   ]
}
A successful response is 201 Created with a JSON payload containing the created resource subscription.
To learn more about configuring integrations for cluster notifications, see Configure integrations and subscriptions.
Connectors
You can manage notifications at the connector level using the Cloud Console or REST API.
To manage notifications for a connector, on the connector overview page, select the Settings tab and you see a Notifications section. Click Manage notifications to configure notifications.
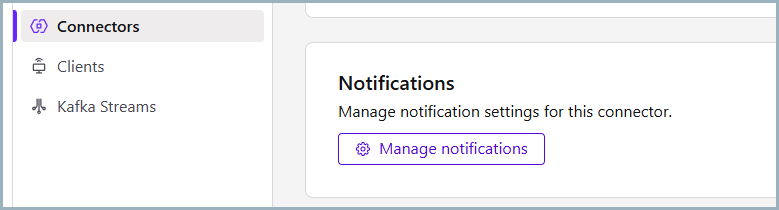
A side panel opens where you can configure integrations and subscriptions for that connector.
To learn more about configuring integrations, see Configure integrations and subscriptions. To learn more about connector notification types, see Connector notifications and state transitions.
To manage notifications for a connector, you make calls to the /notifications/v1/resource-subscriptions endpoint, specifying CONNECTOR as the resource_type in the request. You can create, update, and delete resource subscriptions for connector notifications using the REST API.
The request must include an authentication header that contains an API key and secret scoped for resource management, Base64 encoded. For more about authentication, see Authentication.
The following example shows how to update a resource subscription for connector notifications by sending a PATCH request that specifies the resource_type as CONNECTOR, the current_state to trigger the connector notification, and a JSON payload that specifies the integration ID and the updates to make.
To learn how to create an integration, see Configure integrations and subscriptions.
PATCH /notifications/v1/resource-subscriptions/{id} HTTP/1.1
Host: api.confluent.cloud
{
   "resource": "cloud-connector=lcc-abc123",
   "resource_type": "CONNECTOR",
   "current_state": "DISABLED",
   "integrations": [
      {
         "id": "i-e0KrA"
      }
   ]
}
A successful response is 200 OK with a JSON payload containing the updated resource subscription.
POST /notifications/v1/resource-subscriptions HTTP/1.1
Host: api.confluent.cloud
{
   "resource": "cloud-connector=lcc-abc123",
   "resource_type": "CONNECTOR",
   "current_state": "ENABLED",
   "notification_type": {
      "id": "nt-abc123"
   },
   "integrations": [
      {
         "id": "i-e0KrA"
      }
   ]
}
Notification reference
Notification severity levels
Notifications have the following severity levels:
Critical: High-impact notifications that need immediate attention. Address these notifications with priority.
Warn: Warning notifications you can address now or later.
Info: Informational notifications about the normal operation of your cluster.
Required notifications
The following table describes required notifications.
Severity level | Category | Description |
|---|---|---|
Critical | Account | Organization has been suspended (end of free trial). |
Critical | Service | Access to a customer-managed encryption key (BYOK) has been disrupted. |
Warn | Billing and licensing | Free usage is 80% consumed or free usage expires in three days. |
Warn | Security | SAML certificate is expiring soon. |
Warn | Security | OrganizationAdmin Role Binding Granted. |
Warn | Security | OrganizationAdmin Email Changed. |
Optional notifications
The following table describes optional notifications.
Severity level | Category | Description |
|---|---|---|
Info | Billing and licensing | 30 days have elapsed since org was created. |
Info | Billing and licensing | 50% or more of free trial usage consumed. |
Critical | Service | Kafka cluster expansion failure. |
Critical | Service | Cloud Service Quota reached 100% usage. |
Critical | Service | Connector in FAILED state. |
Critical | Service | Apache Flink® statement failure. |
Warn | Service | Kafka cluster shrink failure. |
Warn | Service | Cloud Service Quota surpassed 90% usage. |
Warn | Service | Flink statement degraded. |
Warn | Service | Flink statement auto-stopped. |
Info | Service | Kafka cluster expansion complete. |
Info | Service | Kafka cluster shrink complete. |
Info | Service | Cloud Service Quota surpassed 50% usage. |
Info | Service | Connector state transition from PROVISIONING to RUNNING. |
Connector notifications and state transitions
In the Cloud Console, you can enable or disable notifications for connectors using the Manage notifications feature.

If you enable this feature, Confluent Cloud sends a notification to your desired notification channels, such as email, Slack, Microsoft Teams, or generic webhook, when the connector transitions to or from either one of the following states:
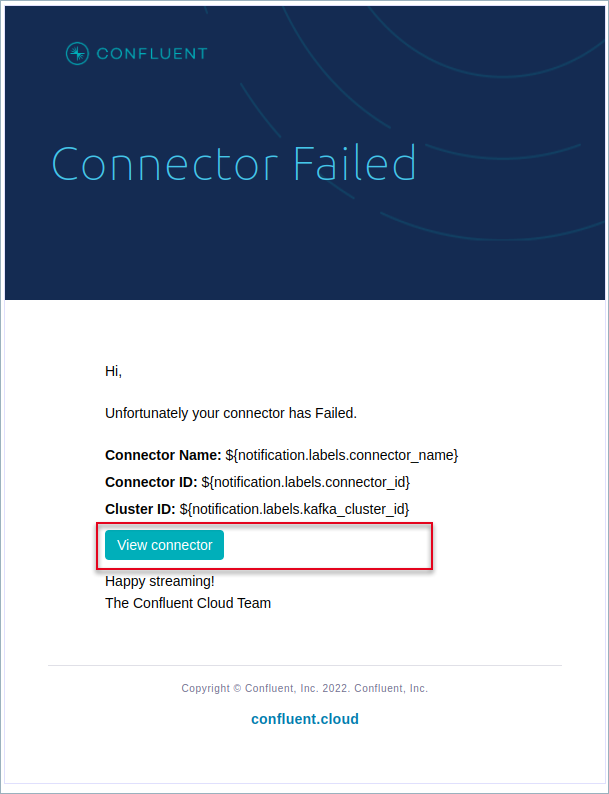
Each notification message includes the following content:
Status of the connector (Running or Failed)
Connector name
Connector ID
Cluster ID
You can troubleshoot any issue further by clicking View connector from the message content as shown in the following example:
The following sections describe connector state transitions and their notification types.
Provisioning to Running
When you first launch a connector, it enters the PROVISIONING state. If the connector launches successfully, the connector state changes to RUNNING. After this occurs, Confluent Cloud sends you a notification about the new connector to the selected notification channels denoting the connector is up and running.
Provisioning to Failed
The connector can transition from PROVISIONING to FAILED state for several reasons, including:
A system error
The connector failed to start due to an error
API keys resource-scoped for Kafka clusters are not propagated to the data plane
Schema Registry role bindings are not propagated to the data plane
If any of these situations occur, Confluent Cloud sends a notification message to your desired notification channels denoting the connector failed.
Running to Failed
If all connector tasks fail, the connector enters the FAILED state. A running connector can go into FAILED state for a number of reasons, including:
Configuration validation errors
Network connectivity issues
If any of these situations occur, Confluent Cloud sends a notification message to your desired notification channels denoting the connector failed.
Note
To prevent email spam, Confluent Cloud deduplicates repeated failures with the same error signature over a time window, so a connector that fails repeatedly in a short period may generate only one notification. Check the connector status in the console for the current state.