Snowflake Sink Connector for Confluent Cloud
The fully-managed Snowflake Sink connector for Confluent Cloud writes records from Apache Kafka® topics directly into Snowflake tables, exposing the data to services for querying, enrichment, and analytics. The connector supports Avro, JSON Schema, Protobuf, or JSON (schemaless) input data.
The Confluent Cloud connector plugin name is SnowflakeSink. The underlying connector class is com.snowflake.kafka.connector.SnowflakeSinkConnector.
Note
This Quick Start is for the fully-managed Confluent Cloud connector. If you are installing the connector locally for Confluent Platform, see the Snowflake Connector for Kafka documentation.
The fully-managed Snowflake Sink connector for Confluent Cloud connects to resources in the same region and cloud provider as your Confluent Cloud cluster. If your Snowflake instance is in a different region or cloud provider than your Confluent Cloud cluster, contact Confluent Support to enable cross-region or cross-cloud connectivity before you configure the connector.
If you require private networking for fully-managed connectors, make sure to set up the proper networking beforehand. For more information, see Manage Networking for Confluent Cloud Connectors.
Features
The Snowflake Sink connector (version 3.4.0) provides the following features:
Database authentication: The connector supports two authentication methods:
Private key authentication (default): Uses RSA key pair authentication for secure access to Snowflake. This method supports both SNOWPIPE and SNOWPIPE_STREAMING ingestion methods.
OAuth 2.0 (Bring your own app): Uses Snowflake OAuth with custom client credentials for authentication. This method only supports the SNOWPIPE_STREAMING ingestion method. Because OAuth uses the authorization code grant flow, this authentication method is only available via the Confluent Cloud Console and is not supported via the Confluent CLI or Confluent REST API. For more information, see Snowflake OAuth for Custom Clients.
Proxy support: The connector supports connecting to Snowflake through an HTTPS proxy.
OCSP certificate validation control: The connector allows you to disable Online Certificate Status Protocol (OCSP) certificate revocation checks using the
snowflake.disable.ocsp.checksconfiguration property. Enable this property only in environments where OCSP servers are not accessible. By default, OCSP checks are enabled.Client-side encryption (CSFLE and CSPE) support: The connector supports CSFLE and CSPE for sensitive data. For more information about CSFLE or CSPE setup, see the connector configuration.
Snowflake Ingestion Methods: The connector supports the Snowpipe (default) and Snowpipe Streaming for Kafka data ingestion methods. Using Snowpipe Streaming may provide a cost-benefit for your Snowflake project.
Snowflake Schematization (
snowflake.enable.schematization): When set toTRUEthe connector provides schema detection and evolution when using Snowpipe Streaming for Kafka. The default value isFALSE. For more information, see Schema detection and schema evolution.Input data formats: The connector supports Avro, JSON Schema, Protobuf, or JSON (schemaless) input data formats. Schema Registry must be enabled to use a Schema Registry-based format (for example, Avro, JSON_SR (JSON Schema), or Protobuf).
Select configuration properties: The following properties determine what metadata is included in the
RECORD_METADATAcolumn in the Snowflake database table.snowflake.metadata.createtime: If this value is set tofalse, theCreateTimeproperty value is omitted from the metadata in theRECORD_METADATAcolumn. The default value istrue.snowflake.metadata.topic: If this value is set tofalse, thetopicproperty value is omitted from the metadata in theRECORD_METADATAcolumn. The default value istrue.snowflake.metadata.offset.and.partition: If the value is set to false, theOffsetandPartitionproperty values are omitted from the metadata in theRECORD_METADATAcolumn. The default value istrue.snowflake.streaming.metadata.connectorPushTime: If this value is set totrue, theSnowflakeConnectorPushTimeproperty value is included in the metadata in theRECORD_METADATAcolumn. The default value isfalse. This metadata is only applicable when using the SNOWPIPE_STREAMING ingestion method.snowflake.metadata.all: If the value is set to false, the metadata in theRECORD_METADATAcolumn is empty. The default value istrue.
Load data into Iceberg tables: The connector now supports ingesting data into Snowflake-managed Apache Iceberg table. To enable this feature, set
snowflake.streaming.iceberg.enabledtotrue. Note that Iceberg table support is available only when using the SNOWPIPE_STREAMING ingestion method.Secret manager integration: The connector supports secret manager integration. For
Passwordbased authentication, the connector can retrieve the following configurations from an integrated secret manager at runtime as needed.Secret manager managed configuration
Type
snowflake.user.nameSTRINGsnowflake.private.keyPASSWORDsnowflake.role.nameSTRINGsnowflake.url.nameSTRINGsnowflake.private.key.passphrasePASSWORDFor more information, see Create a secret manager integration in Confluent Cloud.
For more information and examples to use with the Confluent Cloud API for Connect, see the Confluent Cloud API for Connect Usage Examples section.
Limitations
Be sure to review the following information.
For connector limitations, see Snowflake Sink Connector limitations.
If you plan to use one or more Single Message Transformations (SMTs), see SMT Limitations.
Target table naming guidelines
Note the following table naming guidelines and limitations:
The fully-managed Snowflake Sink connector allows you to configure
topic:tablename mapping. This feature is also supported by the self-managed Snowflake Sink connector.Snowflake itself has limitations on object (table) naming conventions. See Identifier Requirements for details.
Kafka is much more permissive with topic naming conventions. You are allowed to use Kafka topic names that break the table name mapping in the Confluent Cloud Snowflake Sink connector.
When a Kafka topic name does not conform to Snowflake’s table naming limitations (for example,
my-topic-name), the connector will rename the topic to a safe name with an appended hash (for example,my_topic_name_021342). A conforming topic name (for example,my_topic_name) will send results to the expected table namedmy_topic_name.If the connector needs to adjust the name of the table created for a Kafka topic, there is the potential for identical table names. For example, if you are reading data from Kafka topics
numbers+xandnumbers-x, the tables created for these topics will both be namedNUMBERS_X. To avoid table name duplication, the connector appends a suffix to the table name. The suffix is an underscore followed by a generated hash.
Generate a Snowflake key pair
Before you create the connector, you need to generate a key pair. Snowflake authentication requires 2048-bit (minimum) RSA. You add the public key to a Snowflake user account. You add the private key to the connector configuration (when completing the Quick Start instructions).
Note
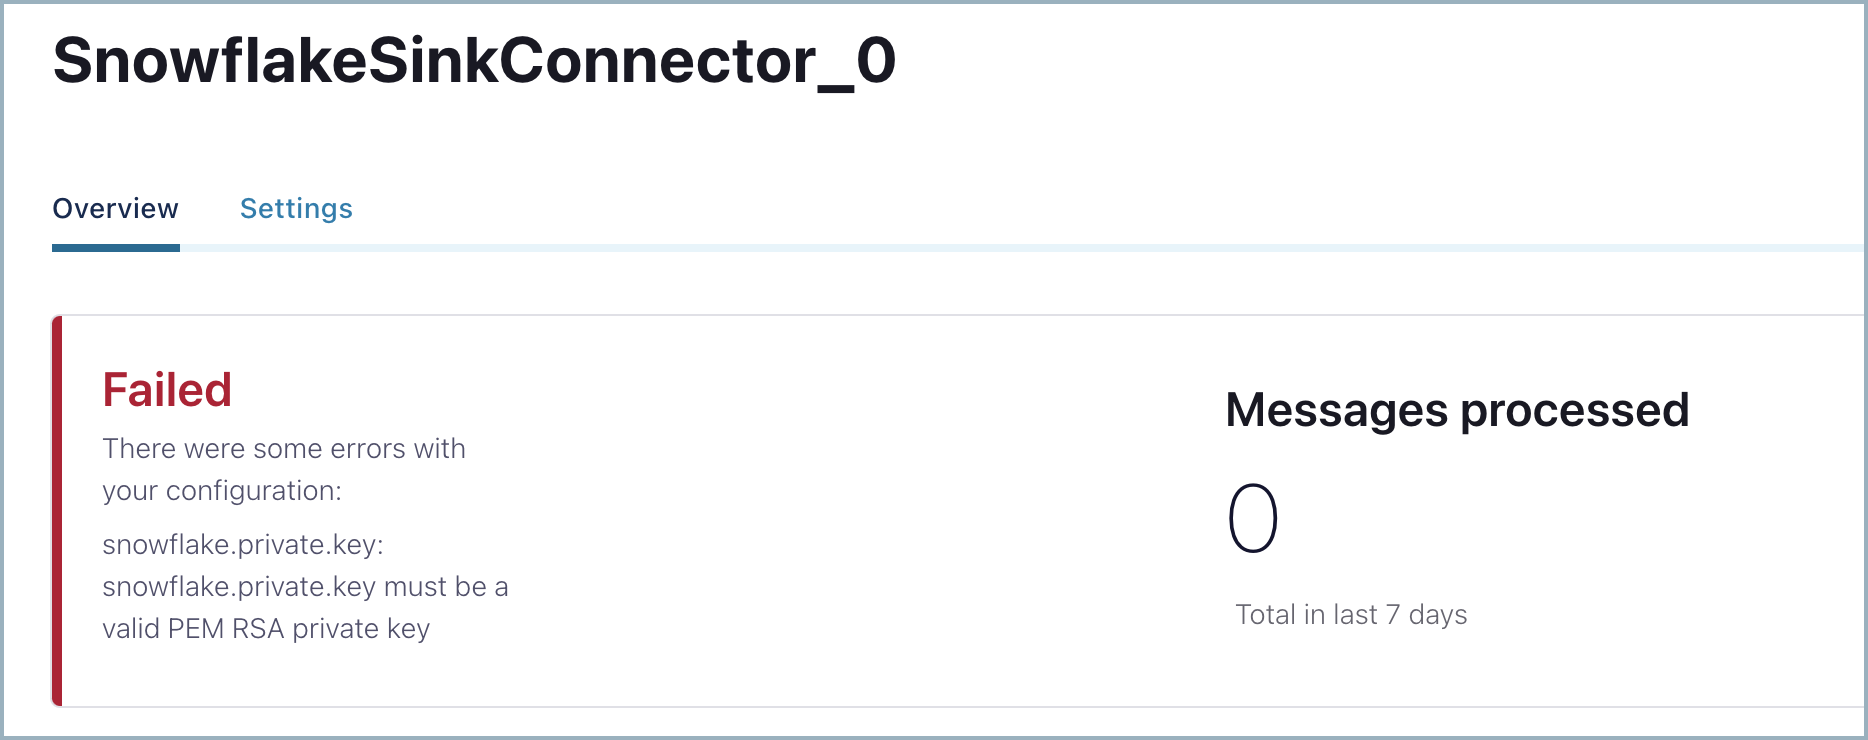
This procedure generates an unencrypted private key. You can generate and use an encrypted key. If you generate an encrypted key, add the passphrase to your connector configuration in addition to the private key. For information about generating an encrypted key, see Using Key Pair Authentication in the Snowflake documentation.
When you use a non-encrypted private key, you might see the following configuration validation error. Check whether your private key is valid or consider using an encrypted private key.
Creating the key pair
Complete the following steps to generate a key pair.
Generate a private key using OpenSSL.
openssl genrsa -out snowflake_key.pem 2048
Generate the public key referencing the private key.
openssl rsa -in snowflake_key.pem -pubout -out snowflake_key.pub
List the generated Snowflake key files.
ls -l snowflake_key*

-rw-r--r--  1  1679 Jun  8 17:04 snowflake_key.pem
-rw-r--r--  1   451 Jun  8 17:05 snowflake_key.pub
Show the contents of the public key file.
cat snowflake_key.pub

-----BEGIN PUBLIC KEY-----
MIIBIjANBgkqhkiG9w0BAQEFAAOCAQ8AMIIBCgKCAQEA2zIuUb62JmrUAMoME+SX
vsz9KUCp/cC+Y+kTGfYB3jRDQ06O0UT+yUKMO/KWuc0dUxZ8s9koW5l/n+TBfxIQ

... omitted

1tD+Ktd/CTXPoVEI2tgCC9Avf/6/9HU3IpV0gL8SZ8U0N5ot4Uw+CSYB3JjMagEG
bBWZ8Qc26pFk7Fd17+ykH6rEdLeQ9OElc0ZruVwSsa4AxaZOT+rqCCP7FQPzKTtA
JQIDAQAB
-----END PUBLIC KEY-----
Copy the key, capturing only the portion between
--BEGIN PUBLIC KEY--and--END PUBLIC KEY--. You can do this manually, or by using the following command:grep -v "BEGIN PUBLIC" snowflake_key.pub | grep -v "END PUBLIC"|tr -d '\r\n'
You will add this to a new user in Snowflake. In the following section, you create a user and add the public key.
Creating a user and adding the public key
Open your Snowflake project. Complete the following steps to create a user account and add the public key to this account.
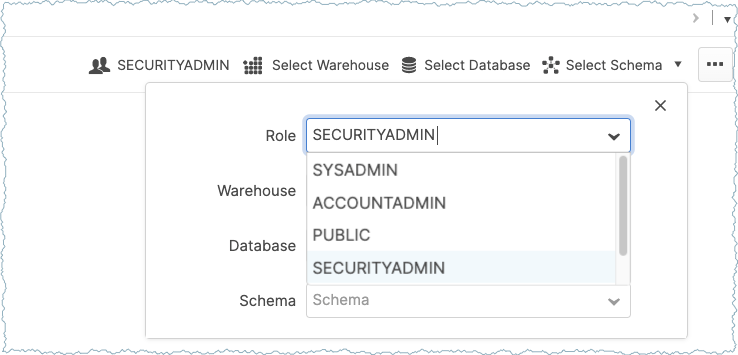
Go to the Worksheets panel and switch to the SECURITYADMIN role.
Important
Be sure to set the SECURITYADMIN role in the Worksheets panel (shown below) and not by using the user account drop-down selection. For additional information, see User Management.
Run the following query in Worksheets to create a user, and add the public key copied earlier.
CREATE USER confluent RSA_PUBLIC_KEY='<public-key>';
Make sure to add the public key as a single line in the statement.The following shows what this looks like in Snowflake Worksheets:

Tip
If you did not set the role to SECURITYADMIN, or if you set the role using the user account drop-down menu, an SQL access control error is displayed.
SQL access control error: Insufficient privileges to operate on account '<account-name>'
Configuring user privileges
Complete the following steps to set the correct privileges for the user added.
For example: Suppose you want to send Apache Kafka® records to a database named PRODUCTION using the schema PUBLIC. The following shows the required queries to configure the necessary user privileges.
// Use a role that can create and manage roles and privileges:
use role securityadmin;

// Create a Snowflake role with the privileges to work with the connector
create role kafka_connector_role;

// Grant privileges on the database:
grant usage on database PRODUCTION to role kafka_connector_role;

// Grant privileges on the schema:
grant usage on schema PRODUCTION.PUBLIC to role kafka_connector_role;
grant create table on schema PRODUCTION.PUBLIC to role kafka_connector_role;
grant create stage on schema PRODUCTION.PUBLIC to role kafka_connector_role;
grant create pipe on schema PRODUCTION.PUBLIC to role kafka_connector_role;

// Grant the custom role to an existing user:
grant role kafka_connector_role to user confluent;

// Make the new role the default role:
alter user confluent set default_role=kafka_connector_role;
Note
Grant privileges directly to the role to work with the connector. Privileges do not inherit from the role hierarchy.
Extracting the private key
You add the private key to your Snowflake connector configuration. Extract the key and put it in a safe place until you set up your connector.
List the generated Snowflake key files.
ls -l snowflake_key*

-rw-r--r--  1  1679 Jun  8 17:04 snowflake_key.pem
-rw-r--r--  1   451 Jun  8 17:05 snowflake_key.pub
Show the contents of the private key file.
cat snowflake_key.pem

-----BEGIN RSA PRIVATE KEY-----
MIIEpQIBAAKCAQEA2zIuUb62JmrUAMoME+SXvsz9KUCp/cC+Y+kTGfYB3jRDQ06O
0UT+yUKMO/KWuc0dUxZ8s9koW5l/n+TBfxIQx+24C2+l9t3TxxaLdf/YCgQwKNR9
dO9/c+SkX8NfcwUynGEo3wpmdb4hp0X9TfWKX9vG//zK2tndmMUrFY5OcGSSVJYJ
Wv3gk04sVxhINo5knpgZoUVztxcRLm/vNvIX1tD+Ktd/CTXPoVEI2tgCC9Avf/6/
9HU3IpV0gL8SZ8U0N5ot4Uw+CSYB3JjMagEGbBWZ8Qc26pFk7Fd17+ykH6rEdLeQ

... omitted

UfrYj7+p03yVflrsB+nyuPETnRJx41b01GrwJk+75v5EIg8U71PQDWfy1qOrUk/d
9u25iaVRzi6DFM0ppE76Lh72SKy+m0iEZIXWbV9q6vf46Oz1PrtffAzyi4pyJbe/
ypQ53f0CgYEA7rE6Dh0tG7EnYfFYrnHLXFC2aVtnkfCMIZX/VIZPX82VGB1mV43G
qTDQ/ax1tit6RHDBk7VU4Xn545Tgj1z6agYPvHtkhxYTq50xVBXr/xwlMnzUZ9s3
VjGpMYQANm2seleV6/si54mT4TkUyB7jMgWdFsewtwF60quvxmiA9RU=
-----END RSA PRIVATE KEY-----
Copy the key. You will add it to the connector configuration. Copy only the part of the key between
--BEGIN RSA PRIVATE KEY--and--END RSA PRIVATE KEY--). You can do this manually or you can use the following command:grep -v "BEGIN RSA PRIVATE KEY" snowflake_key.pem | grep -v "END RSA PRIVATE KEY"|tr -d '\r\n'
Save the key to use later when you are completing the Quick Start steps. Or, you can complete the previous step when you actually need to get the key for the connector config.
Set up OAuth 2.0 authentication
To use OAuth 2.0 authentication with the Snowflake Sink connector, you need to create a security integration in Snowflake. This section provides the steps to configure OAuth 2.0.
Important
OAuth 2.0 Limitations:
Ingestion method: OAuth 2.0 authentication only supports the SNOWPIPE_STREAMING ingestion method. If you need to use the SNOWPIPE ingestion method, you must use private key authentication.
Configuration access: Because OAuth uses the authorization code grant flow, you can only configure OAuth authentication via the Cloud Console. This authentication method is not available through the Confluent CLI or Confluent REST API.
Prerequisites for OAuth 2.0
You must have
ACCOUNTADMINrole or equivalent privileges in Snowflake.A Snowflake role that the connector will use (for example,
KAFKA_CONNECTOR_ROLE).
Create OAuth security integration
Connect to Snowflake using a client with
ACCOUNTADMINrole.Create a security integration for OAuth. Run the following SQL command in your Snowflake worksheet:
USE ROLE ACCOUNTADMIN;
CREATE OR REPLACE SECURITY INTEGRATION confluent_kafka_oauth
  TYPE = OAUTH
  ENABLED = TRUE
  OAUTH_CLIENT = CUSTOM
  OAUTH_CLIENT_TYPE = 'CONFIDENTIAL'
  OAUTH_REDIRECT_URI = 'https://confluent.cloud/api/connect/oauth/callback'
  OAUTH_ISSUE_REFRESH_TOKENS = TRUE
  OAUTH_REFRESH_TOKEN_VALIDITY = 7776000;
Note
confluent_kafka_oauthis a placeholder name. You can use any name that follows Snowflake naming conventions.OAUTH_REFRESH_TOKEN_VALIDITYis set to 7776000 seconds (90 days), which is the maximum allowed validity period. You can set this to a lower value based on your security requirements. The minimum is 3600 seconds (1 hour).
Grant usage on the security integration to the role the connector will use:
GRANT USAGE ON INTEGRATION confluent_kafka_oauth TO ROLE <your_connector_role>;
Replace
<your_connector_role>with the actual role name you want to use with the connector.Retrieve the OAuth client ID and client secret by running:
SELECT SYSTEM$SHOW_OAUTH_CLIENT_SECRETS('confluent_kafka_oauth');
This command returns a JSON object containing the
OAUTH_CLIENT_IDandOAUTH_CLIENT_SECRET. Save these values as you will need them when configuring the connector.Example output:
{
  "OAUTH_CLIENT_ID": "abcd1234EFGH5678==",
  "OAUTH_CLIENT_SECRET": "xyz9876aBcDeFgHiJkL=="
}
For more information about Snowflake OAuth, see the Snowflake OAuth FAQ.
Quick Start
Use this quick start to get up and running with the Confluent Cloud Snowflake Sink connector. The quick start provides the basics of selecting the connector and configuring it to consume data from Kafka and persist the data to a Snowflake database.
- Prerequisites
Authorized access to a Confluent Cloud cluster on Amazon Web Services (AWS), Microsoft Azure (Azure), or Google Cloud.
The Confluent CLI installed and configured for the cluster. See Install the Confluent CLI.
Schema Registry must be enabled to use a Schema Registry-based format (for example, Avro, JSON_SR (JSON Schema), or Protobuf).
One of the following authentication methods configured in Snowflake:
Private key authentication (default): A Snowflake account and key pair to use for connector authentication with the Snowflake database. This method supports both SNOWPIPE and SNOWPIPE_STREAMING ingestion methods.
OAuth 2.0: OAuth security integration configured in Snowflake with the OAuth client ID and client secret. This method only supports the SNOWPIPE_STREAMING ingestion method and and must be configured through the Cloud Console. Note that it is not supported via the Confluent CLI or Confluent REST API.
The user created must be granted privileges in Snowflake to modify the database and schema. For more information, see Access Control Privileges.
The data system the sink connector is connecting to should be in the same region as your Confluent Cloud cluster. If you use a different region or cloud platform, be aware that you may incur additional data transfer charges. Contact your Confluent account team or Confluent Support if you need to use Confluent Cloud and connect to a data system that is in a different region or on a different cloud platform.
For networking considerations, see Networking and DNS. To use a set of public egress IP addresses, see Public Egress IP Addresses for Confluent Cloud Connectors.
OCSP and port 80 requirements: While Snowflake communications use port 443, OCSP certificate checks are transmitted over port 80. If port 80 is not open in your network, you may encounter OCSP-related issues, such as JDBC Error 5. To resolve this, ensure your network administrator opens the firewall to traffic on ports 443 and 80 and permits all URLs in the Snowflake allowlist. No customer data is transferred over unencrypted HTTP; port 80 is used strictly for OCSP operations.
If you cannot open port 80 or your environment prevents access to OCSP servers, set
snowflake.disable.ocsp.checkstotrue. Because this bypasses certificate revocation validation, enable this setting only if your network security policy allows it and no other connectivity options are available. For more information, see Common connectivity issues and resolutions in the Snowflake documentation.
Kafka cluster credentials. The following lists the different ways you can provide credentials.
Enter an existing service account resource ID.
Create a Confluent Cloud service account for the connector. Make sure to review the ACL entries required in the service account documentation. Some connectors have specific ACL requirements.
Create a Confluent Cloud API key and secret. To create a key and secret, you can use confluent api-key create or you can autogenerate the API key and secret directly in the Cloud Console when setting up the connector.
Using the Confluent Cloud Console
Step 1: Launch your Confluent Cloud cluster
To create and launch a Kafka cluster in Confluent Cloud, see Create a kafka cluster in Confluent Cloud.
Step 2: Add a connector
In the left navigation menu, click Connectors. If you already have connectors in your cluster, click + Add connector.
Step 3: Select your connector
Click the Snowflake Sink connector card.
Step 4: Enter the connector details
Note
Ensure you have all your prerequisites completed.
The example commands use Confluent CLI version 2. For more information see, Confluent CLI v2.
At the Add Snowflake Sink Connector screen, complete the following:
If you’ve already populated your Kafka topics, select the topics you want to connect from the Topics list.
To create a new topic, click +Add new topic.
Select the way you want to provide Kafka Cluster credentials. You can choose one of the following options:
My account: This setting allows your connector to globally access everything that you have access to. With a user account, the connector uses an API key and secret to access the Kafka cluster. This option is not recommended for production.
Service account: This setting limits the access for your connector by using a service account. This option is recommended for production.
Use an existing API key: This setting allows you to specify an API key and a secret pair. You can use an existing pair or create a new one. This method is not recommended for production environments.
Note
Freight clusters support only service accounts for Kafka authentication.
Click Continue.
Configure the authentication properties:
Authentication method
Authentication method: Under Snowflake Credentials, select your Authentication method:
Password (default): Use private key authentication
OAuth 2.0 (Bring your own app): Use Snowflake OAuth authentication
Use secret manager: Enable this setting to fetch sensitive configuration values, such as the
Password, from a secret manager.
Secret manager configuration
Secret manager: Select the secret manager that Confluent Cloud should use to retrieve sensitive data.
Configurations from Secret manager: Select the configurations whose values Confluent Cloud should fetch from the secret manager.
Provider Integration: Select an existing integration that has access to your resource such as the secret manager.
Snowflake Credentials
Connection URL: The URL for accessing your Snowflake account. Use the format
https://<account-locator>.<region-ID>.snowflakecomputing.com. For example:https://abcd12345.us-east-1.snowflakecomputing.comThe
https://and443port number are optional. For more information, see Account Locator in a Region. Do not use the region ID if your account is in the AWS US West region and you are using AWS PrivateLink.Connection user name: The username created earlier.
Snowflake role: Specifies the role the connector uses when inserting rows into the table.
For OAuth 2.0 authentication, this property is always required.
For Private Key authentication, this property is required if the active ingestion method is
SNOWPIPE_STREAMING. If the ingestion method isSNOWPIPE, the default role assigned to the user is used.
Private key: The private key created earlier as a single line. Enter only the part of the key between
--BEGIN RSA PRIVATE KEY--and--END RSAPRIVATE KEY--.OAuth Client ID: Enter the client ID obtained from the OAuth security integration you created in Snowflake.
Client Secret: Enter the client secret obtained from the OAuth security integration.
Decryption key of private key: Enter the decryption key for the private key to decrypt it. Use this field only if the private key is encrypted.
Enable HTTPS proxy for Snowflake connections: Set to
trueto use an HTTPS proxy to connect to Snowflake. The default isfalse. When set totrue, the following properties are available:HTTPS proxy host for Snowflake connections: The hostname or IP address of the proxy server.
HTTPS proxy port for Snowflake connections: The port number of the proxy server.
Hosts to bypass HTTPS proxy for Snowflake connections: A list of hosts that should be reached directly, bypassing the proxy.
HTTPS proxy username for Snowflake connections: The username for authenticating with the proxy server.
HTTPS proxy password for Snowflake connections: The password for authenticating with the proxy server.
HTTPS proxy host for Snowflake connections: The HTTPS proxy host for Snowflake connections.
HTTPS proxy port for Snowflake connections: The HTTPS proxy port for Snowflake connections.
Disable OCSP checks: If set to
true, disables Online Certificate Status Protocol (OCSP) certificate revocation checks for Snowflake JDBC connections. Enable this only in environments where OCSP servers are not accessible. The default value isfalse.Hosts to bypass HTTPS proxy for Snowflake connections: The hosts to bypass HTTPS proxy for Snowflake connections.
HTTPS proxy username for Snowflake connections: The HTTPS proxy username for Snowflake connections.
HTTPS proxy password for Snowflake connections: The HTTPS proxy password for Snowflake connections.
Snowflake Database Details
Database name: The database name containing the table to insert rows into.
Schema name: The schema name that contains the table to insert rows into.
Topics to tables mapping: A comma-separated list of tuples specifying the mapping of topics to specific tables. For example, to map topic-1 to table-1 and topic-2 to table-2, use the format:
<topic-1>:<table-1>,<topic-2>:<table-2>, and so on for additional mappings.
Click Continue.
Note
Configuration properties that are not shown in the Cloud Console use the default values. See Configuration Properties for configuration property values and descriptions.
Input Kafka record value format: Select the input Kafka record value format (data coming from the Kafka topic). Valid values are JSON (schemaless), AVRO, JSON_SR (JSON Schema), or PROTOBUF. A valid schema must be available in Schema Registry to use a schema-based message format (for example, Avro, JSON_SR (JSON Schema), or Protobuf).
Snowflake connection
Ingestion method: Select the ingestion method. This property defaults to
SNOWPIPE. SelectSNOWPIPE_STREAMING. Snowpipe Streaming for Kafka may provide a cost-benefit for your Snowflake project.
Data decryption
Enable Client-Side Field Level Encryption for data decryption. Specify a Service Account to access the Schema Registry and associated encryption rules or keys with that schema. Select the connector behavior (
ERRORorNONE) on data decryption failure. If set toERROR, the connector fails and writes the encrypted data in the DLQ. If set toNONE, the connector writes the encrypted data in the target system without decryption. For more information on CSFLE or CSPE setup, see Manage encryption for connectors.
Show advanced configurations
Schema context: Select a schema context to use for this connector, if using a schema-based data format. This property defaults to the Default context, which configures the connector to use the default schema set up for Schema Registry in your Confluent Cloud environment. A schema context allows you to use separate schemas (like schema sub-registries) tied to topics in different Kafka clusters that share the same Schema Registry environment. For example, if you select a non-default context, a Source connector uses only that schema context to register a schema and a Sink connector uses only that schema context to read from. For more information about setting up a schema context, see What are schema contexts and when should you use them?.
Input Kafka record key format: Select the Input Kafka record key format. Valid values are JSON (schemaless), AVRO, JSON_SR (JSON Schema), PROTOBUF, or STRING. A valid schema must be available in Schema Registry to use a schema-based message format (for example, Avro, JSON_SR (JSON Schema), or Protobuf). for additional information.
Key Converter Reference Subject Name Strategy: Set the subject reference name strategy for key. Valid values are
DefaultReferenceSubjectNameStrategyorQualifiedReferenceSubjectNameStrategy. Note that the subject reference name strategy can be selected only for PROTOBUF format with the default strategy beingDefaultReferenceSubjectNameStrategy.
Additional Configs
Value Converter Replace Null With Default: Specifies whether to replace fields that have a default value and that are null to the default value. When set to
true, the connector uses the default value; otherwise, it usesnull. Applies to theJSONconverter.Value Converter Schema ID Deserializer: Sets the class name of the schema ID deserializer for values. The deserializer reads schema IDs from message headers.
Value Converter Reference Subject Name Strategy: Sets the subject reference name strategy for values. Valid entries are
DefaultReferenceSubjectNameStrategyorQualifiedReferenceSubjectNameStrategy. You can use this strategy only withPROTOBUFformat; the default strategy isDefaultReferenceSubjectNameStrategy.Schema ID For Value Converter: Sets the schema ID to use for deserialization when using
ConfigSchemaIdDeserializer. This lets you specify a fixed schema ID for deserializing message values. This property is applicable only whenvalue.converter.value.schema.id.deserializeris set toConfigSchemaIdDeserializer.Value Converter Schemas Enable: Includes schema within each of the serialized values. Input messages must contain
schemaandpayloadfields and must not contain additional fields. For plainJSONdata, set this tofalse. Applies to theJSONconverter.Value Converter Ignore Default For Nullables: When set to
true, this property ensures that the corresponding record in Kafka isnull, instead of showing the default column value. Applies to theAVRO,PROTOBUF, andJSON_SRconverters.Key Converter Schema ID Deserializer: Sets the class name of the schema ID deserializer for keys. The deserializer reads schema IDs from message headers.
Value Converter Decimal Format: Specifies the
JSONorJSON_SRserialization format for ConnectDECIMALlogical type values with two allowed literals:BASE64to serializeDECIMALlogical types as base64 encoded binary data, andNUMERICto serializeDECIMALlogical type values inJSONorJSON_SRas a number representing the decimal value.Schema GUID For Key Converter: Sets the schema GUID to use for deserialization when using
ConfigSchemaIdDeserializer. This lets you specify a fixed schema GUID for deserializing message keys. This property is applicable only whenkey.converter.key.schema.id.deserializeris set toConfigSchemaIdDeserializer.Schema GUID For Value Converter: Sets the schema GUID to use for deserialization when using
ConfigSchemaIdDeserializer. This lets you specify a fixed schema GUID for deserializing message values. This property is applicable only whenvalue.converter.value.schema.id.deserializeris set toConfigSchemaIdDeserializer.Value Converter Connect Meta Data: Enables the Connect converter to add its metadata to the output schema. Applies to Avro converters.
Value Converter Value Subject Name Strategy: Determines how to construct the subject name under which the value schema is registered with Schema Registry.
Key Converter Key Subject Name Strategy: Determines how to construct the subject name for key schema registration.
Schema ID For Key Converter: Sets the schema ID to use for deserialization when using
ConfigSchemaIdDeserializer. This lets you specify a fixed schema ID for deserializing message keys. This property is applicable only whenkey.converter.key.schema.id.deserializeris set toConfigSchemaIdDeserializer.
Auto-restart policy
Enable Connector Auto-restart: Enables the auto-restart behavior of the connector and its task in the event of user-actionable errors. Defaults to
true, enabling the connector to automatically restart in case of user-actionable errors. Set this property tofalseto disable auto-restart for failed connectors. If disabled, you must manually restart the connector.
Consumer configuration
Max poll interval(ms): Sets the maximum delay between subsequent consume requests to Kafka. Use this property to improve connector performance in cases when the connector cannot send records to the sink system. The default is 300,000 milliseconds (5 minutes).
Max poll records: Sets the maximum number of records to consume from Kafka in a single request. Use this property to improve connector performance in cases when the connector cannot send records to the sink system. The default is 500 records.
Connection details
Whether or not to include “createtime” in metadata: If the value is set to
FALSE, theCreateTimeproperty value is omitted from the metadata in theRECORD_METADATAcolumn. The default value isTRUE.Whether or not to include “topic” in metadata: If the value is set to
FALSE, the topic property value is omitted from the metadata in theRECORD_METADATAcolumn. The default value isTRUE.Whether or not to include “offset” and “partition” in metadata: If the value is set to
FALSE, the Offset and Partition property values are omitted from the metadata in theRECORD_METADATAcolumn. The default value isTRUE.Whether or not to include “connectorPushTime” in metadata: If the value is set to
TRUE, theConnectorPushTimeproperty value is added to the metadata in theRECORD_METADATAcolumn. The default value isFALSE. This works with onlySNOWPIPE_STREAMINGingestion mode.Whether or not to include metadata column: If the value is set to
FALSE, the metadata in theRECORD_METADATAcolumn is completely empty. The default value isTRUE.Enable Schematization: Specify to
TRUEto enable schema detection and evolution for Kafka connector with Snowpipe Streaming. The default value isFALSE.The time in seconds to flush cached data: Number of seconds between buffer flushes, where the flush is from the Kafka’s memory cache to the internal stage. The default value is 120 seconds. Minimum value allowed is 10 for snowflake.ingestion.method=SNOWPIPE and 1 for snowflake.ingestion.method=SNOWPIPE_STREAMING. The connector uses buffer.count.records and buffer.size.bytes=10,000,000 (10MB) as well. Whichever comes first, the connector will flush Kafka records to Snowflake.
The number of records to flush cached data: The number of records between buffer flushes, where the flush is from the Kafka’s memory cache to the internal stage. The default and minimum value is 10,000 records. The connector also uses the previous time in seconds property and the followingsize of the buffer property to determine when to flush cached data. When one of these property values is reached, the connector flushes Kafka records to Snowflake.
The size of the connector record buffer: The buffer size defaults to 5000000 bytes (5 MB). The records are compressed when written to Snowflake.
When a flush is triggered when the cache reaches 5 MB, you might expect to see a 5 MB data file in Snowflake. You will see a much smaller file (for example, ~150 KB). This is because the 5 MB of flushed data is converted from Java to UTF. This conversion reduces the file size by 50 percent. The file is then compressed with gzip, which further reduces the file size by 95 percent.
Enable Iceberg Ingestion: Interested in integrating with Iceberg? Take a look at Tableflow — a solution designed to simplify and streamline your Iceberg workflows, refer https://www.confluent.io/product/tableflow/. This property specifies whether the connector ingests data into an Iceberg table. The connector fails if this property doesn’t match the actual table type, refer https://docs.snowflake.com/en/user-guide/kafka-connector-iceberg.
Enable Task Failure on Authorization Errors: If set to true, the connector task will fail whenever it encounters an authorization error from Snowflake.
Enable dynamic flush: If set to
true, each connector task can consume up to twice as many topic partitions based on the buffer size. This option is useful for workloads with many topic partitions but low throughput per partition.Note
Enabling this configuration can degrade performance. Because each task handles more partitions, flush operations can trigger more often with smaller batches of data based on the connector’s buffer footprint.
Max client lag in seconds for Snowpipe Streaming: Decides how often the buffer in the Ingest SDK will be flushed. The default value is 30 seconds. Setting this value too low may degrade performance, while setting it too high may increase latency. This configuration is only applicable when snowflake.ingestion.method is set to SNOWPIPE_STREAMING.
Enable Streaming channel names prefixed with connector name: If enabled, the Snowflake Streaming channel names are prefixed with the connector name. This config enables/disables usage of channel names that were used solely in Kafka Connector versions 2.1.0 and 2.1.1 and is intended for users that previously used these versions and did not update the connector since. IMPORTANT: Enabling this config in any other case will result in data duplication. This configuration is only applicable when snowflake.ingestion.method is set to SNOWPIPE_STREAMING.
Enable handling infinity values: Whether to enable correct handling for infinity and negative infinity values in float/double fields when using Snowpipe Streaming. When enabled, infinity values will be correctly ingested as ‘Inf’ or ‘-Inf’. When disabled, infinity values will be treated as ‘NaN’ for backward compatibility. This configuration is only applicable when snowflake.ingestion.method is set to SNOWPIPE_STREAMING.
Error handling
Error Tolerance: Connector error tolerance. Supported values are none, all
Transforms
Single Message Transformations: To add a new SMT, see Add transforms. For more information about unsupported SMTs, see Unsupported transformations.
Processing position
Set offsets: Click Set offsets to define a specific offset for this connector to begin procession data from. For more information on managing offsets, see Manage offsets.
Click Continue.
Based on the number of topic partitions you select, you will be provided with a recommended number of tasks. One task can handle up to 100 partitions.
To change the number of recommended tasks, enter the number of tasks for the connector to use in the Tasks field. Each task is limited to a number of topic partitions based on the
buffer.size.bytesproperty value. For example, a10MB buffer size is limited to 50 topic partitions, a20MB buffer is limited to 25 topic partitions,50MB buffer is limited to 10 topic partitions, and a100MB buffer to 5 topic partitions.Click Continue.
Review the configuration summary and verify the following:
Verify the connection details and click Launch.
The status for the connector should go from Provisioning to Running.

Click Launch.
Step 5: Check Snowflake
After the connector is running, verify that messages are populating your Snowflake database table.
For more information and examples to use with the Confluent Cloud API for Connect, see the Confluent Cloud API for Connect Usage Examples section.
Tip
When you launch a connector, a Dead Letter Queue topic is automatically created. See View Connector Dead Letter Queue Errors in Confluent Cloud for details.
For Snowflake troubleshooting, see Troubleshooting Issues in the Snowflake documentation.
Note
The Snowflake Sink connector does not remove Snowflake pipes when a connector is deleted. For instructions to manually clean up Snowflake pipes, see Dropping Pipes.
Snowflake Snowpipe failure can prevent messages from showing up in the target table despite being successfully written by the Snowflake Sink connector. If this happens, check the Snowflake COPY_HISTORY view, internal stage, or table stage to find the message and associated error. For more on the workflow of Snowflake Sink connector, see Workflow for the Kafka Connector.
Using the Confluent CLI
Complete the following steps to set up and run the connector using the Confluent CLI.
Note
Make sure you have all your prerequisites completed.
OAuth 2.0 authentication is not supported via the Confluent CLI. If you need to use OAuth authentication, you must create the connector using the Confluent Cloud Console. The Confluent CLI only supports private key authentication.
Step 1: List the available connectors
Enter the following command to list available connectors:
confluent connect plugin list
Step 2: List the connector configuration properties
Enter the following command to show the connector configuration properties:
confluent connect plugin describe <connector-plugin-name>
The command output shows the required and optional configuration properties.
Step 3: Create the connector configuration file
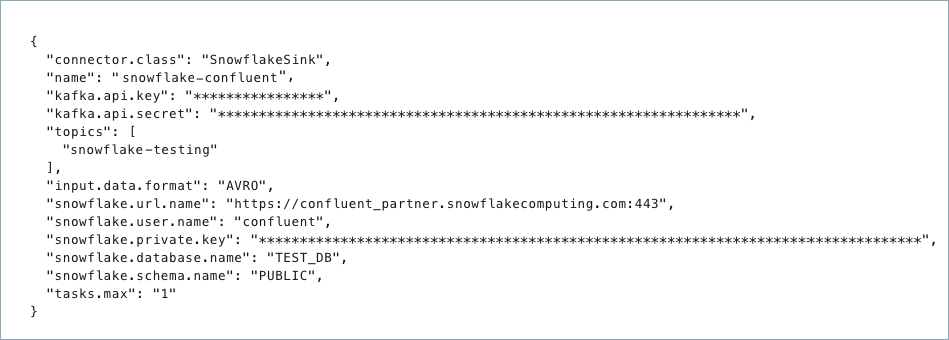
Create a JSON file that contains the connector configuration properties. The following examples show the required connector properties for each authentication method.
Example 1: Private Key Authentication (default)
{
  "connector.class": "SnowflakeSink",
  "name": "<connector-name>",
  "kafka.auth.mode": "KAFKA_API_KEY",
  "kafka.api.key": "<my-kafka-api-key>",
  "kafka.api.secret": "<my-kafka-api-secret>",
  "topics": "<topic1>, <topic2>",
  "input.data.format": "JSON",
  "snowflake.url.name": "https://wm83168.us-central1.gcp.snowflakecomputing.com:443",
  "snowflake.user.name": "<login-username>",
  "snowflake.private.key": "<private-key>",
  "snowflake.database.name": "<database-name>",
  "snowflake.schema.name": "<schema-name>",
  "tasks.max": "1"
}
Example 2: OAuth 2.0 Authentication (Reference Only)
OAuth 2.0 authentication is not supported via the Confluent CLI or Confluent REST API. Because OAuth uses the authorization code grant flow, you must configure OAuth authentication through the Confluent Cloud Console. The example below shows the configuration properties set when using OAuth via the Cloud Console and is provided for reference only.
{
  "connector.class": "SnowflakeSink",
  "name": "<connector-name>",
  "kafka.auth.mode": "KAFKA_API_KEY",
  "kafka.api.key": "<my-kafka-api-key>",
  "kafka.api.secret": "<my-kafka-api-secret>",
  "topics": "<topic1>, <topic2>",
  "input.data.format": "JSON",
  "authentication.method": "OAuth 2.0 (Bring your own app)",
  "snowflake.url.name": "https://wm83168.us-central1.gcp.snowflakecomputing.com:443",
  "snowflake.user.name": "<login-username>",
  "snowflake.role.name": "<your-connector-role>",
  "snowflake.ingestion.method": "SNOWPIPE_STREAMING",
  "oauth.client.id": "<oauth-client-id>",
  "oauth.client.secret": "<oauth-client-secret>",
  "oauth.refresh.token": "<oauth-refresh-token>",
  "snowflake.database.name": "<database-name>",
  "snowflake.schema.name": "<schema-name>",
  "tasks.max": "1"
}
Note
If you need to use OAuth 2.0 authentication, you must create the connector using the Confluent Cloud Console. Use Connect with Snowflake option that handles the OAuth authorization code grant flow and automatically populates the refresh token.
Note the following required property definitions:
"connector.class": Identifies the connector plugin name."name": Enter a name for your connector.
"kafka.auth.mode": Identifies the connector authentication mode you want to use. There are two options:SERVICE_ACCOUNTorKAFKA_API_KEY(the default). To use an API key and secret, specify the configuration propertieskafka.api.keyandkafka.api.secret, as shown in the example configuration (above). To use a service account, specify the Resource ID in the propertykafka.service.account.id=<service-account-resource-ID>. To list the available service account resource IDs, use the following command:confluent iam service-account list
For example:
confluent iam service-account list

   Id     | Resource ID |       Name        |    Description
+---------+-------------+-------------------+-------------------
   123456 | sa-l1r23m   | sa-1              | Service account 1
   789101 | sa-l4d56p   | sa-2              | Service account 2
"topics": Enter one topic or multiple comma-separated topics."input.data.format": Sets the input Kafka record value format (data coming from the Kafka topic). Valid entries are AVRO, JSON_SR, PROTOBUF, or JSON. You must have Confluent Cloud Schema Registry configured if using a schema-based message format (for example, Avro, JSON_SR (JSON Schema), or Protobuf)."snowflake.url.name": The URL the connector uses to reach your Snowflake account, in the formathttps://<account_locator>.<region_id>.<cloud_provider>.snowflakecomputing.com:443. Thehttps://prefix and443port number are optional. For more information, see Account Locator in a Region. Do not use the region ID if your account is in the AWS US West region and you are not using AWS PrivateLink."snowflake.user.name": Enter the user name created earlier. Note that if using the SNOWPIPE_STEAMING ingestion method, you must add the"snowflake.role.name"property. See Configuration Properties for all property values and descriptions."snowflake.private.key":Enter the private key created earlier as a single line.
Enter only the part of the key between
--BEGIN RSA PRIVATE KEY--and--END RSA PRIVATE KEY--.
"snowflake.database.name": Enter the database name containing the table to insert rows into."snowflake.schema.name": Enter the Snowflake Schema name that contains the table to insert rows into."tasks.max": Enter the number of tasks for the connector. Refer to Confluent Cloud connector limitations for additional information.
OAuth 2.0 Authentication Properties
Important
OAuth 2.0 Limitations:
Ingestion method: OAuth 2.0 authentication only supports the SNOWPIPE_STREAMING ingestion method. You must set
"snowflake.ingestion.method":"SNOWPIPE_STREAMING"when using OAuth authentication.Configuration access: Because OAuth uses the authorization code grant flow, you can only configure OAuth authentication via the Confluent Cloud Console. This authentication method is not available through the Confluent CLI or Confluent REST API.
The following properties are set when using OAuth 2.0 authentication ("authentication.method": "OAuth 2.0 (Bring your own app)"). These properties are automatically configured when you use the Connect with Snowflake option in the Cloud Console:
"authentication.method": Set to"OAuth 2.0 (Bring your own app)"to use OAuth authentication. If not specified, the connector uses private key authentication (default)."snowflake.ingestion.method": Must be set to"SNOWPIPE_STREAMING"when using OAuth 2.0 authentication. OAuth is not supported with the"SNOWPIPE"ingestion method."snowflake.role.name": The Snowflake role to use for the connection. This is required when using OAuth 2.0 authentication."oauth.client.id": The OAuth client ID from your Snowflake security integration. This is required when using OAuth 2.0."oauth.client.secret": The OAuth client secret from your Snowflake security integration. This is required when using OAuth 2.0."oauth.refresh.token": The OAuth refresh token obtained during the authentication flow. This token is used to automatically refresh access tokens. This is required when using OAuth 2.0.Important
The refresh token has a Time-To-Live (TTL) based on the
OAUTH_REFRESH_TOKEN_VALIDITYsetting in your Snowflake security integration. The minimum TTL is 1 hour (3600 seconds) and the maximum is 90 days (7776000 seconds). When the refresh token expires, the connector will fail. For recovery steps, see OAuth Refresh Token Expiration.
To configure the connector to use an HTTPS proxy, set the following optional properties:
"snowflake.useHttpsProxy": Set totrueto use an HTTPS proxy. Defaults tofalse."snowflake.https.proxyHost": The hostname or IP address of the proxy server."snowflake.https.proxyPort": The port number of the proxy server."snowflake.https.proxyUser": The username for authenticating with the proxy server."snowflake.https.proxyPassword": The password for authenticating with the proxy server."snowflake.https.nonProxyHosts": A comma-separated list of hosts that should be reached directly, bypassing the proxy.
To disable OCSP certificate revocation checks in environments where OCSP servers are not accessible:
"snowflake.disable.ocsp.checks": Set totrueto disable OCSP checks. The default isfalse. Enable this property only in secure environments where OCSP servers are unreachable.
The following are optional properties to include in the configuration. These properties affect what metadata is included in the RECORD_METADATA column in the Snowflake database table.
"snowflake.metadata.createtime": If this value is set to"false", theCreateTimeproperty value is omitted from the metadata in theRECORD_METADATAcolumn. The default value is"true"."snowflake.metadata.topic": If this value is set to"false", thetopicproperty value is omitted from the metadata in theRECORD_METADATAcolumn. The default value is"true"."snowflake.metadata.offset.and.partition": If the value is set to"false", theOffsetandPartitionproperty values are omitted from the metadata in theRECORD_METADATAcolumn. The default value is"true"."snowflake.streaming.metadata.connectorPushTime": If this value is set to"true", theSnowflakeConnectorPushTimeproperty value is included in the metadata in theRECORD_METADATAcolumn. The default value is"false". This metadata is only applicable when using the SNOWPIPE_STREAMING ingestion method."snowflake.metadata.all": If the value is set to"false", the metadata in theRECORD_METADATAcolumn is empty. The default value is"true".
Buffering and flushing configuration
Snowpipe mode
Set the following properties that determine when records are flushed to Snowflake. Records are flushed when the first one of these values is met. For example: The interval to flush records is set to 120 seconds. This time interval has elapsed from the last flush, but the number of records value has not been met. Records are flushed because the time interval tripped before the records property.
"buffer.flush.time": The time (in seconds) the connector waits before flushing cached records to Snowflake. The default value is120seconds, and the minimum value is 10 seconds. You can configure a longer time interval."buffer.count.records": Records are cached in a buffer (per partition) before they are flushed to Snowflake. The default value is10000. This is the minimum number of records. You can configure this to a larger number of records. Records are flushed to Snowflake when the number of records reaches the property value.Caution
Increasing
buffer.flush.timeandbuffer.count.recordsabove default values may cause the connect worker to run out of memory if record volumes are very high."buffer.size.bytes": Records are cached in a buffer (per partition) before being written to Snowflake as data files. The buffer size defaults to10000000bytes (10 MB). This is the minimum cache size value. Records are flushed to Snowflake when this buffer reaches the property size.Note
When a flush is triggered when the cache reaches 5 MB, you might expect to see a 5 MB data file in Snowflake. You will see a much smaller file (for example, ~150 KB). This is because the 5 MB of flushed data is converted from Java to UTF. This conversion reduces the file size by 50 percent. The file is then compressed with gzip, which further reduces the file size by 95 percent.
Snowpipe streaming mode
In SNOWPIPE_STREAMING mode, the Snowflake Sink connector uses the Snowflake Ingest SDK to send records to Snowflake. The connector batches records and sends them based on two parameters:
"snowflake.streaming.max.client.lag": The maximum time (in seconds) the SDK waits before flushing buffered records to Snowflake. The default value is30seconds. The minimum value is1second and the maximum value is300seconds. This is the primary control for flush frequency in streaming mode. Note that reducing this value may increase the frequency of API calls to Snowflake, which can have implications for both performance and cost. For more information, see Latency recommendations by Snowflake."buffer.size.bytes": The maximum size in bytes of the channel buffer before data is flushed to Snowflake. The default value is10000000bytes (10 MB). This maps to theMAX_CHANNEL_SIZE_IN_BYTESparameter in the Snowflake Ingest SDK. When the channel buffer reaches this size, the SDK flushes data to Snowflake.
Note
The buffer.flush.time and buffer.count.records properties do not apply to SNOWPIPE_STREAMING mode.
Setting tasks.max
"tasks.max": Enter the maximum number of tasks that the connector will use. Each task is limited to a number of topic partitions based on thebuffer.size.bytesproperty value. For example, a10MB buffer size is limited to 50 topic partitions, a20MB buffer is limited to 25 topic partitions,50MB buffer is limited to 10 topic partitions, and a100MB buffer to 5 topic partitions.
Note
To enable CSFLE or CSPE for data encryption, specify the following properties:
csfle.enabled: Flag to indicate whether the connector honors CSFLE or CSPE rules.sr.service.account.id: A Service Account to access the Schema Registry and associated encryption rules or keys with that schema.csfle.onFailure: Configures the connector behavior (ERRORorNONE) on data decryption failure. If set toERROR, the connector fails and writes the encrypted data in the DLQ. If set toNONE, the connector writes the encrypted data in the target system without decryption.
When using CSFLE or CSPE with connectors that route failed messages to a Dead Letter Queue (DLQ), be aware that data sent to the DLQ is written in unencrypted plaintext. This poses a significant security risk as sensitive data that should be encrypted may be exposed in the DLQ.
Do not use DLQ with CSFLE or CSPE in the current version. If you need error handling for CSFLE- or CSPE-enabled data, use alternative approaches such as:
Setting the connector behavior to
ERRORto throw exceptions instead of routing to DLQImplementing custom error handling in your applications
Using
NONEto pass encrypted data through without decryption
For more information on CSFLE or CSPE setup, see Manage encryption for connectors.
SMTs: For details about adding SMTs using the Confluent CLI, see the Single Message Transformations documentation. For a list of SMTs that are not supported with this connector, see Unsupported transformations.
See Configuration Properties for all property values and descriptions.
Step 4: Load the properties file and create the connector
Enter the following command to load the configuration and start the connector:
confluent connect cluster create --config-file <file-name>.json
For example:
confluent connect cluster create --config-file snowflake-sink.json
Example output:
Created connector confluent-snowflake lcc-ix4dl
Step 5: Check the connector status
Enter the following command to check the connector status:
confluent connect cluster list
Example output:
ID          |            Name         | Status  | Type
+-----------+-------------------------+---------+------+
lcc-ix4dl   | confluent-snowflake     | RUNNING | sink
Step 6: Check Snowflake
After the connector is running, verify that records are populating your Snowflake database.
For more information and examples to use with the Confluent Cloud API for Connect, see the Confluent Cloud API for Connect Usage Examples section.
Tip
When you launch a connector, a Dead Letter Queue topic is automatically created. See View Connector Dead Letter Queue Errors in Confluent Cloud for details.
For Snowflake troubleshooting, see Troubleshooting Issues in the Snowflake documentation.
Note
The Snowflake Sink connector does not remove Snowflake pipes when a connector is deleted. For instructions to manually clean up Snowflake pipes, see Dropping Pipes.
Snowflake Snowpipe failure can prevent messages from showing up in the target table despite being successfully written by the Snowflake Sink connector. If this happens, check the Snowflake COPY_HISTORY view, internal stage, or table stage to find the message and associated error. For more on the workflow of Snowflake Sink connector, see Workflow for the Kafka Connector.
Configuration Properties
Use the following configuration properties with the fully-managed connector. For self-managed connector property definitions and other details, see the connector docs in Self-managed connectors for Confluent Platform.
Which topics do you want to get data from?
topics.regexA regular expression that matches the names of the topics to consume from. This is useful when you want to consume from multiple topics that match a certain pattern without having to list them all individually.
Type: string
Importance: low
topicsIdentifies the topic name or a comma-separated list of topic names.
Type: list
Importance: high
errors.deadletterqueue.topic.nameThe name of the topic to be used as the dead letter queue (DLQ) for messages that result in an error when processed by this sink connector, or its transformations or converters. Defaults to ‘dlq-${connector}’ if not set. The DLQ topic will be created automatically if it does not exist. You can provide
${connector}in the value to use it as a placeholder for the logical cluster ID.Type: string
Default: dlq-${connector}
Importance: low
Schema Config
schema.context.nameAdd a schema context name. A schema context represents an independent scope in Schema Registry. It is a separate sub-schema tied to topics in different Kafka clusters that share the same Schema Registry instance. If not used, the connector uses the default schema configured for Schema Registry in your Confluent Cloud environment.
Type: string
Default: default
Importance: medium
Input messages
input.data.formatSets the input Kafka record value format. Valid entries are JSON, AVRO, JSON_SR, PROTOBUF, or STRING. Note that you need to have Confluent Cloud Schema Registry configured if using a schema-based message format like AVRO, JSON_SR, and PROTOBUF
Type: string
Default: JSON
Importance: high
input.key.formatSets the input Kafka record key format. Valid entries are AVRO, JSON_SR, PROTOBUF, STRING or JSON. Note that you need to have Confluent Cloud Schema Registry configured if using a schema-based message format like AVRO, JSON_SR, and PROTOBUF
Type: string
Default: STRING
Valid Values: AVRO, JSON, JSON_SR, PROTOBUF, STRING
Importance: high
key.converter.reference.subject.name.strategySet the subject reference name strategy for key. Valid entries are DefaultReferenceSubjectNameStrategy or QualifiedReferenceSubjectNameStrategy. Note that the subject reference name strategy can be selected only for PROTOBUF format with the default strategy being DefaultReferenceSubjectNameStrategy.
Type: string
Default: DefaultReferenceSubjectNameStrategy
Importance: high
How should we connect to your data?
nameSets a name for your connector.
Type: string
Valid Values: A string at most 64 characters long
Importance: high
Kafka Cluster credentials
kafka.auth.modeKafka Authentication mode. It can be one of KAFKA_API_KEY or SERVICE_ACCOUNT. It defaults to KAFKA_API_KEY mode, whenever possible.
Type: string
Valid Values: SERVICE_ACCOUNT, KAFKA_API_KEY
Importance: high
kafka.api.keyKafka API Key. Required when kafka.auth.mode==KAFKA_API_KEY.
Type: password
Importance: high
kafka.service.account.idThe Service Account that will be used to generate the API keys to communicate with Kafka Cluster.
Type: string
Importance: high
kafka.api.secretSecret associated with Kafka API key. Required when kafka.auth.mode==KAFKA_API_KEY.
Type: password
Importance: high
Authentication method
authentication.methodSelect how you want to authenticate with Snowflake. Supported options are Password and OAuth 2.0.
Password (default): Uses private key authentication.
OAuth 2.0 (Bring your own app): Uses Snowflake OAuth authentication.
Type: string
Default: Password
Importance: high
secret.manager.enabledFetch sensitive configuration values from a secret manager.
Type: boolean
Default: false
Importance: high
Secret manager configuration
secret.managerSelect the secret manager to use for retrieving sensitive data.
Type: string
Importance: high
secret.manager.managed.configsSelect the configurations to fetch their values from the secret manager.
Type: list
Importance: high
secret.manager.provider.integration.idSelect an existing provider integration that has access to your secret manager.
Type: string
Importance: high
How should we connect to your Snowflake database?
snowflake.url.nameThe URL for accessing your Snowflake account, in the form of https://<account_name>.<region_id>.snowflakecomputing.com:443. Note that the https:// and port number are optional. The region ID is not used if your account is in the AWS US West region and you are not using AWS PrivateLink.
Type: string
Importance: high
snowflake.user.nameUser login name for the Snowflake account
Type: string
Importance: high
snowflake.role.nameAccess control role to use when inserting the rows into the table. If Ingestion method is Snowpipe_Streaming Ingestion then it’s required. If Ingestion method is Snowpipe then it’s not required and use default role
Type: string
Importance: low
snowflake.database.nameThe name of the database that contains the table to insert rows into.
Type: string
Importance: high
snowflake.private.keyThe private key to authenticate the user. Include only the key, not the header or footer. If the key is split across multiple lines, remove the line breaks. You can provide either an unencrypted key or an encrypted key. If you use an encrypted key, provide the snowflake.private.key.passphrase parameter so Snowflake can decrypt the key. Use this parameter only if the snowflake.private.key parameter value is encrypted.
Type: password
Importance: high
snowflake.useHttpsProxyEnable HTTPS proxy for Snowflake connections
Type: boolean
Default: false
Importance: low
snowflake.https.proxyHostHTTPS proxy host for Snowflake connections
Type: string
Importance: low
snowflake.https.proxyPortHTTPS proxy port for Snowflake connections
Type: string
Importance: low
snowflake.https.nonProxyHostsHosts to bypass HTTPS proxy for Snowflake connections
Type: string
Importance: low
snowflake.https.proxyUserHTTPS proxy username for Snowflake connections
Type: string
Importance: low
snowflake.https.proxyPasswordHTTPS proxy password for Snowflake connections
Type: password
Importance: low
snowflake.disable.ocsp.checksIf set to true, disables OCSP (Online Certificate Status Protocol) certificate revocation checks for Snowflake JDBC connections. This should only be enabled in environments where OCSP servers are not accessible. Default is false.
Type: boolean
Default: false
Importance: low
Database details
snowflake.schema.nameThe name of the schema that contains the table to insert rows into.
Type: string
Importance: high
snowflake.topic2table.mapMap of topics to tables (optional). Format : comma-separated tuples, e.g. <topic-1>:<table-1>,<topic-2>:<table-2>,…
Type: string
Importance: high
Snowflake connection
snowflake.ingestion.methodChoose the preferred ingestion method. The connector supports the SNOWPIPE (default) and SNOWPIPE_STREAMING for Kafka data ingestion. Using SNOWPIPE_STREAMING may provide a cost-benefit for your Snowflake project.
Type: string
Default: SNOWPIPE
Valid Values: snowflake.ingestion.method must be SNOWPIPE_STREAMING for using OAuth Authentication Method.
Importance: high
Connection details
snowflake.metadata.createtimeIf the value is set to FALSE, the CreateTime property value is omitted from the metadata in the RECORD_METADATA column. The default value is TRUE.
Type: boolean
Default: true
Importance: medium
snowflake.private.key.passphraseIf snowflake.private.key is encrypted, this passphrase is used to decrypt the key. If the value of this parameter is not empty, Kafka uses this phrase to try to decrypt the private key.
Type: password
Default: [hidden]
Importance: medium
snowflake.metadata.topicIf the value is set to FALSE, the topic property value is omitted from the metadata in the RECORD_METADATA column. The default value is TRUE.
Type: boolean
Default: true
Importance: medium
snowflake.metadata.offset.and.partitionIf the value is set to FALSE, the Offset and Partition property values are omitted from the metadata in the RECORD_METADATA column. The default value is TRUE.
Type: boolean
Default: true
Importance: medium
snowflake.streaming.metadata.connectorPushTimeIf the value is set to TRUE, the ConnectorPushTime property value is added to the metadata in the RECORD_METADATA column. The default value is FALSE. This works with only SNOWPIPE_STREAMING ingestion mode.
Type: boolean
Default: false
Importance: medium
oauth.client.idClient (or Application) ID of your Snowflake Security Integration
Type: string
Importance: medium
snowflake.metadata.allIf the value is set to FALSE, the metadata in the RECORD_METADATA column is completely empty. The default value is TRUE.
Type: boolean
Default: true
Importance: medium
oauth.client.secretClient secret of your Snowflake Security Integration.
Type: password
Importance: high
snowflake.enable.schematizationSpecify to TRUE to enable schema detection and evolution for Kafka Connector with Snowpipe Streaming. The default value is FALSE
Type: boolean
Default: false
Importance: medium
oauth.refresh.tokenOAuth 2.0 Refresh Token for Snowflake.
Type: password
Importance: high
buffer.flush.timeNumber of seconds between buffer flushes, where the flush is from the Kafka’s memory cache to the internal stage. The default value is 120 seconds. Minimum value allowed is 10 for snowflake.ingestion.method=SNOWPIPE, and 1 for snowflake.ingestion.method=SNOWPIPE_STREAMING. The connector uses buffer.count.records and buffer.size.bytes=10,000,000 (10MB) as well. Whichever comes first, the connector will flush Kafka records to Snowflake.
Type: long
Default: 120
Valid Values: Value must be greater than 10 in SNOWPIPE method OR greater than 1 in SNOWPIPE_STREAMING method
Importance: low
oauth.auth.endpointAuth endpoint - {snowflake.url.name}/oauth/authorize
Type: string
Default: “”
Importance: high
buffer.count.recordsNumber of records between buffer flushes, where the flush is from the Kafka’s memory cache to the internal stage. The default and minimum value is 10,000 records. The connector uses buffer.flush.time and buffer.size.bytes=10,000,000 (10MB) as well. Whichever comes first, the connector will flush Kafka records to Snowflake.
Type: long
Default: 10000
Valid Values: [10000,…]
Importance: low
oauth.token.endpointToken endpoint - {snowflake.url.name}/oauth/token-request
Type: string
Default: “”
Importance: high
buffer.size.bytesKafka records are cached in a buffer (per partition) before being written to Snowflake as data files. The buffer size defaults to 10000000 bytes (10 MB). The records are compressed when written to Snowflake. Because of the compression, the size of the cached records buffer may be larger that the size of the resulting data files created in Snowflake.
Type: long
Default: 10000000
Valid Values: [10000000,…,100000000]
Importance: low
oauth.query.paramsIn the form of scope=session:role:{snowflakeRoleName}
Type: string
Default: “”
Importance: high
snowflake.streaming.iceberg.enabledInterested in integrating with Iceberg? Take a look at Tableflow — a solution designed to simplify and streamline your Iceberg workflows, refer https://www.confluent.io/product/tableflow/.
This property specifies whether the connector ingests data into an Iceberg table. The connector fails if this property doesn’t match the actual table type, refer https://docs.snowflake.com/en/user-guide/kafka-connector-iceberg.
Type: boolean
Default: false
Importance: medium
enable.task.fail.on.authorization.errorsIf set to true, the connector task will fail whenever it encounters an authorization error from Snowflake.
Type: boolean
Default: true
Importance: low
enable.dynamic.flushIf set to true, each connector task can consume from up to 2x topic partitions depending on the buffer size.
This option is useful for workloads with many topic partitions but low throughput per partition.
Note: Enabling this configuration may degrade performance. Because each task handles more partitions, flush operations may be triggered more frequently with smaller batches of data, based on the connector’s buffer footprint.
Type: boolean
Default: false
Importance: low
snowflake.streaming.channel.name.include.connector.nameIf enabled, the Snowflake Streaming channel names are prefixed with the connector name. This config enables/disables usage of channel names that were used solely in Kafka Connector versions 2.1.0 and 2.1.1 and is intended for users that previously used these versions and did not update the connector since. IMPORTANT: Enabling this config in any other case will result in data duplication. This configuration is only applicable when snowflake.ingestion.method is set to SNOWPIPE_STREAMING.
Type: boolean
Default: false
Importance: low
snowflake.streaming.enable.handling.infinity.valuesWhether to enable correct handling for infinity and negative infinity values in float/double fields when using Snowpipe Streaming. When enabled, infinity values will be correctly ingested as ‘Inf’ or ‘-Inf’. When disabled, infinity values will be treated as ‘NaN’ for backward compatibility. This configuration is only applicable when snowflake.ingestion.method is set to SNOWPIPE_STREAMING.
Type: boolean
Default: false
Importance: low
snowflake.streaming.max.client.lagDecides how often the buffer in the Ingest SDK will be flushed. The default value is 30 seconds. Setting this value too low may degrade performance, while setting it too high may increase latency. This configuration is only applicable when snowflake.ingestion.method is set to SNOWPIPE_STREAMING.
Type: int
Default: 30
Valid Values: [1,…,300]
Importance: low
Error handling
errors.toleranceUse this property if you would like to configure the connector’s error handling behavior differently from the Connect framework’s.
Type: string
Default: all
Importance: low
Consumer configuration
max.poll.interval.msThe maximum delay between subsequent consume requests to Kafka. This configuration property may be used to improve the performance of the connector, if the connector cannot send records to the sink system. Defaults to 300000 milliseconds (5 minutes).
Type: long
Default: 300000 (5 minutes)
Valid Values: [60000,…,1800000] for non-dedicated clusters and [60000,…] for dedicated clusters
Importance: low
max.poll.recordsThe maximum number of records to consume from Kafka in a single request. This configuration property may be used to improve the performance of the connector, if the connector cannot send records to the sink system. Defaults to 500 records.
Type: long
Default: 500
Valid Values: [1,…,500] for non-dedicated clusters and [1,…] for dedicated clusters
Importance: low
Number of tasks for this connector
tasks.maxThe number of tasks for the connector. Each task is limited to a number of topic partitions based on the buffer.size.bytes configuration, e.g., 10 MB -> 50 Topic Partitions, 20 MB-> 25 Topic Partitions, 50 MB -> 10 Topic Partitions, and 100 MB -> 5 Topic Partitions.
Type: int
Valid Values: [1,…]
Importance: high
Additional Configs
consumer.override.auto.offset.resetDefines the behavior of the consumer when there is no committed position (which occurs when the group is first initialized) or when an offset is out of range. You can choose either to reset the position to the “earliest” offset (the default) or the “latest” offset. You can also select “none” if you would rather set the initial offset yourself and you are willing to handle out of range errors manually. More details: https://docs.confluent.io/platform/current/installation/configuration/consumer-configs.html#auto-offset-reset
Type: string
Importance: low
consumer.override.isolation.levelControls how to read messages written transactionally. If set to read_committed, consumer.poll() will only return transactional messages which have been committed. If set to read_uncommitted (the default), consumer.poll() will return all messages, even transactional messages which have been aborted. Non-transactional messages will be returned unconditionally in either mode. More details: https://docs.confluent.io/platform/current/installation/configuration/consumer-configs.html#isolation-level
Type: string
Importance: low
header.converterThe converter class for the headers. This is used to serialize and deserialize the headers of the messages.
Type: string
Importance: low
key.converter.use.schema.guidThe schema GUID to use for deserialization when using ConfigSchemaIdDeserializer. This allows you to specify a fixed schema GUID to be used for deserializing message keys. Only applicable when key.converter.key.schema.id.deserializer is set to ConfigSchemaIdDeserializer.
Type: string
Importance: low
key.converter.use.schema.idThe schema ID to use for deserialization when using ConfigSchemaIdDeserializer. This allows you to specify a fixed schema ID to be used for deserializing message keys. Only applicable when key.converter.key.schema.id.deserializer is set to ConfigSchemaIdDeserializer.
Type: int
Importance: low
value.converter.allow.optional.map.keysAllow optional string map key when converting from Connect Schema to Avro Schema. Applicable for Avro Converters.
Type: boolean
Importance: low
value.converter.auto.register.schemasSpecify if the Serializer should attempt to register the Schema.
Type: boolean
Importance: low
value.converter.connect.meta.dataAllow the Connect converter to add its metadata to the output schema. Applicable for Avro Converters.
Type: boolean
Importance: low
value.converter.enhanced.avro.schema.supportEnable enhanced schema support to preserve package information and Enums. Applicable for Avro Converters.
Type: boolean
Importance: low
value.converter.enhanced.protobuf.schema.supportEnable enhanced schema support to preserve package information. Applicable for Protobuf Converters.
Type: boolean
Importance: low
value.converter.flatten.unionsWhether to flatten unions (oneofs). Applicable for Protobuf Converters.
Type: boolean
Importance: low
value.converter.generate.index.for.unionsWhether to generate an index suffix for unions. Applicable for Protobuf Converters.
Type: boolean
Importance: low
value.converter.generate.struct.for.nullsWhether to generate a struct variable for null values. Applicable for Protobuf Converters.
Type: boolean
Importance: low
value.converter.int.for.enumsWhether to represent enums as integers. Applicable for Protobuf Converters.
Type: boolean
Importance: low
value.converter.latest.compatibility.strictVerify latest subject version is backward compatible when use.latest.version is true.
Type: boolean
Importance: low
value.converter.object.additional.propertiesWhether to allow additional properties for object schemas. Applicable for JSON_SR Converters.
Type: boolean
Importance: low
value.converter.optional.for.nullablesWhether nullable fields should be specified with an optional label. Applicable for Protobuf Converters.
Type: boolean
Importance: low
value.converter.optional.for.proto2Whether proto2 optionals are supported. Applicable for Protobuf Converters.
Type: boolean
Importance: low
value.converter.scrub.invalid.namesWhether to scrub invalid names by replacing invalid characters with valid characters. Applicable for Avro and Protobuf Converters.
Type: boolean
Importance: low
value.converter.use.latest.versionUse latest version of schema in subject for serialization when auto.register.schemas is false.
Type: boolean
Importance: low
value.converter.use.optional.for.nonrequiredWhether to set non-required properties to be optional. Applicable for JSON_SR Converters.
Type: boolean
Importance: low
value.converter.use.schema.guidThe schema GUID to use for deserialization when using ConfigSchemaIdDeserializer. This allows you to specify a fixed schema GUID to be used for deserializing message values. Only applicable when value.converter.value.schema.id.deserializer is set to ConfigSchemaIdDeserializer.
Type: string
Importance: low
value.converter.use.schema.idThe schema ID to use for deserialization when using ConfigSchemaIdDeserializer. This allows you to specify a fixed schema ID to be used for deserializing message values. Only applicable when value.converter.value.schema.id.deserializer is set to ConfigSchemaIdDeserializer.
Type: int
Importance: low
value.converter.wrapper.for.nullablesWhether nullable fields should use primitive wrapper messages. Applicable for Protobuf Converters.
Type: boolean
Importance: low
value.converter.wrapper.for.raw.primitivesWhether a wrapper message should be interpreted as a raw primitive at root level. Applicable for Protobuf Converters.
Type: boolean
Importance: low
behavior.on.null.valuesSpecify how the connector should handle tombstone records. A tombstone record is defined as a record where the entire value field is null.
This property supports the following values:
DEFAULT: When the Kafka connector encounters a tombstone record, it inserts an empty JSON string in the content column.
IGNORE (default): The Kafka connector skips tombstone records and does not insert rows for these records.
Type: string
Default: IGNORE
Importance: low
key.converter.key.schema.id.deserializerThe class name of the schema ID deserializer for keys. This is used to deserialize schema IDs from the message headers.
Type: string
Default: io.confluent.kafka.serializers.schema.id.DualSchemaIdDeserializer
Importance: low
key.converter.key.subject.name.strategyHow to construct the subject name for key schema registration.
Type: string
Default: TopicNameStrategy
Importance: low
value.converter.decimal.formatSpecify the JSON/JSON_SR serialization format for Connect DECIMAL logical type values with two allowed literals:
BASE64 to serialize DECIMAL logical types as base64 encoded binary data and
NUMERIC to serialize Connect DECIMAL logical type values in JSON/JSON_SR as a number representing the decimal value.
Type: string
Default: BASE64
Importance: low
value.converter.flatten.singleton.unionsWhether to flatten singleton unions. Applicable for Avro and JSON_SR Converters.
Type: boolean
Default: false
Importance: low
value.converter.ignore.default.for.nullablesWhen set to true, this property ensures that the corresponding record in Kafka is NULL, instead of showing the default column value. Applicable for AVRO,PROTOBUF and JSON_SR Converters.
Type: boolean
Default: false
Importance: low
value.converter.reference.subject.name.strategySet the subject reference name strategy for value. Valid entries are DefaultReferenceSubjectNameStrategy or QualifiedReferenceSubjectNameStrategy. Note that the subject reference name strategy can be selected only for PROTOBUF format with the default strategy being DefaultReferenceSubjectNameStrategy.
Type: string
Default: DefaultReferenceSubjectNameStrategy
Importance: low
value.converter.replace.null.with.defaultWhether to replace fields that have a default value and that are null to the default value. When set to true, the default value is used, otherwise null is used. Applicable for JSON Converter.
Type: boolean
Default: true
Importance: low
value.converter.schemas.enableInclude schemas within each of the serialized values. Input messages must contain schema and payload fields and may not contain additional fields. For plain JSON data, set this to false. Applicable for JSON Converter.
Type: boolean
Default: false
Importance: low
value.converter.value.schema.id.deserializerThe class name of the schema ID deserializer for values. This is used to deserialize schema IDs from the message headers.
Type: string
Default: io.confluent.kafka.serializers.schema.id.DualSchemaIdDeserializer
Importance: low
value.converter.value.subject.name.strategyDetermines how to construct the subject name under which the value schema is registered with Schema Registry.
Type: string
Default: TopicNameStrategy
Importance: low
Auto-restart policy
auto.restart.on.user.errorEnable connector to automatically restart on user-actionable errors.
Type: boolean
Default: true
Importance: medium
Troubleshooting
For Snowflake troubleshooting, see Troubleshooting Issues in the Snowflake documentation.
Tip
When you launch a connector, a Dead Letter Queue topic is automatically created. See View Connector Dead Letter Queue Errors in Confluent Cloud for details.
OAuth Refresh Token Expiration
When you use OAuth 2.0 authentication, the connector uses a refresh token to automatically obtain new access tokens. However, the refresh token itself has a TTL that is configured in your Snowflake security integration using the OAUTH_REFRESH_TOKEN_VALIDITY parameter.
Error symptoms
When the refresh token expires, the connector will fail with an error similar to:
[SF_KAFKA_CONNECTOR] Retry count:0 caught an exception for
operation:FETCH_OAUTH_TOKEN with message:[SF_KAFKA_CONNECTOR] Exception:
Fetching OAuth token fail Error Code: 1004 Detail: Fail to get OAuth token
from authorization server
Resolution steps
To resolve this issue and refresh the OAuth token:
Navigate to the Cloud Console and open your connector configuration.
Click Edit configuration to enter edit mode.
In the Authentication section, click the Connect with Snowflake button.
You will be redirected to Snowflake to re-authenticate. Enter your credentials when prompted.
After successful authentication, you will be redirected back to Confluent Cloud, and the connector configuration automatically updates with a new refresh token.
Save the connector configuration.
The connector should now resume normal operation.
Preventing token expiration
To minimize interruptions due to token expiration:
Set the
OAUTH_REFRESH_TOKEN_VALIDITYto a longer period when creating your security integration (up to 90 days / 7776000 seconds).Monitor the connector status regularly and refresh the token before it expires.
For more information on token validity, see Snowflake OAuth FAQ.
Note
As of June 2024, the minimum TTL for refresh tokens is 1 hour (3600 seconds) and the maximum is 90 days (7776000 seconds). However, these values may change. Always refer to the latest Snowflake documentation for current limits.
Insufficient permission error
The Snowflake user lacks the privileges required to operate on the BASE schema. Ensure the user has the necessary permissions to perform operations on this schema.
Error symptoms
When Snowflake Sink connector tasks fail due to insufficient privileges, the error message indicates that the connector lacks the permissions required to operate.
[SF_KAFKA_CONNECTOR] Exception: Failed to create pipe
Error Code: 2009
Detail: Failed to create pipe on Snowflake, please check that you have permission to do so.
Message: SQL access control error: Insufficient privileges to operate on schema 'BASE'
Resolution steps
To resolve this issue, verify and grant the required permissions for the Snowflake user on the BASE schema and its associated tables.
For more information on role and privilege configuration, see the following resources:
Schema Evolution Guidelines with Snowpipe Streaming
To enable automatic schema detection and evolution, set snowflake.enable.schematization=true. This requires:
The role specified in
snowflake.role.namemust haveEVOLVE SCHEMAprivilege (or higher, likeOWNERSHIPorALL) on the target table.For Apache Iceberg™ tables, the
EVOLVE SCHEMAprivilege alone is insufficient. The connector’s role must be the direct owner of the Iceberg table. This means that theOWNERSHIPprivilege must be assigned directly to the connector role, rather than inherited through a Snowflake database role.The target table must have
enable_schema_evolution = Y
See Snowflake Schema Evolution documentation for more details.
Error Handling
If either requirement is not met, the connector’s behavior depends on the errors.tolerance setting:
errors.tolerance=NONE: Connector task fails immediatelyerrors.tolerance=ALL: Messages are sent to DLQ with error message:The given row cannot be converted to the internal format: Extra columns: [<column_list>]. Columns not present in the table shouldn't be specified
Recovery Steps
To reprocess failed messages:
Fix the schema issues or grant required privileges
Note
If you reset the connector’s offset when using Snowpipe Streaming for Kafka, you may also need to reset the Snowflake offset tokens. For more information, see Reset Offset in Streaming Mode.
Restart processing
Reset Offset with Snowpipe Streaming
Reset Offset in Streaming Mode
To reset custom offsets when using Snowpipe Streaming, follow these steps:
Stop the connector.
Reset the Snowflake offset token to
-1by executing the following statement in your Snowflake worksheet.SELECT SYSTEM$SNOWPIPE_STREAMING_UPDATE_CHANNEL_OFFSET_TOKEN('db.schema.table', 'channel_name', '-1');
For more information on usage , see SYSTEM$SNOWPIPE_STREAMING_UPDATE_CHANNEL_OFFSET_TOKEN.
Note
If your topic has multiple partitions, repeat these steps for each corresponding channel.
Reset your offsets in Confluent Cloud.
Restart the connector.
Warning
After this action, if any previously ingested offsets are sent to Snowflake, they will be processed. This introduces the risk of duplicates.
Suggested Reading
The following blog post provides an introduction to the Snowflake Sink connector and a scenario walkthrough.
Blog post: Announcing the Snowflake Sink connector for Apache Kafka in Confluent Cloud
Frequently asked questions
Find answers to frequently asked questions about the Snowflake Sink connector for Confluent Cloud.
Why does my connector fail with Invalid encrypted private key errors?
This error occurs when the private key format is not compatible with the connector’s encryption requirements.
Common causes and solutions:
Non-FIPS 140-2 compliant encryption: The connector only supports private keys encrypted using FIPS 140-2 compliant algorithms. If your private key is encrypted with a passphrase, verify the encryption algorithm is FIPS 140-2 compliant, or use an unencrypted private key. Regenerate your private key using the recommended steps which use FIPS-compliant encryption.
Incorrect key format: Ensure you provide only the key content between
--BEGIN RSA PRIVATE KEY--and--END RSA PRIVATE KEY--as a single line without headers or footers.
Why is my connector stuck in PROVISIONING state?
If your connector remains in PROVISIONING state indefinitely without logs or errors, this indicates validation or authentication problems during initial setup.
Common causes and solutions:
Invalid Kafka API credentials: The connector cannot validate the Kafka API key and secret. Verify your
kafka.api.keyandkafka.api.secretare correct and have permissions to access the specified topics. To verify permissions, check the API key’s ACLs in the Confluent Cloud Console under Data Integration > API Keys, or use the Confluent CLI commandconfluent kafka acl list --api-key <key>to confirm the key has read access to the topics.Invalid Snowflake credentials: Verify your Snowflake URL, username, and private key are correctly configured. Test your Snowflake credentials using a Snowflake client.
Network connectivity: Ensure the connector can reach both your Kafka cluster and Snowflake instance. For cross-region or cross-cloud deployments, verify that connectivity is enabled by contacting Confluent Support.
Topic validation failure: The connector validates that specified topics exist and are accessible. Verify all topics in your configuration exist and your Kafka API key has permissions to read from them.
If the connector remains stuck after verifying these settings, delete and recreate the connector with the corrected configuration.
Why does my connector fail with Insufficient privileges errors?
Permission errors occur when the Snowflake user lacks the required privileges to perform operations on the database, schema, or tables.
Common causes and solutions:
Missing table creation privileges: The user needs
CREATE TABLEprivilege on the schema. Grant this privilege usingGRANT CREATE TABLE ON SCHEMA <schema_name> TO ROLE <role_name>;Missing pipe creation privileges: The user needs
CREATE PIPEprivilege when using the Snowpipe ingestion method. Grant usingGRANT CREATE PIPE ON SCHEMA <schema_name> TO ROLE <role_name>;Missing stage privileges: The user needs
CREATE STAGEandUSAGEprivileges on stages. Grant usingGRANT CREATE STAGE ON SCHEMA <schema_name> TO ROLE <role_name>;Missing EVOLVE SCHEMA privilege: When using
snowflake.enable.schematization=true, the role needsEVOLVE SCHEMAprivilege on the target table. Grant usingGRANT EVOLVE SCHEMA ON TABLE <table_name> TO ROLE <role_name>;
For complete privilege requirements, see Creating a role to use the Kafka connector and Configuring user privileges.
Why does my connector fail with Incompatible table schema errors?
This error occurs when the connector attempts to write data to a Snowflake table with an incompatible schema:
[SF_KAFKA_CONNECTOR] Exception: Incompatible table Error Code: 5003
Detail: Table doesn't have a compatible schema
Common causes and solutions:
NOT NULL constraints on additional columns: If your Snowflake table has columns with NOT NULL constraints that are not present in the Kafka message schema, the insert will fail. Either remove the NOT NULL constraint or ensure your Kafka messages include all required fields.
Schema evolution disabled: When
snowflake.enable.schematization=false, the connector can’t automatically add new columns. To enable schema evolution with Snowpipe Streaming mode, setsnowflake.enable.schematization=trueand ensure the role hasEVOLVE SCHEMAprivilege on the target table. If you create the table manually, you must setenable_schema_evolution = Yon the table. Schema evolution is only supported with Snowpipe Streaming mode.Data type mismatches: Verify that Kafka message field types are compatible with the Snowflake table column types.
To enable automatic schema evolution when using Snowpipe Streaming mode, set snowflake.enable.schematization=true and if you create the table manually, ensure your target table has enable_schema_evolution = Y. For more information, see Schema Evolution Guidelines with Snowpipe Streaming.
Why is data not appearing in my Snowflake table?
The connector shows RUNNING status but data is not visible in the Snowflake table.
Common causes and solutions:
Snowpipe load failures: When using the Snowpipe ingestion method, the connector can successfully write data files to the Snowflake stage, but the Snowpipe load process can fail to ingest those files into the target table. Check the Snowflake COPY_HISTORY view to identify failed file loads and error details. You can also verify staged files using
LIST @<database_name>.<schema_name>.%<table_name>;to confirm files are present but not loaded.Data not flushed yet: Records are buffered before being flushed to Snowflake. When using the Snowpipe ingestion method, data is flushed by default every 120 seconds or when 10,000 records accumulate. Wait for the flush interval to elapse or reduce
buffer.flush.timefor testing.Empty messages or tombstones: Verify your Kafka topic contains actual data and not just tombstone messages. Check the Kafka topic in the Confluent Cloud Console to confirm message content.
Stage file visibility: Check the internal stage in Snowflake to verify data files are being created. Run
LIST @<database_name>.<schema_name>.%<table_name>;to see staged files.
For more information on the Snowflake Sink connector workflow, see Workflow for the Kafka Connector.
Why does my connector fail with JDBC communication errors?
Connection failures occur when the connector cannot communicate with Snowflake:
Cannot connect to Snowflake, due to JDBC driver encountered communication error.
Message: HTTP status=503.
Common causes and solutions:
Snowflake service unavailable: Snowflake may be experiencing temporary issues. Check the Snowflake Status Page for service incidents.
Network connectivity: Verify network connectivity between Confluent Cloud and Snowflake. For private networking, ensure VPC peering or PrivateLink is correctly configured.
Proxy configuration: If using a proxy, verify all proxy settings are correct including
snowflake.https.proxyHost,snowflake.https.proxyPort, and proxy credentials.Port 80 blocked: OCSP certificate checks require port 80 to be open. Ensure your network allows outbound traffic on ports 80 and 443. For more information, see the prerequisites.
Review the connector logs in the Confluent Cloud Console for detailed error messages. If the issue persists, verify your Snowflake URL format follows the pattern https://<account_locator>.<region_id>.<cloud_provider>.snowflakecomputing.com:443.
For more information about specific JDBC error codes and their resolutions, see JDBC Errors in the Snowflake documentation.
How do I determine the correct number of tasks for my connector?
Task count directly impacts connector performance and is limited by the buffer size and number of topic partitions.
The buffer.size.bytes property determines the maximum number of topic partitions a single task can handle:
10 MB buffer: Up to 50 topic partitions per task
20 MB buffer: Up to 25 topic partitions per task
50 MB buffer: Up to 10 topic partitions per task
100 MB buffer: Up to 5 topic partitions per task
To calculate the required number of tasks:
Count the total number of partitions across all topics the connector consumes.
Divide by the partition limit for your buffer size.
Round up to get the minimum number of tasks.
For example, if you have 200 topic partitions and use the default 10 MB buffer allowing 50 partitions per task, you need at least 4 tasks.
If your connector experiences lag or slow data ingestion, increase the task count to distribute partitions across more tasks. Alternatively, you can enable the enable.dynamic.flush feature, which allows each task to consume from up to twice the normal topic partition limit. Enabling this feature comes with a performance tradeoff.
Why does my OAuth authentication keep failing after several days?
OAuth refresh token expiration causes authentication failures after the token’s TTL expires.
The refresh token has a Time-To-Live based on the OAUTH_REFRESH_TOKEN_VALIDITY setting in your Snowflake security integration. The minimum TTL is 1 hour and the maximum is 90 days.
For resolution steps, see OAuth Refresh Token Expiration.
To prevent future expirations:
Set
OAUTH_REFRESH_TOKEN_VALIDITYto the maximum value of 90 days when creating your security integration.Monitor connector status regularly and refresh the token before it expires.
Consider using private key authentication if OAuth token management is challenging for your use case.
Why are my table names different from my topic names?
The connector automatically adjusts Kafka topic names that do not conform to Snowflake table naming requirements.
Snowflake has specific Identifier Requirements for table names. When a topic name violates these requirements, the connector converts it to a safe name:
Special characters such as hyphens are replaced with underscores.
A hash suffix is appended to prevent naming conflicts.
For example:
Topic
my-topic-namebecomes tablemy_topic_name_021342Topic
my_topic_namebecomes tablemy_topic_namewithout changes
To avoid unexpected table names:
Use topic names that conform to Snowflake identifier requirements.
Use alphanumeric characters and underscores only.
Avoid special characters, spaces, or hyphens in topic names.
For more information, see Target table naming guidelines.
Next Steps
For an example that shows fully-managed Confluent Cloud connectors in action with Confluent Cloud for Apache Flink, see the Cloud ETL Demo. This example also shows how to use Confluent CLI to manage your resources in Confluent Cloud.