
Kafka Client Quick Start for Confluent Cloud
You can write Kafka client applications to connect to Confluent Cloud in any supported language. You just need to configure the clients using the Confluent Cloud cluster credentials.
Get Started for Free
Sign up for a Confluent Cloud trial and get $400 of free credit.
Official Confluent clients are available for:
librdkafka and derived clients, including Golang, .NET, and Python
This document covers how to properly configure a client. If you have already configured a client and are looking for examples on writing a client application, see the “Hello, World!” code examples that produce to and consume from any Kafka cluster, including Confluent Cloud clusters.
Tips
All clients that connect to Confluent Cloud must support SASL_PLAIN or SASL_OAUTHBEARER (with OAuth-OIDC configured) and TLS 1.2 encryption.
Avoid intermediate certificate pinning because it can introduce connection failures. Confluent might change certificates and their properties at any time. If the intermediate certificate you pinned is replaced, then your applications will fail to connect.
If your organization requires pinning, then pin to the Let’s Encrypt ISRG Root X1 certificate instead of any intermediate certificate. Be aware that if Confluent switches CA providers, connections to your applications might be impacted.
Security requirements
All clients must support TLS 1.2 encryption and either SASL_PLAIN or SASL_OAUTHBEARER authentication. For detailed security configuration, certificate management, and TLS requirements, see Client Configuration Properties.
Configure clients
Clients must be configured properly to connect to a Confluent Cloud cluster. For a subset of client languages, you can also configure clients to connect to a Confluent Cloud Schema Registry cluster.
You can obtain a configuration file prefilled with necessary credentials either from the Confluent Cloud Console or on the Confluent CLI.
Configure clients from the Confluent Cloud Console
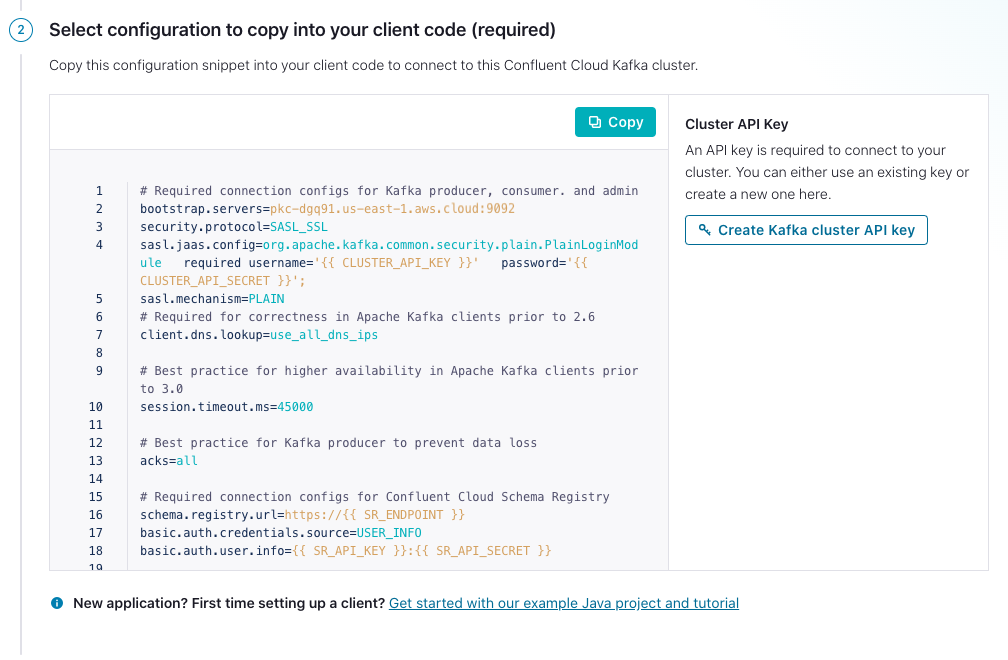
The easiest way to get started connecting your client apps to Confluent Cloud is to copy and paste the configuration file from the Confluent Cloud Console.
Log in to Confluent Cloud.
Select an environment.
Select a cluster.
Select Clients from the navigation menu.
(Optional) Click + New client button.
Select the language you are using for your client application.
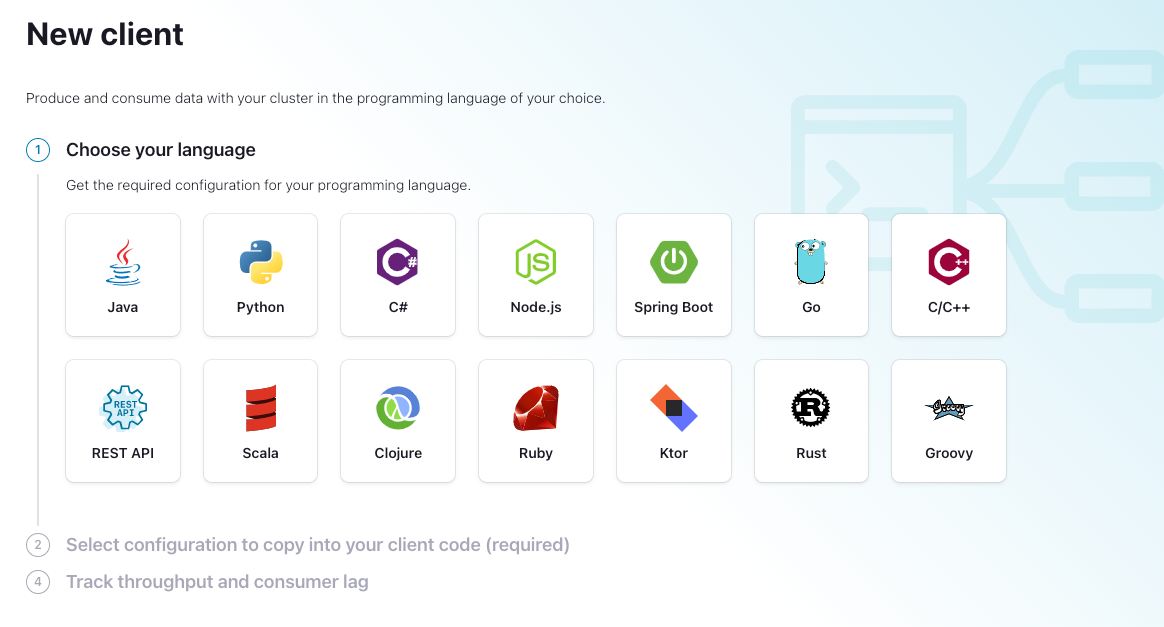
After you have selected a language, create or use existing API keys for your Kafka cluster and Schema Registry cluster as needed. Then, copy and paste the displayed configuration into your client application source code.
Configure clients from the Confluent CLI
For Confluent CLI frequent users, once you have set up context in the CLI, you can use one-line command confluent kafka client-config create to create a configuration file for connecting your client apps to Confluent Cloud.
The following table lists client languages, corresponding language ID, and whether the language supports Confluent Cloud Schema Registry configuration. For languages that support Confluent Cloud Schema Registry configuration, you can optionally configure it for your client apps by passing Schema Registry information via the flags to the command.
Language | Language ID | Support for Confluent Cloud Schema Registry | Notes |
|---|---|---|---|
Clojure |
| No | |
C/C++ |
| No | See examples: C/C++ examples (librdkafka) |
C# |
| No | |
Go |
| Yes | See examples: confluent-kafka-go/examples |
Groovy |
| No | |
Java |
| Yes | |
Kotlin |
| No | |
Ktor |
| Yes | |
JavaScript |
| Yes | See examples: confluent-kafka-javascript/examples |
Python |
| Yes | See examples: confluent-kafka-python/examples |
REST API |
| Yes | |
Ruby |
| No | |
Rust |
| No | |
Scala |
| No | |
Spring Boot |
| Yes |
Tip
If you already have CLI context set up, you can skip directly to step 6 to create the client configuration.
- Prerequisites:
Access to Confluent Cloud with an active cluster.
Log in to your cluster using the confluent login command with the cluster URL specified.
confluent login
Enter your Confluent Cloud credentials:
Email: susan@myemail.com
Password:
Set the Confluent Cloud environment.
Get the environment ID.
confluent environment list
Your output should resemble:
      Id       |        Name
+--------------+--------------------+
  * t2703      | default
    env-abc123 | demo-env-102893
    env-xyz123 | ccloud-demo
    env-wxy123 | data-lineage-demo
    env-abc12d | my-new-environment
Set the environment using the ID (
<env-id>).confluent environment use <env-id>
Your output should resemble:
Now using "env-xyz123" as the default (active) environment.
Set the cluster to use.
Get the cluster ID.
confluent kafka cluster list
Your output should resemble:
      Id      |   Name    | Type  | Cloud    |  Region  | Availability | Status
+-------------+-----------+-------+----------+----------+--------------+--------+
    lkc-oymmj | cluster_1 | BASIC | gcp      | us-east4 | single-zone  | UP
  * lkc-7k6kj | cluster_0 | BASIC | gcp      | us-east1 | single-zone  | UP
Set the cluster using the ID (
<cluster-id>). This is the cluster where the commands are run.confluent kafka cluster use <cluster-id>
To verify the selected cluster after setting it, type
confluent kafka cluster listagain. The selected cluster will have an asterisk (*) next to it.
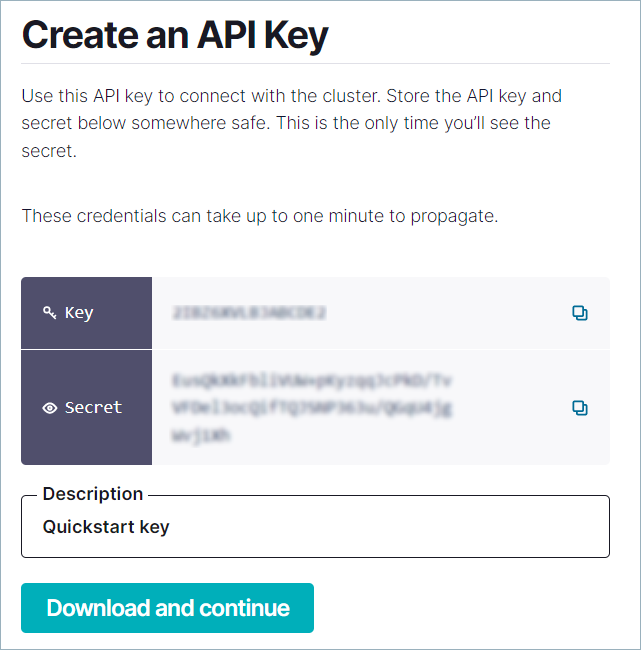
Create an API key and secret, and save them.
You can generate the API key on the Confluent CLI or from the Confluent Cloud Console. Be sure to save the API key and secret.
You can use either a Kafka cluster API key scoped to the specific cluster or a global API key. A global API key works identically to a Kafka cluster key for client authentication. Use the same
sasl.usernameandsasl.passwordconfiguration fields. Global API keys are useful when your application connects to multiple clusters or also accesses other Confluent Cloud resources such as Schema Registry or Flink.Note
Global API keys do not support Basic and Standard Kafka clusters. For those cluster types, use a resource-scoped Kafka cluster API key.
Run the following command to create the API key and secret, using the ID (
<cluster-id>).confluent api-key create --resource <cluster-id>
Your output should resemble:
It may take a couple of minutes for the API key to be ready.
Save the API key and secret. The secret is not retrievable later.
+---------+------------------------------------------------------------------+
| API Key | ABC123xyz                                                        |
| Secret  | 123xyzABC123xyzABC123xyzABC123xyzABC123xyzABC123xyzABC123xyzABCx |
+---------+------------------------------------------------------------------+
For more information, see Use API Keys to Authenticate to Confluent Cloud.
In the console, click the Kafka API keys tab and click Create key. Save the key and secret, then click the checkbox next to I have saved my API key and secret and am ready to continue.
Add the API secret with
confluent api-key store <key> <secret>. When you create an API key with the CLI, it is automatically stored locally. However, when you create an API key using the console, API, or with the CLI on another machine, the secret is not available for CLI use until you store it. This is required because secrets cannot be retrieved after creation.confluent api-key store <api-key> <api-secret> --resource <cluster-id>
For more information, see Use API Keys to Authenticate to Confluent Cloud.
Set the API key to use for Confluent CLI commands, using the ID (
<cluster-id>).confluent api-key use <api-key> --resource <cluster-id>
Create a client configuration file for the language of your choice, using language ID (
<language-id>). Then, copy and paste the displayed configuration into your client application source code.See Client Language Table for a list of language IDs and whether the language supports Schema Registry configuration.
For the output of command
confluent kafka client-config create <language-id>, the client configuration file is printed to stdout and the errors or warnings are printed to stderr.You can redirect the command output to separate files by doing the following:
confluent kafka client-config create <language-id> 1> config-file.config 2> errors-warnings-file.err
If you do not want to use the CLI context, you can alternatively pass all the necessary information via flags:
confluent kafka client-config create <language-id> \
  --environment <env-id> \
  --cluster <cluster-id> \
  --api-key <api-key> --api-secret <api-secret> \
  --schema-registry-api-key <api-key> --schema-registry-api-secret <api-secret> # only for languages that support Schema Registry configuration
For languages that do NOT support Schema Registry configuration, run the following command:
confluent kafka client-config create <language-id>
For languages that support Schema Registry configuration, run the following command:
confluent kafka client-config create <language-id> \
  --schema-registry-api-key <api-key> \
  --schema-registry-api-secret <api-secret>