
Manage Client-Side Field Level Encryption using Confluent Cloud Console
Manage CSFLE encryption rules in the Cloud Console by defining schemas, adding tags to classify sensitive fields, registering encryption keys from your AWS, Azure, or Google Cloud key management system (KMS), and creating encryption rules that map tags to keys.
Quick actions:
View rules: Go to Stream Governance → Schema Registry → Rules.
Add encryption key: Register your KEK from AWS KMS, Azure Key Vault, or Google Cloud KMS.
Create rule: Select schema + tag + encryption key.
Grant access: Assign RBAC permissions for producers (encrypt) and consumers (decrypt).
You can use the Confluent Cloud Console to manage Client-Side Field Level Encryption (CSFLE) for protecting your organization’s sensitive data in Confluent Cloud on AWS, Azure, and Google Cloud.
For requirements and supported clients, see Requirements.
Steps to manage CSFLE
The high-level steps to manage CSFLE are:
Define the schema or choose an existing schema.
Add tags to classify your data.
Create encryption keys in your key management service (KMS) and add them to Confluent Cloud.
Add encryption rules.
An encryption rule is a schema subject plus tags plus an encryption key.
Grant RBAC permissions.
Producers need access to the encryption key to be able to produce messages. Consumers need access to the encryption key to be able to decrypt and access the unencrypted messages.
If you do not grant Confluent access to your Key Encryption Key (KEK), you must set up the proper configurations for producers and consumers to access the KEKs.
View encryption rules
To view encryption rules:
Go to the Confluent Cloud Console and select your environment.
In the left navigation menu, click Stream Governance > Schema Registry > Rules.
The Rules page displays.
On the Rules page, you see a listing of any existing encryption rules. For each of the existing rules, the following information is displayed:
Schema subject name
Rule name
Rule category
Tags
An encryption rule is defined as a schema subject plus tags plus an encryption key.
Schema: The schema defines the structure of the data, and forms the basis of a topics.">data contract. Schemas are grouped under schema subjects, so when you work with schemas, you must refer to them by their schema subject.
Tags: The class of data that you want to encrypt. For example, if you have a tag called PII to indicate personally identifiable information, you can create an encryption rule to encrypt all fields tagged with PII.
Encryption key: The Key Encryption Key (KEK) that you want to use to encrypt the specified classification, such as PII.
You are billed for each encryption rule.
For example, you can create an encryption rule to encrypt all fields tagged with PII (personally identifiable information). These might relate to credit card numbers, social security numbers, email addresses, names, and so on. The resulting JSON rule might look like this:
{
 "ruleSet": {
   "domainRules": [
     {
       "name": "encryptPII",
       "kind": "TRANSFORM",
       "type": "ENCRYPT",
       "mode": "WRITEREAD",
       "tags": ["PII"],
       "params": {
         "encrypt.kek.name": "<kekName>"
       }
     }
   ]
 }
}
Edit encryption rules
To edit an encryption rule:
Go to the Confluent Cloud Console and select your environment.
In the left navigation menu, click Stream Governance > Schema Registry > Rules.
The Rules page displays a list of existing encryption rules.
Under Mode on the right side of the table, click the More button (3 dots) and select Edit. Here you can make changes to the rule definition and parameters, as described in Add an encryption rule.

Click Save to save any changes you make, or click Cancel to discard the changes.
Add an encryption key
Before you can add an encryption rule, you must create an encryption key in your key management service (KMS). You can add that encryption key to Confluent using the Confluent Cloud Console.
Open the Confluent Cloud Console and select your environment.
In the left navigation menu, click Stream Governance > Schema Registry > Encryption keys.
The Encryption keys page displays.
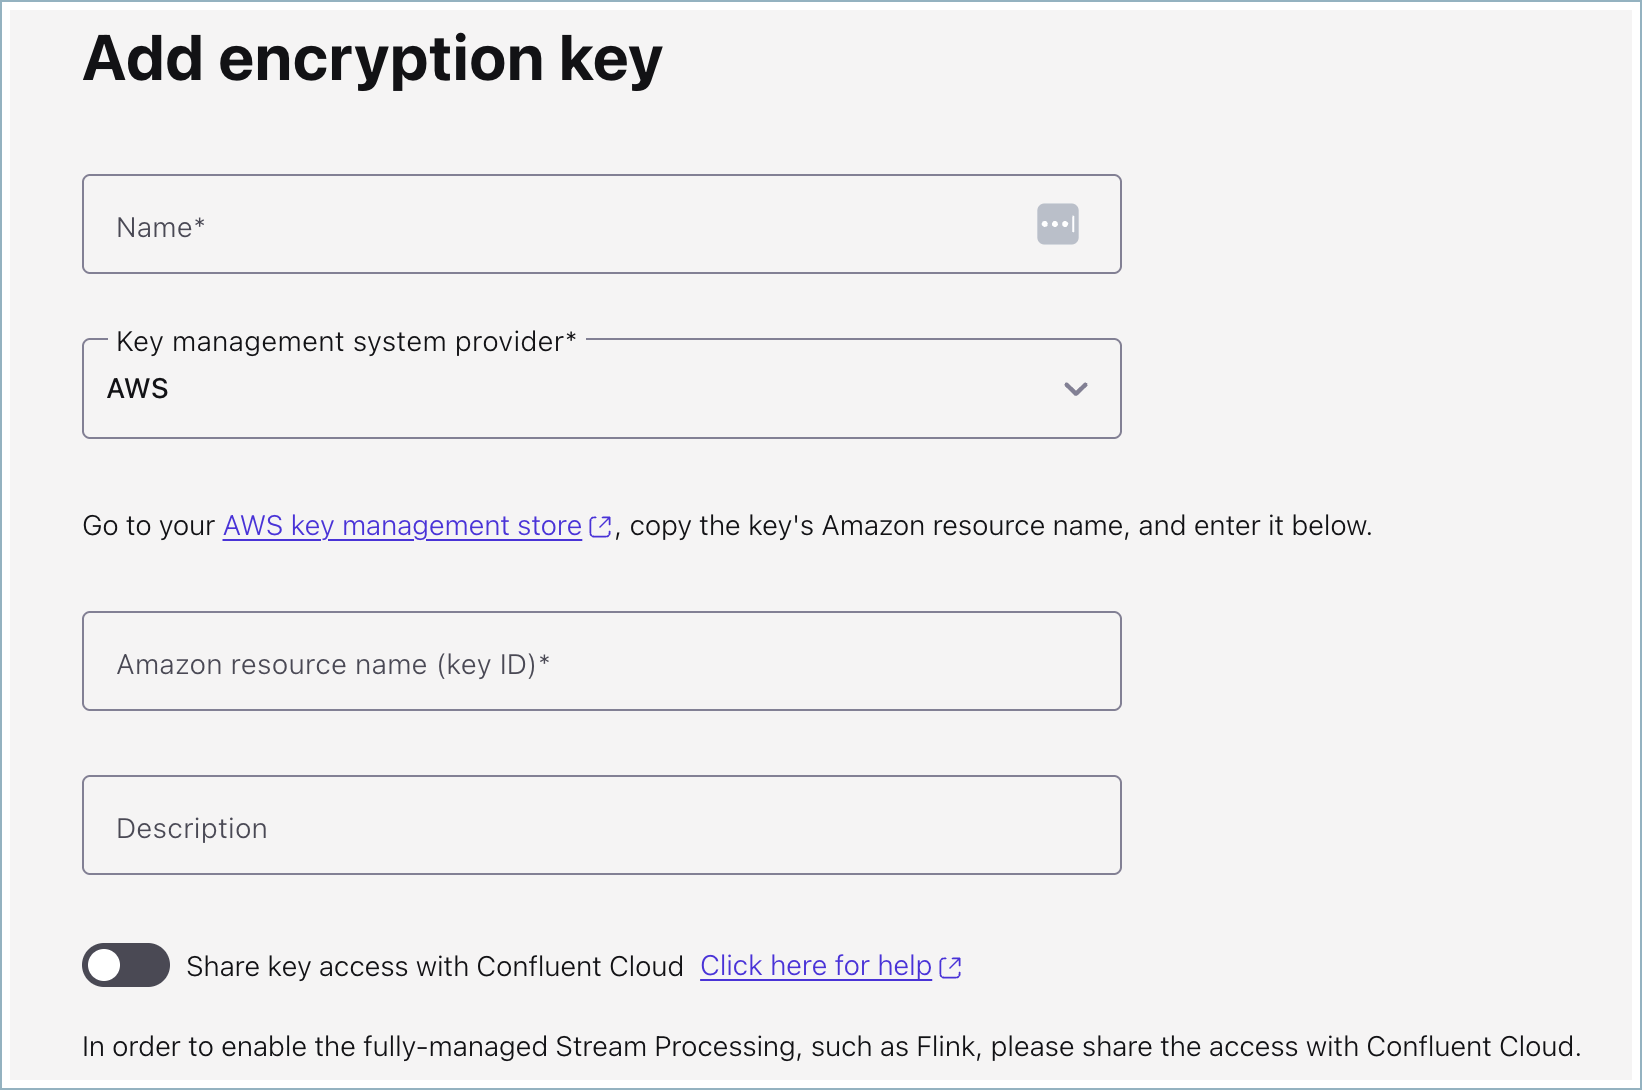
Click Add encryption key.
The Add encryption key page displays.
In the Name field, enter a meaningful name.
In the Key management system provider field, select the key management service that you want to use to manage the encryption key. Supported key management options include AWS, Azure, and Google Cloud. Depending on which provider you select, you are given a link to that provider’s associated key management store.
Add a description for the key in the Description field.
Optionally, enable Share key access with Confluent Cloud to allow Confluent to perform server-side operations that require temporary decryption within Confluent Cloud. If you enable this option, follow the steps below to create an encryption key for your key management service (AWS, Azure, or Google Cloud).
If you do not want to enable this option, click Add at this point to add the encryption key, and skip to the next task: Add an encryption rule.
Share key access with Confluent Cloud
If you enabled Share key access with Confluent Cloud, follow the steps below to create an encryption key for each key management service (AWS, Azure, or Google Cloud).
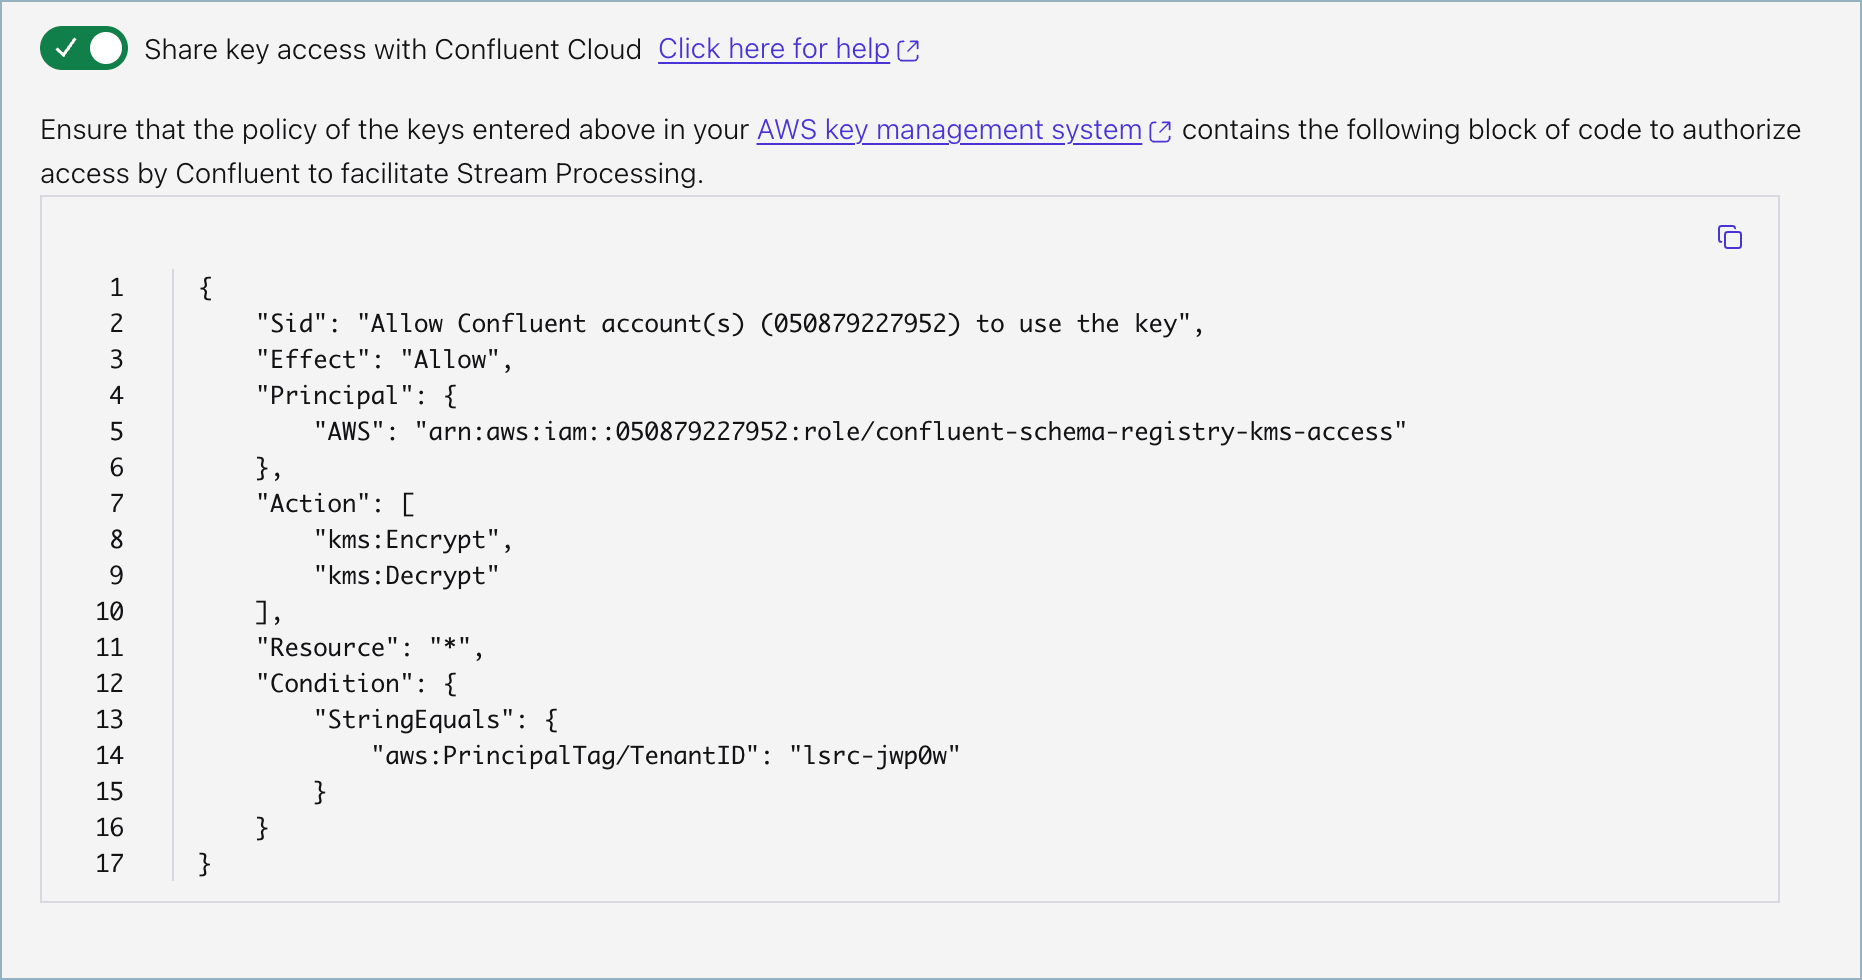
Provide your Name, select AWS as provider, and paste your KMS key ARN.
Enable Share encryption key access with Confluent Cloud if you want Confluent Cloud to perform server-side operations that require temporary decryption within Confluent Cloud services (for example, Schema Registry, ksqlDB, Flink). Confluent Cloud does not store decrypted data.
Ensure the KMS key policy and IAM permissions grant access to Confluent as shown in the Confluent Cloud Console. See AWS KMS key policies and AWS KMS IAM permissions.
Click Add.
Provide your Name, select Azure as provider, paste the Key Vault key ID, and supply your tenant ID and client ID (user-assigned managed identity).
Enable Share encryption key access with Confluent Cloud if you want Confluent Cloud to perform server-side operations that require temporary decryption within Confluent Cloud.
Configure Azure access for Confluent using managed identity, a custom role with key permissions (encrypt/decrypt/read), and a federated identity credential tied to the Confluent service account as shown in the Confluent Cloud Console.
See: Managed identities, Custom roles, and Federated identity credential.
Click Add.
Provide your Name, select GCP as provider, and paste the KMS key resource name.
Enable Share encryption key access with Confluent Cloud if you want Confluent Cloud to perform server-side operations that require temporary decryption within Confluent Cloud.
Grant the Confluent service account the needed IAM permissions (for example,
cloudkms.cryptoKeyVersions.useToEncryptanduseToDecrypt) and assign them to the service account shown in the Confluent Cloud Console.See: Custom IAM roles and KMS IAM.
Click Add.
Add an encryption rule
Follow the steps below to add encryption rules, which define the class of data that you want to encrypt, and the associated encryption key.
Encryption is only supported for fields of type
stringorbytes.
Open the Confluent Cloud Console and select your environment.
In the left navigation menu, click Stream Governance > Schema Registry > Data contracts.
Existing data contracts are listed on the Data contracts page.
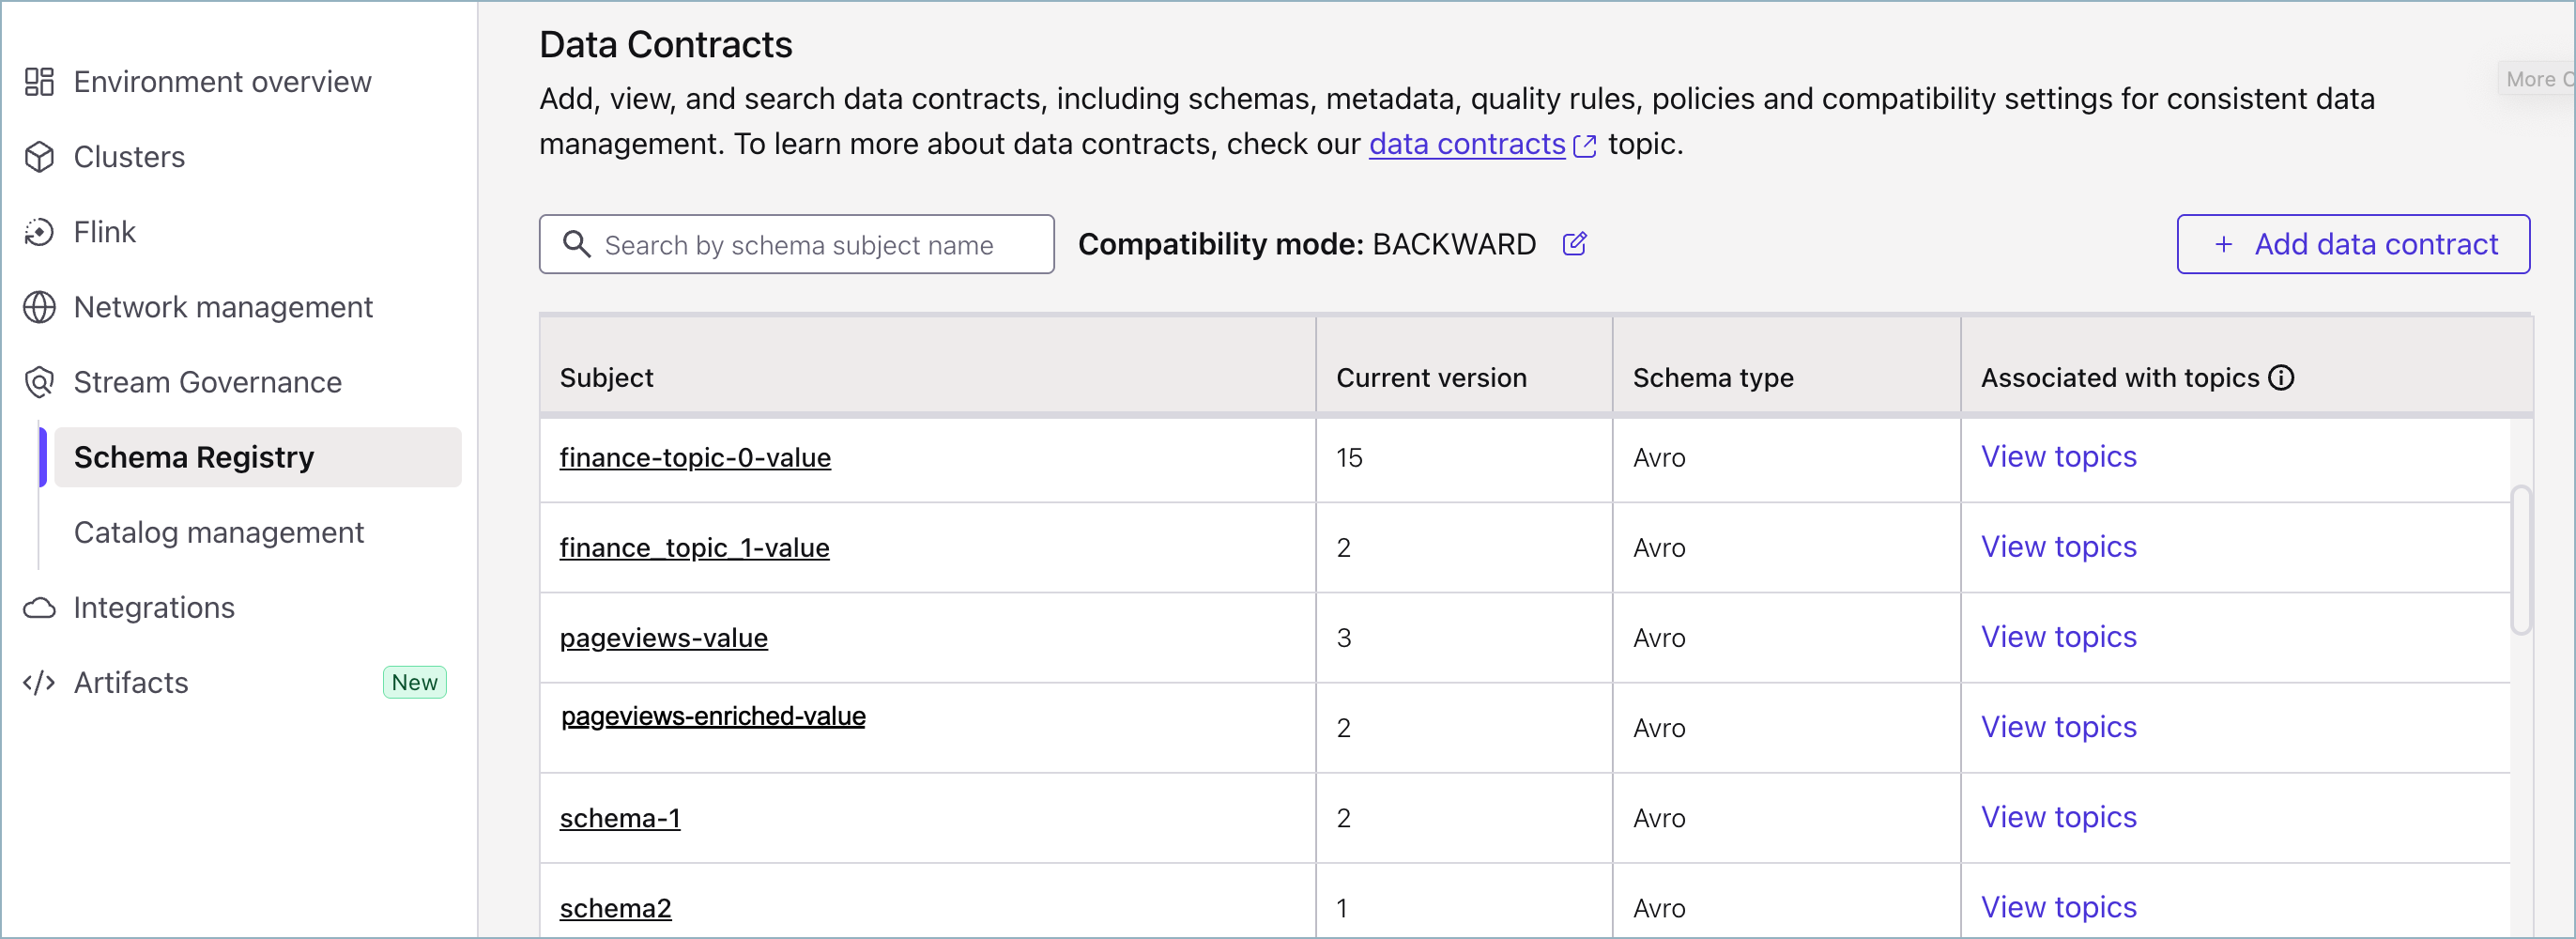
If no data contracts are listed, or if you want to create a new data contract to work with, click Add data contract, and follow the steps described in Create a schema (data contract).
Select a data contract from the list, click Evolve, then click Rules > Add rules.
The Add rules side panel displays.
Create encryption rules for the fields in the schema subject that you want to encrypt.
Open the Category dropdown list and select Data encryption rule.
Enter a Rule name. Enter a meaningful name that is unique within the schema subject.
Enter a Description.
In the Encrypt fields with section, select the Tags that the rules apply to and select the Encryption key that you want to use.
In the Apply action on section, select the options that you want to apply to the fields that you want to encrypt. You can apply the following actions:
On failure (WRITE): Default is ERROR.
On success (WRITE): Default is NONE.
On failure (READ): Default is ERROR.
On success (READ): Default is NONE.
For each action, you can select the following options:
None
DLQ
Error
For example, if you select On failure (WRITE) and DLQ, and the write operation fails, the record is sent to the dead letter queue.
If you select On success (WRITE) and Error, and the write operation succeeds, an error is returned.
Warning
Security Risk: Dead Letter Queue (DLQ) with CSFLE
When using DLQ actions with Client-Side Field Level Encryption (CSFLE), be aware that data sent to the DLQ is written in plaintext (unencrypted). This poses a significant security risk as sensitive data that should be encrypted may be exposed in the DLQ.
Do not use DLQ actions with CSFLE in the current version. If you need error handling for CSFLE-enabled data, use alternative approaches such as:
Setting the action to Error to throw exceptions instead of routing to DLQ
Implementing custom error handling in your applications
Using None to pass encrypted data through without decryption
In the Parameters section, you can optionally add parameters to the rule.
The parameters are key-value pairs that you can use to configure the rule.
Click Add. The new rule defines the fields that you want to encrypt and the encryption key that you want to use to encrypt the fields. You can use the same encryption key for multiple fields.
Click Add to save the rule, or click Add another rule to add more encryption rules.
The Encryption rules page displays with the new encryption rules.