
Optimize Egress Costs with Follower Fetching on Confluent Cloud in AWS
You can reduce your AWS egress bandwidth costs by configuring your Kafka clients to fetch from the nearest follower replica instead of the leader. When clients consume from a replica in the same Availability Zone (AZ), they avoid cross-zone egress charges on your AWS networking.
This “fetch from follower” capability is based on Kafka Improvement Proposal (KIP) 392.
How it works
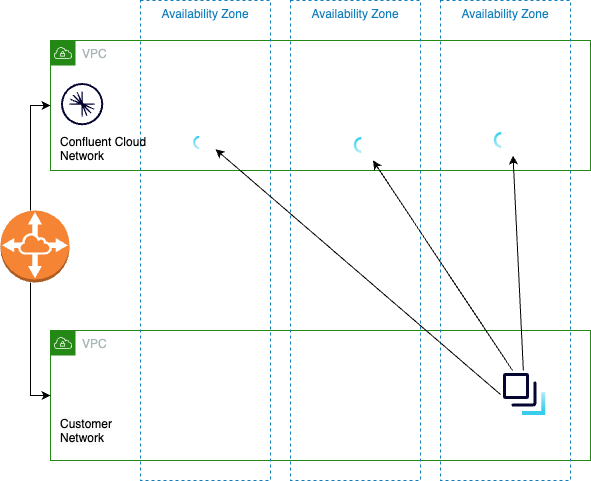
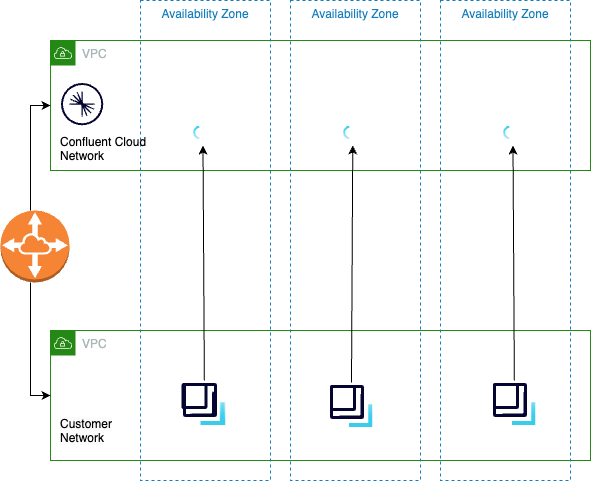
In AWS, data transfer over a virtual private cloud (VPC) peering connection that stays within an Availability Zone is free. However, by default, clients connect to the leader Kafka replica. In a multi-zone cluster that means that clients make expensive cross-zone calls.
To get the benefit of fetch from followers, you do the following:
Distribute clients across all Availability Zones
Configure clients to fetch from followers in the local Availability Zone
Use Confluent Cloud Metrics API to identify clients not configured to fetch from follower.
Prerequisites
One of the following networking configurations is required:
An Enterprise or Freight cluster with Private Network Interface (PNI) configured and attached to Confluent Cloud
A VPC peering connection between AWS and the above Confluent Cloud network with a Dedicated cluster
Configure clients
Some things to consider about client configuration:
Distribute your clients across all the Availability Zones for your cluster
The Availability Zone ID in your client configuration must match exactly the Availability Zone ID in the Confluent Cloud Console
Availability Zone ID (
use2-az1) is different from an Availability Zone name (us-east-1a)After you configure and deploy clients, use the metrics API to ensure your clients are making calls in the same zones as followers
Clients should have unique principal IDs to simplify tracking
To configure your clients to use this optimization, set the client.rack property to use one of the AWS zones listed for your network.
client.rack=<AWS-Zone-ID>
Alternatively, you can specify zone identifiers for Enterprise and Freight clusters with PNI networking as defined in Specify zone identifiers.
Availability Zone IDs vs. Availability Zone names
Use the Availability Zone ID (use2-az1) to identify your Availability Zone and not the Availability Zone name (us-east-1a). AWS generates Availability Zone names randomly for each AWS account. Availability Zone ID are constant across all accounts. For more information, see Availability Zone IDs for your AWS resources.
Use the Metrics API to find clients not yet configured
If you are using the client.rack method for zone identification, you can use the following instructions to identify client zone alignment.
Use Confluent Cloud Metrics API to query io.confluent.kafka.server/response_bytes. Group the query with the metric.zone_alignment and metric.principal_id labels to determine how clients connected to your cluster are utilizing bandwidth.
Possible metric.zone_alignment values:
CROSS_ZONE - some cross zone traffic might be necessary to contact the leader
SAME_ZONE - the client is using the same zone to communicate with a replica
UNKNOWN - the
client.rackproperty is not configured for this client
For more information on the Confluent Cloud Metrics API, see API Reference.
How to query
Group the metric.zone_alignment and metric.principal_id labels to filter io.confluent.kafka.server/response_bytes.
Create a file named
metric_zone_alignment.jsonusing the following template. Be sure to changelkc-XXXXXand the timestamp values to match your needs.{ "aggregations": [ { "metric": "io.confluent.kafka.server/response_bytes" } ], "filter": { "op": "AND", "filters": [ { "field": "resource.kafka.id", "op": "EQ", "value": "lkc-XXXXX" }, { "field": "metric.type", "op": "EQ", "value": "Fetch" } ] }, "group_by": [ "metric.zone_alignment", "metric.principal_id" ], "granularity": "PT30M", "intervals": [ "2023-01-13T23:30:00Z/PT1H" ], "limit": 1000 }
Submit the query as a
POSTusing the following command. Be sure to changeAPI_KEYandSECRETto match your environments.http 'https://api.telemetry.confluent.cloud/v2/metrics/cloud/query' --auth '<API_KEY>:<SECRET>' < metric_zone_alignment.json
Your output should resemble:
{
   "timestamp": "2023-01-01T00:00:00Z",
   "value": 76,
   "metric.principal_id": "sa-abc123",
   "metric.zone_alignment": "CROSS_ZONE"
}
{
   "timestamp": "2023-01-01T00:00:00Z",
   "value": 11535077,
   "metric.principal_id": "sa-456xxx",
   "metric.zone_alignment": "SAME_ZONE"
}
{
   "timestamp": "2023-01-01T00:00:00Z",
   "value": 7340578,
   "metric.principal_id": "sa-xyz123",
   "metric.zone_alignment": "UNKNOWN"
}
Next steps
Try Confluent Cloud on AWS Marketplace with $1000 of free usage for 30 days, and pay as you go. No credit card is required.