Microsoft SQL Server Source (JDBC) Connector for Confluent Cloud
The fully-managed Microsoft SQL Server Source connector for Confluent Cloud captures a snapshot of the existing data in a Microsoft SQL Server database, then monitors and records all subsequent row-level changes. The connector supports Avro, JSON Schema, Protobuf, or JSON (schemaless) output data formats. All of the events for each table are recorded in a separate Apache Kafka® topic. The events can then be easily consumed by applications and services. Note that deleted records are not captured.
Note
This Quick Start is for the fully-managed Confluent Cloud connector. If you are installing the connector locally for Confluent Platform, see JDBC Connector (Source and Sink) for Confluent Platform.
If you require private networking for fully-managed connectors, make sure to set up the proper networking beforehand. For more information, see Manage Networking for Confluent Cloud Connectors.
Features
The Microsoft SQL Server Source connector provides the following features:
At least once delivery: The connector guarantees that records are delivered at least once to the Kafka topic.
Topics created automatically: The connector can automatically create Kafka topics. When creating topics, the connector uses the naming convention:
<topic.prefix><tableName>. The tables are created with the properties:topic.creation.default.partitions=1andtopic.creation.default.replication.factor=3.Insert modes:
timestamp mode is enabled when only a timestamp column is specified when you enter database details.
timestamp+incrementing mode is enabled when both a timestamp column and incrementing column are specified when you enter database details.
Important
A timestamp column must not be nullable.
A timestamp column must use datetime2 and not datetime. If the timestamp column uses datetime, the topic may receive numerous duplicates.
Database authentication: Supports password authentication and Microsoft Entra ID-based authentication using Confluent Provider Integration. For more information about provider integration setup, see the connector authentication.
Record processing: Supports table and query modes. Use the
queryproperty to execute custom SQL queries for joining tables or selecting specific data subsets.SSL support: Supports one-way SSL.
Data formats: The connector supports Avro, JSON Schema, Protobuf, or JSON (schemaless) output data. Schema Registry must be enabled to use a Schema Registry-based format (for example, Avro, JSON_SR (JSON Schema), or Protobuf).
Select configuration properties:
db.timezonepoll.interval.msbatch.max.rowstimestamp.delay.interval.mstopic.prefixschema.pattern
Offset management capabilities: Supports offset management. For more information, see Manage custom offsets.
Client-side encryption (CSFLE and CSPE) support: The connector supports CSFLE and CSPE for sensitive data. For more information about CSFLE or CSPE setup, see the connector configuration.
Secret manager integration: The connector supports secret manager integration. For
Passwordbased authentication, the connector can retrieve the following configurations from an integrated secret manager at runtime as needed.Secret manager managed configuration
Type
connection.hostSTRINGconnection.portINTconnection.userSTRINGconnection.passwordPASSWORDFor more information, see Create a secret manager integration in Confluent Cloud.
For more information and examples to use with the Confluent Cloud API for Connect, see the Confluent Cloud API for Connect Usage Examples section.
Limitations
Be sure to review the following information.
For connector limitations, see Microsoft SQL Server Source (JDBC) Connector limitations.
If you plan to use one or more Single Message Transformations (SMTs), see SMT Limitations.
Manage custom offsets
You can manage the offsets for this connector. Offsets provide information on the point in the system from which the connector is accessing data. For more information, see Manage Offsets for Fully-Managed Connectors in Confluent Cloud.
To manage offsets:
Manage offsets using Confluent Cloud APIs. For more information, see Connect offsets API reference.
To get the current offset, make a GET request that specifies the environment, Kafka cluster, and connector name.
GET /connect/v1/environments/{environment_id}/clusters/{kafka_cluster_id}/connectors/{connector_name}/offsets
Host: https://api.confluent.cloud
Response:
Successful calls return HTTP 200 with a JSON payload that describes the offset.
{
    "id": "lcc-example123",
    "name": "{connector_name}",
    "offsets": [
        {
            "partition": {
                "protocol": "1",
                "table": "{table_name}"
            },
            "offset": {
                "incrementing": 26
            }
        }
    ],
    "metadata": {
        "observed_at": "2024-03-28T17:57:48.139635200Z"
    }
}
Responses include the following information:
The position of latest offset.
The observed time of the offset in the metadata portion of the payload. The
observed_attime indicates a snapshot in time for when the API retrieved the offset. A running connector is always updating its offsets. Useobserved_atto get a sense for the gap between real time and the time at which the request was made. By default, offsets are observed every minute. CallingGETrepeatedly will fetch more recently observed offsets.Information about the connector.
In these examples, the curly braces around “{connector_name}” indicate a replaceable value.
To update the offset, make a POST request that specifies the environment, Kafka cluster, and connector name. Include a JSON payload that specifies new offset and a patch type.
POST /connect/v1/environments/{environment_id}/clusters/{kafka_cluster_id}/connectors/{connector_name}/offsets/request
Host: https://api.confluent.cloud

 {
     "type": "PATCH",
     "offsets": [
       {
         "partition": {
           "protocol": "1",
           "table": "{table_name}"
         },
         "offset": {
           "incrementing": 3
         }
       }
     ]
 }
Considerations:
You can only make one offset change at a time for a given connector.
This is an asynchronous request. To check the status of this request, you must use the check offset status API. For more information, see Get the status of an offset request.
For source connectors, the connector attempts to read from the position defined by the requested offsets.
Response:
Successful calls return HTTP 202 Accepted with a JSON payload that describes the offset.
{
    "id": "lcc-example123",
    "name": "{connector_name}",
    "offsets": [
        {
            "partition": {
                "protocol": "1",
                "table": "{table_name}"
            },
            "offset": {
                "incrementing": 3
            }
        }
    ],
    "requested_at": "2024-03-28T17:58:45.606796307Z",
    "type": "PATCH"
}
Responses include the following information:
The requested position of the offsets in the source.
The time of the request to update the offset.
Information about the connector.
To delete the offset, make a POST request that specifies the environment, Kafka cluster, and connector name. Include a JSON payload that specifies the delete type.
 POST /connect/v1/environments/{environment_id}/clusters/{kafka_cluster_id}/connectors/{connector_name}/offsets/request
 Host: https://api.confluent.cloud

{
  "type": "DELETE"
}
Considerations:
Delete requests delete the offset for the provided partition and reset to the base state. A delete request is as if you created a fresh new connector.
This is an asynchronous request. To check the status of this request, you must use the check offset status API. For more information, see Get the status of an offset request.
Do not issue delete and patch requests at the same time.
For source connectors, the connector attempts to read from the position defined in the base state.
Response:
Successful calls return HTTP 202 Accepted with a JSON payload that describes the result.
{
  "id": "lcc-example123",
  "name": "{connector_name}",
  "offsets": [],
  "requested_at": "2024-03-28T17:59:45.606796307Z",
  "type": "DELETE"
}
Responses include the following information:
Empty offsets.
The time of the request to delete the offset.
Information about Kafka cluster and connector.
The type of request.
To get the status of a previous offset request, make a GET request that specifies the environment, Kafka cluster, and connector name.
GET /connect/v1/environments/{environment_id}/clusters/{kafka_cluster_id}/connectors/{connector_name}/offsets/request/status
Host: https://api.confluent.cloud
Considerations:
The status endpoint always shows the status of the most recent PATCH/DELETE operation.
Response:
Successful calls return HTTP 200 with a JSON payload that describes the result. The following is an example of an applied patch.
{
   "request": {
      "id": "lcc-example123",
      "name": "{connector_name}",
      "offsets": [
          {
              "partition": {
                  "protocol": "1",
                  "table": "{table_name}"
              },
              "offset": {
                  "incrementing": 3
              }
          }
      ],
      "requested_at": "2024-03-28T17:58:45.606796307Z",
      "type": "PATCH"
   },
   "status": {
      "phase": "APPLIED",
      "message": "The Connect framework-managed offsets for this connector have been altered successfully. However, if this connector manages offsets externally, they will need to be manually altered in the system that the connector uses."
   },
   "previous_offsets": [
       {
           "partition": {
               "protocol": "1",
               "table": "{table_name}"
           },
           "offset": {
               "incrementing": 26
           }
       }
   ],
   "applied_at": "2024-03-28T17:58:48.079141883Z"
}
Responses include the following information:
The original request, including the time it was made.
The status of the request: applied, pending, or failed.
The time you issued the status request.
The previous offsets. These are the offsets that the connector last updated prior to updating the offsets. Use these to try to restore the state of your connector if a patch update causes your connector to fail or to return a connector to its previous state after rolling back.
JDBC modes and offsets
You can run the JDBC source connectors in one of four modes. Each mode uses a different offset object in its JSON payload to track the progress of the connector. The provided samples show an offset object from a JBDC source connector in incrementing mode.
bulk- No offset. This is the default mode for JDBC source connectors.incrementing- The offset is provided by theincrementingproperty in the offset object.timestamp- The offset is provided by thetimestampandtimestamp-nanosproperties in the offset object.timestamp+incrementing- The offset is provided by theincrementing,timestampandtimestamp-nanosproperties in the offset object.
JSON payload
The table below offers a description of the unique fields in the JSON payload for managing offsets of the JDBC Source connectors, including:
IBM Db2 Source connector
Microsoft SQL Server Source connector
MySQL Source connector
Oracle Database Source connector
PostgreSQL Source connector
Field | Definition | Required/Optional |
|---|---|---|
| Specifies the value of Available only in the following modes: incrementing, timestamp+incrementing. | Required |
| Specifies the protocol. Available in the following modes: incrementing, timestamp, timestamp+incrementing. | Required |
| The name of the table. Available in the following modes: incrementing, timestamp, timestamp+incrementing. | Required |
| The number of milliseconds since Available only in the following modes: timestamp, timestamp+incrementing. | Required |
| Fractional seconds component of the timestamp object. Available only in the following modes: timestamp, timestamp+incrementing. | Required |
Quick Start
Use this quick start to get up and running with the Confluent Cloud Microsoft SQL Server Source connector. The quick start provides the basics of selecting the connector and configuring it to obtain a snapshot of the existing data in a Microsoft SQL Server database and then monitoring and recording all subsequent row-level changes.
- Prerequisites
Authorized access to a Confluent Cloud cluster on Amazon Web Services (AWS), Microsoft Azure (Azure), or Google Cloud.
The Confluent CLI installed and configured for the cluster. See Install the Confluent CLI.
The connector automatically creates Kafka topics using the naming convention:
<topic.prefix><tableName>. The tables are created with the properties:topic.creation.default.partitions=1andtopic.creation.default.replication.factor=3. If you want to create topics with specific settings, create the topics before running this connector.Important
If you are configuring granular access using a service account, and you leave the optional Topic prefix (
topic.prefix) configuration property empty, you must grant ACLCREATEandWRITEaccess to all the Kafka topics or create RBAC role bindings. To add ACLs, you use the (*) wildcard in the ACL entries as shown in the following examples.confluent kafka acl create --allow --service-account "<service-account-id>" --operation create --topic "*"
confluent kafka acl create --allow --service-account "<service-account-id>" --operation write --topic "*"
Schema Registry must be enabled to use a Schema Registry-based format (for example, Avro, JSON_SR (JSON Schema), or Protobuf).
Make sure your connector can reach your service. Consider the following before running the connector:
Depending on the service environment, certain network access limitations may exist. See Manage Networking for Confluent Cloud Connectors for details.
To use a set of public egress IP addresses, see Public Egress IP Addresses for Confluent Cloud Connectors. For additional fully-managed connector networking details, see Networking and DNS.
Do not include
jdbc:xxxx://in the connection hostname property. An example of a connection hostname property isdatabase.example.endpoint.com. For example,mydatabase.abc123ecs2.us-west.rds.amazonaws.com.Clients from Azure Virtual Networks are not allowed to access the server by default. Ensure your Azure Virtual Network is correctly configured and that Allow access to Azure Services is enabled.
See your specific cloud platform documentation for how to configure security rules for your VPC.
A database table timestamp column must not be nullable and must use datetime2 and not datetime.
Kafka cluster credentials. The following lists the different ways you can provide credentials.
Enter an existing service account resource ID.
Create a Confluent Cloud service account for the connector. Make sure to review the ACL entries required in the service account documentation. Some connectors have specific ACL requirements.
Create a Confluent Cloud API key and secret. To create a key and secret, you can use confluent api-key create or you can autogenerate the API key and secret directly in the Cloud Console when setting up the connector.
Using the Confluent Cloud Console
Step 1: Launch your Confluent Cloud cluster
To create and launch a Kafka cluster in Confluent Cloud, see Create a kafka cluster in Confluent Cloud.
Step 2: Add a connector
In the left navigation menu, click Connectors. If you already have connectors in your cluster, click + Add connector.
Step 3: Select your connector
Click the Microsoft SQL Server Source connector card.
Step 4: Enter the connector details
Note
Make sure you have all your prerequisites completed.
An asterisk ( * ) designates a required entry.
At the Microsoft SQL Server Source Connector screen, complete the following:
In the Topic prefix field, define a topic prefix your connector will use to publish to Kafka topics. The connector will Kafka topics using the following naming convention: <topic.prefix><tableName>.
Important
If you are configuring granular access using a service account, and you leave the optional Topic prefix (topic.prefix) configuration property empty, you must grant ACL CREATE and WRITE access to all the Kafka topics or create RBAC role bindings. To add ACLs, you use the (*) wildcard in the ACL entries as shown in the following examples.
confluent kafka acl create --allow --service-account
"<service-account-id>" --operation create --topic "*"
confluent kafka acl create --allow --service-account
"<service-account-id>" --operation write --topic "*"
Select the way you want to provide Kafka Cluster credentials. You can choose one of the following options:
My account: This setting allows your connector to globally access everything that you have access to. With a user account, the connector uses an API key and secret to access the Kafka cluster. This option is not recommended for production.
Service account: This setting limits the access for your connector by using a service account. This option is recommended for production.
Use an existing API key: This setting allows you to specify an API key and a secret pair. You can use an existing pair or create a new one. This method is not recommended for production environments.
Note
Freight clusters support only service accounts for Kafka authentication.
Click Continue.
Configure the authentication properties:
Authentication method
Authentication method: Select how you want to authenticate with your database. Currently,
Passwordis the only valid option.Use secret manager: Enable this setting to fetch sensitive configuration values, such as the
Password, from a secret manager.
Azure credentials
Provider Integration: Select an existing integration that has access to your resource such as the secret manager.
Secret manager configuration
Secret manager: Select the secret manager that Confluent Cloud should use to retrieve sensitive data.
Configurations from Secret manager: Select the configurations whose values Confluent Cloud should fetch from the secret manager.
Provider Integration: Select an existing integration that has access to your resource such as the secret manager.
How should we connect to your database?
Connection host: The JDBC connection host. Do not include
jdbc:xxxx://in the connection hostname property. An example of a connection hostname property isdatabase-1.123abc456ecs2.us-west-2.rds.amazonaws.com. Depending on the service environment, certain network access limitations may exist. For details, see Manage Networking for Confluent Cloud Connectors.Connection port: JDBC connection port for Microsoft SQL Server.
Connection user: JDBC connection user for Microsoft SQL Server.
Connection password: JDBC connection password for Microsoft SQL Server.
Database name: JDBC database name for Microsoft SQL Server.
SSL mode: The SSL mode to use to connect to your database.
Trust store: Upload the trust store file that contains the Certificate Authority (CA) information.
Trust store password: The trust store password containing server CA certificate. Only required if using
verify-caorverify-fullSSL mode.
Click Continue.
Table include list: List of tables to include in copying. Use comma-separated list of regular expressions or fully qualified table names to specify multiple tables (for example,
mydb.dbo.users, mydb.dbo.ordersor.*users.*, .*orders.*). For SQL Server, usedatabase.schema.tableformat (for example,mydb.dbo.users).Table exclude list: A comma-separated list of regular expressions that match the fully-qualified names of tables to be excluded from copying. Use a comma-separated list to specify multiple regular expressions. Table names are case-sensitive. For example,
table.exclude.list: schema1.customer.*,schema2.order.*. If specified,table.whitelistcannot be set.
Output messages
Select output record value format: Sets the output Kafka record value format. Valid entries are AVRO, JSON_SR, PROTOBUF, or JSON. Note that you need to have Confluent Cloud Schema Registry configured if using a schema-based message format like AVRO, JSON_SR, and PROTOBUF.
Database details
Table names (Deprecated): (Deprecated) List of tables to include in copying. Use a comma-separated list to specify multiple tables (for example: "User, Address, Email"). This is deprecated. Use table.include.list.
Table types: By default, the JDBC connector will only detect tables with type
TABLEfrom the source database. This config allows a command separated list of table types to extract.Database timezone: Name of the JDBC timezone used in the connector when querying with time-based criteria. Defaults to
UTC.
Data encryption
Enable Client-Side Field Level Encryption for data encryption. Specify a Service Account to access the Schema Registry and associated encryption rules or keys with that schema. For more information on CSFLE or CSPE setup, see Manage encryption for connectors.
Show advanced configurations
Schema context: Select a schema context to use for this connector, if using a schema-based data format. This property defaults to the Default context, which configures the connector to use the default schema set up for Schema Registry in your Confluent Cloud environment. A schema context allows you to use separate schemas (like schema sub-registries) tied to topics in different Kafka clusters that share the same Schema Registry environment. For example, if you select a non-default context, a Source connector uses only that schema context to register a schema and a Sink connector uses only that schema context to read from. For more information about setting up a schema context, see What are schema contexts and when should you use them?.
Mode: The mode for updating a table each time it is polled. Defaults to
bulkmode.Table to timestamp columns mappings: A comma-separated list of table regex to timestamp columns mappings. On specifying multiple timestamp columns, COALESCE SQL function would be used to find out the effective timestamp for a row. Expected format is
regex1:[col1|col2],regex2:[col3]. Regexes would be matched against the fully-qualified table names. Identifier names are case sensitive. Every table included for capture should match exactly one of the provided mappings. An example for a valid input would be.*\.customers.*:[updated_at|modified_at],.*\.orders.*:[changed_at].Numeric Mapping: Map NUMERIC values by precision and optionally scale to integral or decimal types.
Transaction Isolation Level: Isolation level determines how transaction integrity is visible to other users and systems.
DEFAULTis the default isolation level configured at the database server.READ_UNCOMMITTEDis the lowest isolation level. At this level, a transaction may see changes that are not committed (that is, dirty reads) made by other transactions.READ_COMMITTEDguarantees that any data read is already committed at the moment it is read.REPEATABLE_READadds to the guarantees of theREAD_COMMITTEDlevel with the addition of also guaranteeing that any data read cannot change, if the transaction reads the same data again. However, phantom reads are possible.SERIALIZABLEis the highest isolation level. In addition to everythingREPEATABLE_READguarantees,SERIALIZABLEalso eliminates phantom reads.SQL_SERVER_SNAPSHOTachieves the same results asSERIALIZABLE. However, instead of using locks, it uses row versioning.Table to incrementing column mappings: A comma-separated list of table regex to incrementing column mappings. Expected format is
regex1:col1,regex2:col2. Regexes would be matched against the fully-qualified table names. Identifier names are case sensitive. Every table included for capture should match exactly one of the provided mappings. An example for a valid input would be.*\.customers.*:id,.*\.orders.*:order_id.Quote SQL Identifiers: When to quote table names, column names, and other identifiers in SQL statements. For backward compatibility, the default value is
ALWAYS.Timestamp column name (Deprecated): (Deprecated legacy configuration. Use timestamp.columns.mapping for new implementations.) Comma separated list of one or more timestamp columns to detect new or modified rows using the COALESCE SQL function. Rows whose first non-null timestamp value is greater than the largest previous timestamp value seen will be discovered with each poll. At least one column should not be nullable.
Initial timestamp: The epoch timestamp used for initial queries that use timestamp criteria. The value -1 sets the initial timestamp to the current time. If not specified, the connector retrieves all data. Once the connector has managed to successfully record a source offset, this property has no effect even if changed to a different value later on.
Date Calendar System: The time elapsed from epoch populated in the end table topic for
DATEorTIMESTAMPtype columns can have two different values based upon the Calendar used to interpret it. IfLEGACYis used, it will use the hybrid Gregorian/Julian calendar which was the default in the older java date time APIs. However, if ‘PROLEPTIC_GREGORIAN’ is used, then it will use the proleptic gregorian calendar which extends the Gregorian rules backward indefinitely and does not apply the 1582 cutover. This matches the behavior of modern Java date/time APIs (java.time). This is defaulted to LEGACY for backward compatibility. Changing this configuration on an existing connector might lead to a drift in the Kafka topic record values.Incrementing column name (Deprecated): (Deprecated legacy configuration. Use incrementing.column.mapping for new implementations.) The name of the strictly incrementing column to use to detect new rows. Any empty value indicates the column should be autodetected by looking for an auto-incrementing column. This column may not be nullable.
Additional Configs
Value Converter Replace Null With Default: Specifies whether to replace fields that have a default value and that are null to the default value. When set to
true, the connector uses the default value; otherwise, it usesnull. Applies to theJSONconverter.Value Converter Reference Subject Name Strategy: Sets the subject reference name strategy for values. Valid entries are
DefaultReferenceSubjectNameStrategyorQualifiedReferenceSubjectNameStrategy. You can use this strategy only withPROTOBUFformat; the default strategy isDefaultReferenceSubjectNameStrategy.Value Converter Schemas Enable: Includes schema within each of the serialized values. Input messages must contain
schemaandpayloadfields and must not contain additional fields. For plainJSONdata, set this tofalse. Applies to theJSONconverter.Errors Tolerance: Use this property to configure the connector’s error handling behavior.
Warning
Use this property with caution for sink connectors, as it can lead to data loss. If you set this property to
all, the connector does not fail on errant records, but logs them (and sends to DLQ for sink connectors) and continues processing. If you set this property tonone, the connector task fails on errant records.Value Converter Ignore Default For Nullables: When set to
true, this property ensures that the corresponding record in Kafka isnull, instead of showing the default column value. Applies to theAVRO,PROTOBUF, andJSON_SRconverters.Value Converter Decimal Format: Specifies the
JSONorJSON_SRserialization format for ConnectDECIMALlogical type values with two allowed literals:BASE64to serializeDECIMALlogical types as base64 encoded binary data, andNUMERICto serializeDECIMALlogical type values inJSONorJSON_SRas a number representing the decimal value.Key Converter Schema ID Serializer: The class name of the schema ID serializer for keys. This is used to serialize schema IDs in the message headers.
Value Converter Connect Meta Data: Enables the Connect converter to add its metadata to the output schema. Applies to Avro converters.
Value Converter Value Subject Name Strategy: Determines how to construct the subject name under which the value schema is registered with Schema Registry.
Key Converter Key Subject Name Strategy: Determines how to construct the subject name for key schema registration.
Value Converter Schema ID Serializer: The class name of the schema ID serializer for values. This is used to serialize schema IDs in the message headers.
Auto-restart policy
Enable Connector Auto-restart: Enables the auto-restart behavior of the connector and its task in the event of user-actionable errors. Defaults to
true, enabling the connector to automatically restart in case of user-actionable errors. Set this property tofalseto disable auto-restart for failed connectors. If disabled, you must manually restart the connector.
Database details
Query Config: If specified, the connector uses this custom SQL query to read source records, which allows for operations like joining tables or selecting subsets of data. Providing a query instructs the connector to read only the result set instead of performing a full table copy. This configuration supports different query modes with the incremental query properly constructed by appending a
WHEREclause (for more information, see Incremental Query Modes). Note that onlySELECTstatements are supported. Always adhere to security best practices, like enforcing strict authorization using managed connector RBAC, applying appropriate network access controls for control plane APIs, and following the principle of least privilege when provisioning identities or credentials for any third-party systems.Schema pattern: Schema pattern to fetch table metadata from the database.
Timestamp granularity for timestamp columns: Defines the granularity of the Timestamp column.
CONNECT_LOGICAL(default) represents timestamp values using Connect’s built-in representations.NANOS_LONGrepresents timestamp values as nanoseconds (ns) since the epoch (UNIX epoch time).NANOS_STRINGrepresents timestamp values as ns since the epoch in string format.NANOS_ISO_DATETIME_STRINGrepresents timestamp values in ISO formatyyyy-MM-dd'T'HH:mm:ss.n.
Connection details
Poll interval (ms): Set the time in milliseconds to wait for new change events when no data is returned. Default is
500ms.Max rows per batch: The maximum number of rows to include in a single batch when polling for new data. This setting can be used to limit the amount of data buffered internally in the connector.
Delay interval (ms): The amount of time to wait after a row with a certain timestamp appears before the connector includes it in the result. Add a delay to allow transactions with an earlier timestamp to complete.
Transforms
Single Message Transformations: To add a new SMT, see Add transforms. For more information about unsupported SMTs, see Unsupported transformations.
Processing position
Set offsets: Click Set offsets to define a specific offset for this connector to begin procession data from. For more information on managing offsets, see Manage offsets.
For all property values and definitions, see Configuration Properties.
Click Continue.
Based on the number of topic partitions you select, you will be provided with a recommended number of tasks.
To change the number of tasks, use the Range Slider to select the desired number of tasks.
Click Continue.
Verify the connection details by previewing the running configuration.
Tip
For information about previewing your connector output, see Data Previews for Confluent Cloud Connectors.
After you’ve validated that the properties are configured to your satisfaction, click Launch.
The status for the connector should go from Provisioning to Running.

Step 5: Check the Kafka topic
After the connector is running, verify that messages are populating your Kafka topic.
For more information and examples to use with the Confluent Cloud API for Connect, see the Confluent Cloud API for Connect Usage Examples section.
Using the Confluent CLI
Complete the following steps to set up and run the connector using the Confluent CLI.
Note
Make sure you have all your prerequisites completed.
Step 1: List the available connectors
Enter the following command to list available connectors:
confluent connect plugin list
Step 2: List the connector configuration properties
Enter the following command to show the connector configuration properties:
confluent connect plugin describe <connector-plugin-name>
The command output shows the required and optional configuration properties.
Step 3: Create the connector configuration file
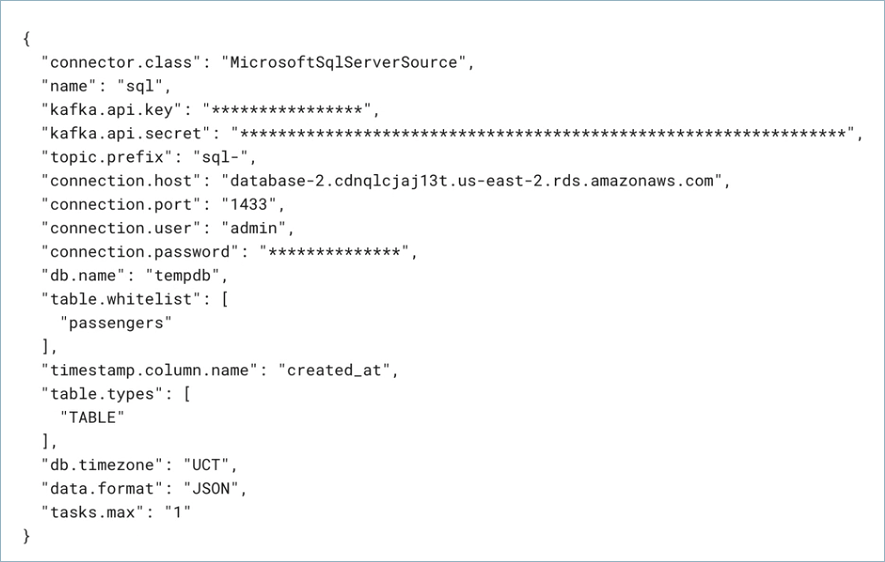
Create a JSON file that contains the connector configuration properties. The following example shows the required connector properties.
{
"name" : "confluent-microsoft-sql-source",
"connector.class": "MicrosoftSqlServerSource",
"kafka.auth.mode": "KAFKA_API_KEY",
"kafka.api.key": "<my-kafka-api-key>",
"kafka.api.secret" : "<my-kafka-api-secret>",
"topic.prefix" : "microsoftsql_",
"connection.host" : "<my-database-endpoint>",
"connection.port" : "1433",
"connection.user" : "<database-username>",
"connection.password": "<database-password>",
"db.name": "ms-sql-test",
"table.include.list": ".*passengers.*",
"timestamp.columns.mapping": ".*passengers.*:[created_at]",
"output.data.format": "JSON",
"db.timezone": "UTC",
"tasks.max" : "1"
}
Note the following property definitions:
"kafka.auth.mode": Identifies the connector authentication mode you want to use. There are two options:SERVICE_ACCOUNTorKAFKA_API_KEY(the default). To use an API key and secret, specify the configuration propertieskafka.api.keyandkafka.api.secret, as shown in the example configuration (above). To use a service account, specify the Resource ID in the propertykafka.service.account.id=<service-account-resource-ID>. To list the available service account resource IDs, use the following command:confluent iam service-account list
For example:
confluent iam service-account list Id | Resource ID | Name | Description +---------+-------------+-------------------+------------------- 123456 | sa-l1r23m | sa-1 | Service account 1 789101 | sa-l4d56p | sa-2 | Service account 2
"topic.prefix": Enter a topic prefix. The connector automatically creates Kafka topics using the naming convention:<topic.prefix><tableName>. The tables are created with the properties:topic.creation.default.partitions=1andtopic.creation.default.replication.factor=3. If you want to create topics with specific settings, create the topics before running this connector. If you are configuring granular access using a service account, you must set up ACLs for the topic prefix.Important
If you are configuring granular access using a service account, and you leave the optional Topic prefix (
topic.prefix) configuration property empty, you must grant ACLCREATEandWRITEaccess to all the Kafka topics or create RBAC role bindings. To add ACLs, you use the (*) wildcard in the ACL entries as shown in the following examples.confluent kafka acl create --allow --service-account "<service-account-id>" --operation create --topic "*"
confluent kafka acl create --allow --service-account
"<service-account-id>" --operation write --topic "*"
The following provides more information about how to use the
ssl.modeproperty:The default option
preferis enabled ifssl.modeis not added to the connector configuration. Whenpreferis enabled, the connector attempts to use an encrypted connection to the database server.preferandrequire: use a secure (encrypted) connection. The connector fails if a secure connection cannot be established. These modes do not do Certification Authority (CA) validation.verify-ca: similar torequire, but also verifies the server TLS certificate against the configured Certificate Authority (CA) certificates. Fails if no valid matching CA certificates are found.verify-full: similar toverify-ca, but also verifies that the server certificate matches the host to which the connection is attempted.
If you choose
verify-caorverify-full, use the propertyssl.rootcertfileand add the contents of the text certificate file for the property value. For example,"ssl.rootcertfile": "<certificate-text>".The following provides more information about how to use the
timestamp.column.nameandincrementing.column.nameproperties.Enter a
timestamp.column.nameto enable timestamp mode. This mode uses a timestamp (or timestamp-like) column to detect new and modified rows. This assumes the column is updated with each write, and that values are monotonically incrementing, but not necessarily unique.Enter both a
timestamp.column.nameand anincrementing.column.nameto enable timestamp+incrementing mode. This mode uses two columns, a timestamp column that detects new and modified rows, and a strictly incrementing column which provides a globally unique ID for updates so each row can be assigned a unique stream offset. By default, the connector only detectstable.typeswith typeTABLEfrom the source database. EnterVIEWfor virtual tables created from joining one or more tables. EnterALIASfor tables with a shortened or temporary name.
If you define a schema pattern in your database, you need to enter the
schema.patternproperty to fetch table metadata from the database.""retrieves table metadata for tables not using a schema.null(default) indicates that the schema name is not used to narrow the search and that all table metadata is fetched, regardless of the schema."output.data.format": Sets the output Kafka record value format (data coming from the connector). Valid entries are AVRO, JSON_SR, PROTOBUF, JSON, or STRING. You must have Confluent Cloud Schema Registry configured if using a schema-based message format (for example, Avro, JSON_SR (JSON Schema), or Protobuf)."db.timezone": Identifies the database timezone. This can be any valid database timezone. The default is UTC. For more information, see this list of database timezones.
Note
To enable CSFLE or CSPE for data encryption, specify the following properties:
csfle.enabled: Flag to indicate whether the connector honors CSFLE or CSPE rules.sr.service.account.id: A Service Account to access the Schema Registry and associated encryption rules or keys with that schema.
For more information on CSFLE or CSPE setup, see Manage encryption for connectors.
SMTs: For details about adding SMTs using the Confluent CLI, see the Single Message Transformations documentation.
See Configuration Properties for all property values and definitions.
Step 4: Load the properties file and create the connector
Enter the following command to load the configuration and start the connector:
confluent connect cluster create --config-file <file-name>.json
For example:
confluent connect cluster create --config-file microsoft-sql-source.json
Example output:
Created connector confluent-microsoft-sql-source lcc-ix4dl
Step 5: Check the connector status
Enter the following command to check the connector status:
confluent connect cluster list
Example output:
ID          |            Name                | Status  |  Type
+-----------+--------------------------------+---------+-------+
lcc-ix4dl   | confluent-microsoft-sql-source | RUNNING | source
Step 6: Check the Kafka topic.
After the connector is running, verify that messages are populating your Kafka topic.
For more information and examples to use with the Confluent Cloud API for Connect, see the Confluent Cloud API for Connect Usage Examples section.
Configuration Properties
Use the following configuration properties with the fully-managed connector. For self-managed connector property definitions and other details, see the connector docs in Self-managed connectors for Confluent Platform.
How should we connect to your data?
nameSets a name for your connector.
Type: string
Valid Values: A string at most 64 characters long
Importance: high
Kafka Cluster credentials
kafka.auth.modeKafka Authentication mode. It can be one of KAFKA_API_KEY or SERVICE_ACCOUNT. It defaults to KAFKA_API_KEY mode, whenever possible.
Type: string
Valid Values: SERVICE_ACCOUNT, KAFKA_API_KEY
Importance: high
kafka.api.keyKafka API Key. Required when kafka.auth.mode==KAFKA_API_KEY.
Type: password
Importance: high
kafka.service.account.idThe Service Account that will be used to generate the API keys to communicate with Kafka Cluster.
Type: string
Importance: high
kafka.api.secretSecret associated with Kafka API key. Required when kafka.auth.mode==KAFKA_API_KEY.
Type: password
Importance: high
Schema Config
schema.context.nameAdd a schema context name. A schema context represents an independent scope in Schema Registry. It is a separate sub-schema tied to topics in different Kafka clusters that share the same Schema Registry instance. If not used, the connector uses the default schema configured for Schema Registry in your Confluent Cloud environment.
Type: string
Default: default
Importance: medium
How do you want to prefix table names?
topic.prefixPrefix to prepend to table names to generate the name of the Apache Kafka® topic to publish data to.
Type: string
Importance: high
Authentication method
authentication.methodSelect how you want to authenticate with your database.
Type: string
Default: Password
Importance: high
secret.manager.enabledFetch sensitive configuration values from a secret manager.
Type: boolean
Default: false
Importance: high
Azure credentials
provider.integration.idAzure provider-integration to mint Microsoft Entra ID application tokens.
Type: string
Importance: high
Secret manager configuration
secret.managerSelect the secret manager to use for retrieving sensitive data.
Type: string
Importance: high
secret.manager.managed.configsSelect the configurations to fetch their values from the secret manager.
Type: list
Importance: high
secret.manager.provider.integration.idSelect an existing provider integration that has access to your secret manager.
Type: string
Importance: high
How should we connect to your database?
connection.hostDepending on the service environment, certain network access limitations may exist. Make sure the connector can reach your service. Do not include jdbc:xxxx:// in the connection hostname property (e.g. database-1.abc234ec2.us-west.rds.amazonaws.com).
Type: string
Importance: high
connection.portJDBC connection port.
Type: int
Valid Values: [0,…,65535]
Importance: high
connection.userJDBC connection user.
Type: string
Importance: high
connection.passwordJDBC connection password.
Type: password
Importance: high
db.nameJDBC database name.
Type: string
Importance: high
ssl.modeWhat SSL mode should we use to connect to your database.
preferallows for the connection to not be encrypted andrequireallows for the connection to be encrypted but does not do certificate validation on the server.verify-caandverify-fullrequire a file containing SSL CA certificate to be provided. The server’s certificate will be verified to be signed by one of these authorities.``verify-ca`` will verify that the server certificate is issued by a trusted CA.verify-fullwill verify that the server certificate is issued by a trusted CA and that the server hostname matches that in the certificate. Client authentication is not performed.Type: string
Default: prefer
Importance: high
ssl.truststorefileThe binary trust store file that contains the server’s CA certificate. Only required if you use verify-ca or verify-full ssl mode. The connector supports files in JKS format. For REST API usage, you must base64-encode the binary trust store file and prefix it with
data:text/plain;base64,. For example, first, encode the filebase64_truststore=$(cat /path/to/truststore.jks | base64)and then usedata:text/plain;base64,$base64_truststoreas the value.Type: password
Default: [hidden]
Importance: low
ssl.truststorepasswordThe trust store password containing server CA certificate. Only required if using verify-ca or verify-full ssl mode.
Type: password
Default: [hidden]
Importance: low
Database details
table.whitelist(Deprecated) List of tables to include in copying. Use a comma-separated list to specify multiple tables (for example: “User, Address, Email”). This is deprecated, please use table.include.list.
Type: list
Importance: medium
table.include.listA comma-separated list of regular expressions that match the fully-qualified names of tables to be copied. Use a comma-separated list to specify multiple regular expressions. Table names are case-sensitive. For example,
table.include.list: schema1.customer.*,schema2.order.*. If specified,table.whitelistcannot be set.Type: list
Importance: medium
table.exclude.listA comma-separated list of regular expressions that match the fully-qualified names of tables to be excluded from copying. Use a comma-separated list to specify multiple regular expressions. Table names are case-sensitive. For example,
table.exclude.list: schema1.customer.*,schema2.order.*. If specified,table.whitelistcannot not be set.Type: list
Importance: medium
queryIf specified, the connector uses this custom SQL query to read source records, which allows for operations like joining tables or selecting subsets of data. Providing a query instructs the connector to read only the result set instead of performing a full table copy. This configuration supports different query modes with the incremental query properly constructed by appending a WHERE clause (For more information, Incremental Query Modes - <https://docs.confluent.io/kafka-connectors/jdbc/current/source-connector/overview.html#incremental-query-modes>). Note that only SELECT statements are supported. Always adhere to security best practices, like enforcing strict authorization via <https://docs.confluent.io/cloud/current/connectors/managed-connector-rbac.html#managed-connector-rbac>, applying appropriate :ref: network access controls - <https://docs.confluent.io/cloud/current/security/access-control/ip-filtering/manage-ip-filters.html> for control plane APIs, and following the principle of least privilege when provisioning identities or credentials for any third-party systems.
Type: password
Default: [hidden]
Importance: medium
table.typesBy default, the JDBC connector will only detect tables with type TABLE from the source Database. This config allows a command separated list of table types to extract.
Type: list
Default: TABLE
Importance: medium
schema.patternSchema pattern to fetch table metadata from the database.
Type: string
Importance: medium
db.timezoneName of the JDBC timezone used in the connector when querying with time-based criteria. Defaults to UTC.
Type: string
Default: UTC
Importance: medium
numeric.mappingMap NUMERIC values by precision and optionally scale to integral or decimal types. Use
noneif all NUMERIC columns are to be represented by Connect’s DECIMAL logical type. Usebest_fitif NUMERIC columns should be cast to Connect’s INT8, INT16, INT32, INT64, or FLOAT64 based upon the column’s precision and scale. Usebest_fit_eager_doubleif, in addition to the properties of best_fit described above, it is desirable to always cast NUMERIC columns with scale to Connect FLOAT64 type, despite potential of loss in accuracy. Useprecision_onlyto map NUMERIC columns based only on the column’s precision assuming that column’s scale is 0. Thenoneoption is the default, but may lead to serialization issues with Avro since Connect’s DECIMAL type is mapped to its binary representation, andbest_fitwill often be preferred since it maps to the most appropriate primitive type.Type: string
Default: none
Importance: low
timestamp.granularityDefine the granularity of the Timestamp column. CONNECT_LOGICAL (default): represents timestamp values using Kafka Connect built-in representations. MICROS_LONG: represents timestamp values as micros since epoch. MICROS_STRING: represents timestamp values as micros since epoch in string. MICROS_ISO_DATETIME_STRING: uses iso format for timestamps in micros. NANOS_LONG: represents timestamp values as nanos since epoch. NANOS_STRING: represents timestamp values as nanos since epoch in string. NANOS_ISO_DATETIME_STRING: uses iso format
Type: string
Default: CONNECT_LOGICAL
Importance: low
Mode
modeThe mode for updating a table each time it is polled.
BULK: perform a bulk load of the entire table each time it is polled.TIMESTAMP: use a timestamp (or timestamp-like) column to detect new and modified rows. This assumes the column is updated with each write, and that values are monotonically incrementing, but not necessarily unique.INCREMENTING: use a strictly incrementing column on each table to detect only new rows. Note that this will not detect modifications or deletions of existing rows.TIMESTAMP AND INCREMENTING: use two columns, a timestamp column that detects new and modified rows and a strictly incrementing column which provides a globally unique ID for updates so each row can be assigned a unique stream offset.Type: string
Default: “”
Importance: medium
timestamp.columns.mappingA comma-separated list of table regex to timestamp columns mappings. On specifying multiple timestamp columns, COALESCE SQL function would be used to find out the effective timestamp for a row. Expected format is
regex1:[col1|col2],regex2:[col3]. Regexes would be matched against the fully-qualified table names. Identifier names are case sensitive. Every table included for capture should match exactly one of the provided mappings. An example for a valid input would be.*\.customers.*:[updated_at|modified_at],.*\.orders.*:[changed_at].Type: list
Importance: medium
incrementing.column.mappingA comma-separated list of table regex to incrementing column mappings. Expected format is
regex1:col1,regex2:col2. Regexes would be matched against the fully-qualified table names. Identifier names are case sensitive. Every table included for capture should match exactly one of the provided mappings. An example for a valid input would be.*\.customers.*:id,.*\.orders.*:order_id.Type: list
Importance: medium
transaction.isolation.modeIsolation level determines how transaction integrity is visible to other users and systems. DEFAULT: This is the default isolation level configured at the Database Server. READ_UNCOMMITTED: This is the lowest isolation level. At this level, one transaction may see dirty reads (that is, not-yet-committed changes made by other transactions). READ_COMMITTED: This level guarantees that any data read is already committed at the moment it is read. REPEATABLE_READ: In addition to the guarantees of the READ_COMMITTED level, this option also guarantees that any data read cannot change, if the transaction reads the same data again. However, phantom reads are possible. SERIALIZABLE: This is the highest isolation level. In addition to everything REPEATABLE_READ guarantees, it also eliminates phantom reads. SQL_SERVER_SNAPSHOT: This option achieves the same results as SERIALIZABLE. However, instead of using locks, it uses row versioning.
Type: string
Default: DEFAULT
Valid Values: DEFAULT, READ_COMMITTED, READ_UNCOMMITTED, REPEATABLE_READ, SERIALIZABLE, SQL_SERVER_SNAPSHOT
Importance: medium
timestamp.column.name(Deprecated legacy configuration. Use timestamp.columns.mapping for new implementations.) Comma separated list of one or more timestamp columns to detect new or modified rows using the COALESCE SQL function. Rows whose first non-null timestamp value is greater than the largest previous timestamp value seen will be discovered with each poll. At least one column should not be nullable.
Type: list
Importance: medium
quote.sql.identifiersWhen to quote table names, column names, and other identifiers in SQL statements. For backward compatibility, the default value is ALWAYS.
Type: string
Default: ALWAYS
Valid Values: ALWAYS, NEVER
Importance: medium
incrementing.column.name(Deprecated legacy configuration. Use incrementing.column.mapping for new implementations.) The name of the strictly incrementing column to use to detect new rows. Any empty value indicates the column should be autodetected by looking for an auto-incrementing column. This column may not be nullable.
Type: string
Default: “”
Importance: medium
timestamp.initialThe epoch timestamp used for initial queries that use timestamp criteria. The value
-1sets the initial timestamp to the current time. If not specified, the connector retrieves all data. Once the connector has managed to successfully record a source offset, this property has no effect even if changed to a different value later on.Type: long
Valid Values: [-1,…]
Importance: medium
date.calendar.systemThe time elapsed from epoch populated in the end table topic for DATE or TIMESTAMP type columns can have two different values based upon the Calendar used to interpret it. If
LEGACYis used, it will use the hybrid Gregorian/Julian calendar which was the default in the older java date time APIs. However, ifPROLEPTIC_GREGORIANis used, then it will use the proleptic gregorian calendar which extends the Gregorian rules backward indefinitely and does not apply the 1582 cutover. This matches the behavior of modern Java date/time APIs (java.time). This is defaulted to LEGACY for backward compatibility. Changing this configuration on an existing connector might lead to a drift in the kafka topic record values.Type: string
Default: LEGACY
Importance: medium
Connection details
poll.interval.msFrequency in ms to poll for new data in each table.
Type: int
Default: 5000 (5 seconds)
Valid Values: [100,…]
Importance: high
batch.max.rowsMaximum number of rows to include in a single batch when polling for new data. This setting can be used to limit the amount of data buffered internally in the connector.
Type: int
Default: 100
Valid Values: [1,…,5000]
Importance: low
timestamp.delay.interval.msHow long to wait after a row with a certain timestamp appears before we include it in the result. You may choose to add some delay to allow transactions with an earlier timestamp to complete. The first execution will fetch all available records (starting at timestamp 0) until current time minus the delay. Every following execution will get data from the last time we fetched until current time minus the delay.
Type: int
Default: 0
Valid Values: [0,…]
Importance: high
Output messages
output.data.formatSets the output Kafka record value format. Valid entries are AVRO, JSON_SR, PROTOBUF, JSON, or STRING. Note that you need to have Confluent Cloud Schema Registry configured if using a schema-based message format like AVRO, JSON_SR, and PROTOBUF
Type: string
Default: JSON
Importance: high
Number of tasks for this connector
tasks.maxMaximum number of tasks for the connector.
Type: int
Valid Values: [1,…]
Importance: high
Additional Configs
header.converterThe converter class for the headers. This is used to serialize and deserialize the headers of the messages.
Type: string
Importance: low
producer.override.compression.typeThe compression type for all data generated by the producer. Valid values are none, gzip, snappy, lz4, and zstd.
Type: string
Importance: low
producer.override.linger.msThe producer groups together any records that arrive in between request transmissions into a single batched request. More details can be found in the documentation: https://docs.confluent.io/platform/current/installation/configuration/producer-configs.html#linger-ms.
Type: long
Valid Values: [100,…,1000]
Importance: low
value.converter.allow.optional.map.keysAllow optional string map key when converting from Connect Schema to Avro Schema. Applicable for Avro Converters.
Type: boolean
Importance: low
value.converter.auto.register.schemasSpecify if the Serializer should attempt to register the Schema.
Type: boolean
Importance: low
value.converter.connect.meta.dataAllow the Connect converter to add its metadata to the output schema. Applicable for Avro Converters.
Type: boolean
Importance: low
value.converter.enhanced.avro.schema.supportEnable enhanced schema support to preserve package information and Enums. Applicable for Avro Converters.
Type: boolean
Importance: low
value.converter.enhanced.protobuf.schema.supportEnable enhanced schema support to preserve package information. Applicable for Protobuf Converters.
Type: boolean
Importance: low
value.converter.flatten.unionsWhether to flatten unions (oneofs). Applicable for Protobuf Converters.
Type: boolean
Importance: low
value.converter.generate.index.for.unionsWhether to generate an index suffix for unions. Applicable for Protobuf Converters.
Type: boolean
Importance: low
value.converter.generate.struct.for.nullsWhether to generate a struct variable for null values. Applicable for Protobuf Converters.
Type: boolean
Importance: low
value.converter.int.for.enumsWhether to represent enums as integers. Applicable for Protobuf Converters.
Type: boolean
Importance: low
value.converter.latest.compatibility.strictVerify latest subject version is backward compatible when use.latest.version is true.
Type: boolean
Importance: low
value.converter.object.additional.propertiesWhether to allow additional properties for object schemas. Applicable for JSON_SR Converters.
Type: boolean
Importance: low
value.converter.optional.for.nullablesWhether nullable fields should be specified with an optional label. Applicable for Protobuf Converters.
Type: boolean
Importance: low
value.converter.optional.for.proto2Whether proto2 optionals are supported. Applicable for Protobuf Converters.
Type: boolean
Importance: low
value.converter.scrub.invalid.namesWhether to scrub invalid names by replacing invalid characters with valid characters. Applicable for Avro and Protobuf Converters.
Type: boolean
Importance: low
value.converter.use.latest.versionUse latest version of schema in subject for serialization when auto.register.schemas is false.
Type: boolean
Importance: low
value.converter.use.optional.for.nonrequiredWhether to set non-required properties to be optional. Applicable for JSON_SR Converters.
Type: boolean
Importance: low
value.converter.wrapper.for.nullablesWhether nullable fields should use primitive wrapper messages. Applicable for Protobuf Converters.
Type: boolean
Importance: low
value.converter.wrapper.for.raw.primitivesWhether a wrapper message should be interpreted as a raw primitive at root level. Applicable for Protobuf Converters.
Type: boolean
Importance: low
errors.toleranceUse this property if you would like to configure the connector’s error handling behavior. WARNING: This property should be used with CAUTION for SOURCE CONNECTORS as it may lead to dataloss. If you set this property to ‘all’, the connector will not fail on errant records, but will instead log them (and send to DLQ for Sink Connectors) and continue processing. If you set this property to ‘none’, the connector task will fail on errant records.
Type: string
Default: none
Importance: low
key.converter.key.schema.id.serializerThe class name of the schema ID serializer for keys. This is used to serialize schema IDs in the message headers.
Type: string
Default: io.confluent.kafka.serializers.schema.id.PrefixSchemaIdSerializer
Importance: low
key.converter.key.subject.name.strategyHow to construct the subject name for key schema registration.
Type: string
Default: TopicNameStrategy
Importance: low
value.converter.decimal.formatSpecify the JSON/JSON_SR serialization format for Connect DECIMAL logical type values with two allowed literals:
BASE64 to serialize DECIMAL logical types as base64 encoded binary data and
NUMERIC to serialize Connect DECIMAL logical type values in JSON/JSON_SR as a number representing the decimal value.
Type: string
Default: BASE64
Importance: low
value.converter.flatten.singleton.unionsWhether to flatten singleton unions. Applicable for Avro and JSON_SR Converters.
Type: boolean
Default: false
Importance: low
value.converter.ignore.default.for.nullablesWhen set to true, this property ensures that the corresponding record in Kafka is NULL, instead of showing the default column value. Applicable for AVRO,PROTOBUF and JSON_SR Converters.
Type: boolean
Default: false
Importance: low
value.converter.reference.subject.name.strategySet the subject reference name strategy for value. Valid entries are DefaultReferenceSubjectNameStrategy or QualifiedReferenceSubjectNameStrategy. Note that the subject reference name strategy can be selected only for PROTOBUF format with the default strategy being DefaultReferenceSubjectNameStrategy.
Type: string
Default: DefaultReferenceSubjectNameStrategy
Importance: low
value.converter.replace.null.with.defaultWhether to replace fields that have a default value and that are null to the default value. When set to true, the default value is used, otherwise null is used. Applicable for JSON Converter.
Type: boolean
Default: true
Importance: low
value.converter.schemas.enableWhen true, the JsonConverter writes each record to Kafka as a {schema, payload} envelope so downstream consumers can interpret the value with its schema. When false, only the payload (plain JSON) is written. Applicable for JSON Converter.
Type: boolean
Default: false
Importance: low
value.converter.value.schema.id.serializerThe class name of the schema ID serializer for values. This is used to serialize schema IDs in the message headers.
Type: string
Default: io.confluent.kafka.serializers.schema.id.PrefixSchemaIdSerializer
Importance: low
value.converter.value.subject.name.strategyDetermines how to construct the subject name under which the value schema is registered with Schema Registry.
Type: string
Default: TopicNameStrategy
Importance: low
Auto-restart policy
auto.restart.on.user.errorEnable connector to automatically restart on user-actionable errors.
Type: boolean
Default: true
Importance: medium
Frequently asked questions
Find answers to frequently asked questions about the Microsoft SQL Server Source connector for Confluent Cloud.
How do I connect to a self-hosted SQL Server database from Confluent Cloud?
To connect the fully-managed Microsoft SQL Server Source connector to a self-hosted SQL Server database, you must configure private networking using egress endpoints:
Create a PrivateLink egress endpoint: In the Cloud Console, navigate to your environment and create an egress PrivateLink endpoint that connects to your SQL Server database.
Configure the endpoint service: Ensure your SQL Server database is accessible through an Amazon PrivateLink endpoint service, Azure Private Link service, or Google Cloud Private Service Connect.
Update the connector configuration: In the
Connection hostproperty, use the DNS name of the egress endpoint instead of a public IP address or hostname.Verify connectivity: Ensure the egress endpoint status is
Readybefore creating the connector. You can verify this in the Cloud Console under Networking > Egress.
Important
The egress endpoint must be in the same region as your Kafka cluster. Cross-region egress is not supported.
For detailed setup instructions, see Manage Networking for Confluent Cloud Connectors.
Why is my connector receiving duplicate records?
The connector can produce duplicate records in the Kafka topic when using timestamp mode with an incorrect column type or nullable timestamp columns.
Common causes and solutions:
Using datetime instead of datetime2: On SQL Server 2016 and later, the connector rejects
datetimecolumns configured as timestamp columns and throws the following error:A DATETIME column is configured for timestamp.column.name with Sql Server. DATETIME is not supported. Use DATETIME2 instead.This restriction exists because a precision casting mismatch between JDBC and SQL Server 2016+ causes the connector to loop infinitely on the same record. JDBC casts to higher precision non-recursively, for example
3.330000ms, while SQL Server 2016+ casts recursively, for example3.333333ms. This disparity prevents the connector from advancing past the current offset.Verify the column type:
SELECT COLUMN_NAME, DATA_TYPE
FROM INFORMATION_SCHEMA.COLUMNS
WHERE TABLE_NAME = 'your_table' AND COLUMN_NAME = 'your_timestamp_column';
If the column uses
datetime, alter it todatetime2:ALTER TABLE your_table ALTER COLUMN your_timestamp_column datetime2;
Nullable timestamp column: If you configure a single timestamp column, it should be
NOT NULL. ANULLvalue causes the row to be skipped rather than duplicated, becauseNULLcannot satisfy the> last_timestampcomparison in the connector’s WHERE clause.If you configure multiple timestamp columns, the connector uses the SQL
COALESCEfunction to select the first non-null value. In this case, at least one of the configured columns should not be nullable.Verify and update the column constraint:
ALTER TABLE your_table
ALTER COLUMN your_timestamp_column datetime2 NOT NULL;
Future timestamps: The connector uses the database server’s current time minus
timestamp.delay.interval.msas the upper bound of its query. Records with timestamps ahead of the database clock are excluded from query results until the clock catches up, which appears as a delivery delay rather than duplicate records.Ensure your application does not write future timestamps to the timestamp column, and verify that
db.timezoneis configured to match the timezone used by your SQL Server instance.
Important
On SQL Server 2016 and later, datetime columns are not supported as timestamp columns. The connector validates the column type at startup and rejects datetime with a ConnectException. Use datetime2 instead, which provides nanosecond-level precision compatible with the JDBC driver.
Why is my connector not detecting new or updated records?
The connector may miss records if you have not configured the timestamp or incrementing columns correctly.
Common causes and solutions:
Timestamp column not updated: The timestamp column must be updated every time a row is modified:
Ensure your application or database triggers update the timestamp column on every
UPDATEoperation. Verify with a test update:UPDATE your_table SET your_column = 'value' WHERE id = 1; SELECT your_timestamp_column FROM your_table WHERE id = 1;
If the timestamp did not change, add a trigger or modify your application to update it.
Wrong timestamp mode: Using
timestampmode when you needtimestamp+incrementingmode.timestampmode configuration:{ "timestamp.column.name": "updated_at" }
timestamp+incrementingmode configuration:{ "timestamp.column.name": "updated_at", "incrementing.column.name": "id" }
Use
timestamp+incrementingmode to ensure each row receives a globally unique stream offset. This is required when multiple rows can share the same timestamp value and you need to guarantee that no rows are missed or duplicated during ingestion.Poll interval too long: The
poll.interval.msproperty controls how frequently the connector queries the database:Reduce the poll interval to check more frequently:
{
  "poll.interval.ms": "5000"
}
The default is
5000milliseconds.Timestamp delay interval: The
timestamp.delay.interval.msproperty adds a delay before querying recent records:If this value is too high, recent records may appear delayed. Adjust it:
{
  "timestamp.delay.interval.ms": "0"
}
Note
The
timestamp.delay.interval.msproperty subtracts the configured delay from the database server’s current time to set the query’s upper bound. This allows in-flight transactions with earlier timestamps to commit before the connector reads them, preventing missed records due to uncommitted writes.
Note
When using timestamp mode, the timestamp column must be monotonically increasing and updated on every row modification. The connector does not detect DELETE operations in any mode.
What SQL Server user permissions are required for the connector?
The SQL Server database user specified in Connection user must have specific permissions to read data and table metadata.
Required permissions:
Database access: Grant connection and basic permissions:
USE YourDatabase;
GO
CREATE LOGIN connector_user WITH PASSWORD = 'YourPassword';
GO
CREATE USER connector_user FOR LOGIN connector_user;
GO
Table read permissions: Grant
SELECTon tables or schemas:GRANT SELECT ON SCHEMA::dbo TO connector_user; GO
Alternatively, grant on specific tables:
GRANT SELECT ON dbo.your_table TO connector_user;
GO
Metadata access: The connector uses standard JDBC metadata APIs —
DatabaseMetaData.getTables,getColumns, andgetPrimaryKeys— and queriessys.synonymsfor synonym support. These operations requireSELECTpermission on the tables being accessed and membership in thepublicdatabase role. In restrictive environments, you may also need to grant access to the synonyms view:GRANT SELECT ON sys.synonyms TO connector_user; GO
VIEW DEFINITIONis generally not required unless your security policy restricts access to system catalog views.Verify permissions: Check granted permissions:
SELECT
  USER_NAME(grantee_principal_id) AS UserName,
  permission_name,
  state_desc
FROM sys.database_permissions
WHERE USER_NAME(grantee_principal_id) = 'connector_user';
Note
For Azure SQL Database, permissions are managed similarly. Use ALTER ROLE db_datareader ADD MEMBER connector_user for read permissions.
How do I filter which tables the connector reads from?
Use the table.include.list property to specify which tables the connector should monitor.
Table filtering configuration:
Include specific tables: Provide a comma-separated list of regular expressions that match the fully-qualified names of the tables to include. Table names are case-sensitive. Because values are treated as regular expressions, use
\\.to match a literal dot. An unescaped.matches any character.{ "table.include.list": "dbo\\.customers,dbo\\.orders" }
This includes only the
customersandorderstables from thedboschema.Include tables with pattern matching: Use regex patterns:
{
  "table.include.list": ".*customers.*,.*orders.*"
}
This includes all tables containing
customersorordersin the name.Exclude tables: Use
table.exclude.listto exclude specific tables:{ "table.include.list": "dbo.*", "table.exclude.list": "dbo.temp.*,dbo.audit.*" }
This includes all tables in
dboschema except those starting withtemporaudit.Note
The
table.exclude.listproperty requirestable.include.listto also be specified. It cannot be used alone to exclude tables. Iftable.include.listis specified, the legacytable.whitelistandtable.blacklistproperties cannot be set.Use schema pattern: If you have multiple schemas, filter by schema:
{
  "schema.pattern": "dbo",
  "table.include.list": "customers,orders"
}
The
schema.patternproperty narrows the search to specific schemas.
Important
The schema.pattern property uses JDBC metadata pattern matching with % and _ wildcards, not regular expressions. The default value is null (all schemas), which is applied by omitting the property from the connector configuration. Use "" (empty string) to match only tables without a schema. For SQL Server, the connector defaults to the dbo schema when no schema is specified in table identifiers.
Why are my Kafka topics not being created automatically?
The connector creates topics automatically using the naming convention <topic.prefix><tableName>, but topic creation can fail due to permissions or configuration issues.
Common causes and solutions:
Missing topic prefix: The
topic.prefixproperty is required:Configure a topic prefix:
{
  "topic.prefix": "sqlserver_"
}
Topics are created as
sqlserver_tablename.Insufficient ACL permissions: The service account needs permissions to create topics:
If using a service account with granular ACLs, grant
CREATEpermission on topic prefix. For details, see JDBC-based Source Connectors and the MongoDB Atlas Source Connector.Empty topic prefix with ACLs: If
topic.prefixis empty and you use granular ACLs, additional configuration is required:For empty topic prefix ACL requirements, see the prerequisites.
Table name character restrictions: The connector constructs the topic name by concatenating
topic.prefixwith the table name. If the resulting topic name contains characters that are invalid for Kafka topics (only ASCII alphanumerics,.,_, and-are permitted), the connector fails to produce records. Rename the source table or use a custom query with an explicittopic.prefixto avoid this issue.Topic already exists with different settings: If topics were created manually with different partition or replication settings:
The default topic settings are determined by the Confluent Cloud platform configuration. Pre-create topics if you need specific partition counts or replication settings.
Note
Topics are created automatically during the first poll. Check the connector logs if topics are not appearing.
How can I optimize connector performance and reduce database load?
You can tune connector performance using poll interval, batch size, and timestamp delay settings.
Performance optimization:
Adjust poll interval: Control how frequently the connector queries the database:
{
  "poll.interval.ms": "10000"
}
Increase the interval to reduce database load. The default is
5000milliseconds.Increase batch size: Fetch more rows per query:
{
  "batch.max.rows": "500"
}
Larger batch sizes reduce the number of queries but use more memory. The default is
100rows.Use timestamp delay: Add a delay before querying recent records to avoid missing updates:
{
  "timestamp.delay.interval.ms": "1000"
}
This delays querying records by 1 second to ensure all updates are committed.
Optimize database indexes: Ensure indexes exist on timestamp and incrementing columns:
CREATE INDEX idx_timestamp ON your_table(updated_at);
CREATE INDEX idx_id ON your_table(id);
Use table filtering: Only monitor tables you need:
{
  "table.include.list": "critical_table1,critical_table2"
}
Reduces the number of tables the connector polls.
Monitor database performance: Check SQL Server metrics:
Query execution time: Monitor query duration in SQL Server logs.
Lock waits: Check for blocking queries.
Transaction log size: Ensure adequate log space.
CPU and memory: Monitor resource utilization.
Note
Balance poll frequency with database load. For high-volume tables, consider increasing batch.max.rows and poll.interval.ms.
How do I reset or modify connector offsets?
The connector supports offset management to reset or modify the starting point for data ingestion.
To view, reset, or modify connector offsets, see Manage custom offsets.
Important
Resetting offsets causes the connector to re-read data, which may result in duplicate records in your Kafka topics. Use offset reset carefully.
What should I do if my connector keeps failing or restarting?
Frequent connector failures indicate configuration issues, network problems, or database connectivity errors.
Common causes and solutions:
Check connector logs: In the Cloud Console, review error messages:
Authentication failures: Verify username and password.
Connection timeouts: Check egress endpoint status and network connectivity.
Table access errors: Verify table names and user permissions.
Timestamp column errors: Check column type and nullable constraints.
Verify SQL Server connectivity: Test that SQL Server is reachable:
Check firewall rules: Allow traffic on SQL Server port
1433, which is the default.Verify egress endpoint status: Ensure status is
Ready.Test credentials manually: Connect using SQL Server Management Studio with the same credentials.
Validate timestamp columns: Ensure timestamp columns meet requirements:
SELECT COLUMN_NAME, DATA_TYPE, IS_NULLABLE
FROM INFORMATION_SCHEMA.COLUMNS
WHERE TABLE_NAME = 'your_table' AND COLUMN_NAME = 'your_timestamp_column';
The column should use
datetime2(required on SQL Server 2016 and later) and preferablyNOT NULLto ensure no rows are skipped during ingestion.Check table filtering: Verify
table.include.listorschema.patternmatches existing tables:SELECT TABLE_SCHEMA, TABLE_NAME FROM INFORMATION_SCHEMA.TABLES WHERE TABLE_TYPE = 'BASE TABLE';
Verify Schema Registry availability: If using Avro, JSON Schema, or Protobuf formats, ensure Schema Registry is enabled and accessible.
Monitor connector resources: Check if the connector is hitting resource limits:
Reduce batch.max.rows: Lower the batch size.
Increase poll.interval.ms: Reduce query frequency.
Check database query performance: Look for slow queries or locks.
Important
For persistent failures, use the connector diagnostics feature and share logs with Confluent Support.
Next Steps
For an example that shows fully-managed Confluent Cloud connectors in action with Confluent Cloud for Apache Flink, see the Cloud ETL Demo. This example also shows how to use Confluent CLI to manage your resources in Confluent Cloud.