

Cluster Linking Active-Passive Manual Switchover Tutorial
This tutorial shows you how to manually fail over and fail back an active-passive Confluent Cloud cluster pair using Cluster Linking.
Your primary cluster in the active region processes all production read and write traffic during normal operations, while the secondary cluster in the DR region maintains read-only mirror topics. This manual process is for deployments that don’t use Automatic Failover.
When a regional disaster occurs, you manually stop production workloads on the primary cluster, promote the mirror topics on the DR cluster to standard read-write topics, and redirect your application clients to the DR cluster bootstrap endpoint.
Prerequisites and considerations
Before setting up an active-passive manual switchover architecture, review the following prerequisites and constraints.
Cluster and account prerequisites
Supported cluster types: Dedicated or Enterprise clusters only on both primary and secondary clusters (Basic, Standard, and Freight are not supported).
Environment and Organization scope: Both primary and DR clusters must be in the same Confluent Cloud organization. They can be in the same environment or in different environments, with tradeoffs to consider with either setup.
Cluster sizing: Size both clusters identically, the same Confluent Unit for Kafka (CKU) count, so the secondary cluster can absorb full primary traffic upon failover.
Bidirectional cluster link: As a best practice, create the cluster link in bidirectional mode from the outset. This enables direction flipping during failback and allows critical metadata sync.
Client prerequisites
Dynamic client re-bootstrapping: Client applications must be designed to update their bootstrap server configuration (for example, HashiCorp Consul, Vault, or AWS Secrets Manager) and restart during a failover event.
Pre-provisioned API keys and credentials: Create API keys and secrets on the secondary (DR) cluster ahead of time. Store these in your key manager so clients can authenticate immediately upon failover.
Networking and connectivity prerequisites
Network connectivity: Before failover, configure network paths (virtual private cloud (VPC) or virtual network (VNet) peering, PrivateLink, or Transit Gateways) between your applications and both the primary and secondary clusters.
Schema and governance constraints
Schema validation properties: Topic-level schema validation properties (
confluent.key.schema.validationandconfluent.value.schema.validation) are not automatically replicated by Cluster Linking. You must manually configure these settings on the DR cluster.Schema Registry DR: Schema Registry failover is managed separately from Apache Kafka® topic failover. Ensure Schema Linking is configured between your primary and secondary Schema Registry clusters.
What the tutorial covers
This tutorial demos use of the Confluent CLI Cluster Linking commands to create a DR cluster and fail over to it.
You start by building a cluster link to the DR cluster (destination) and mirroring all pertinent topics, access control lists (ACLs), and consumer group offsets. This is the “steady state” setup.
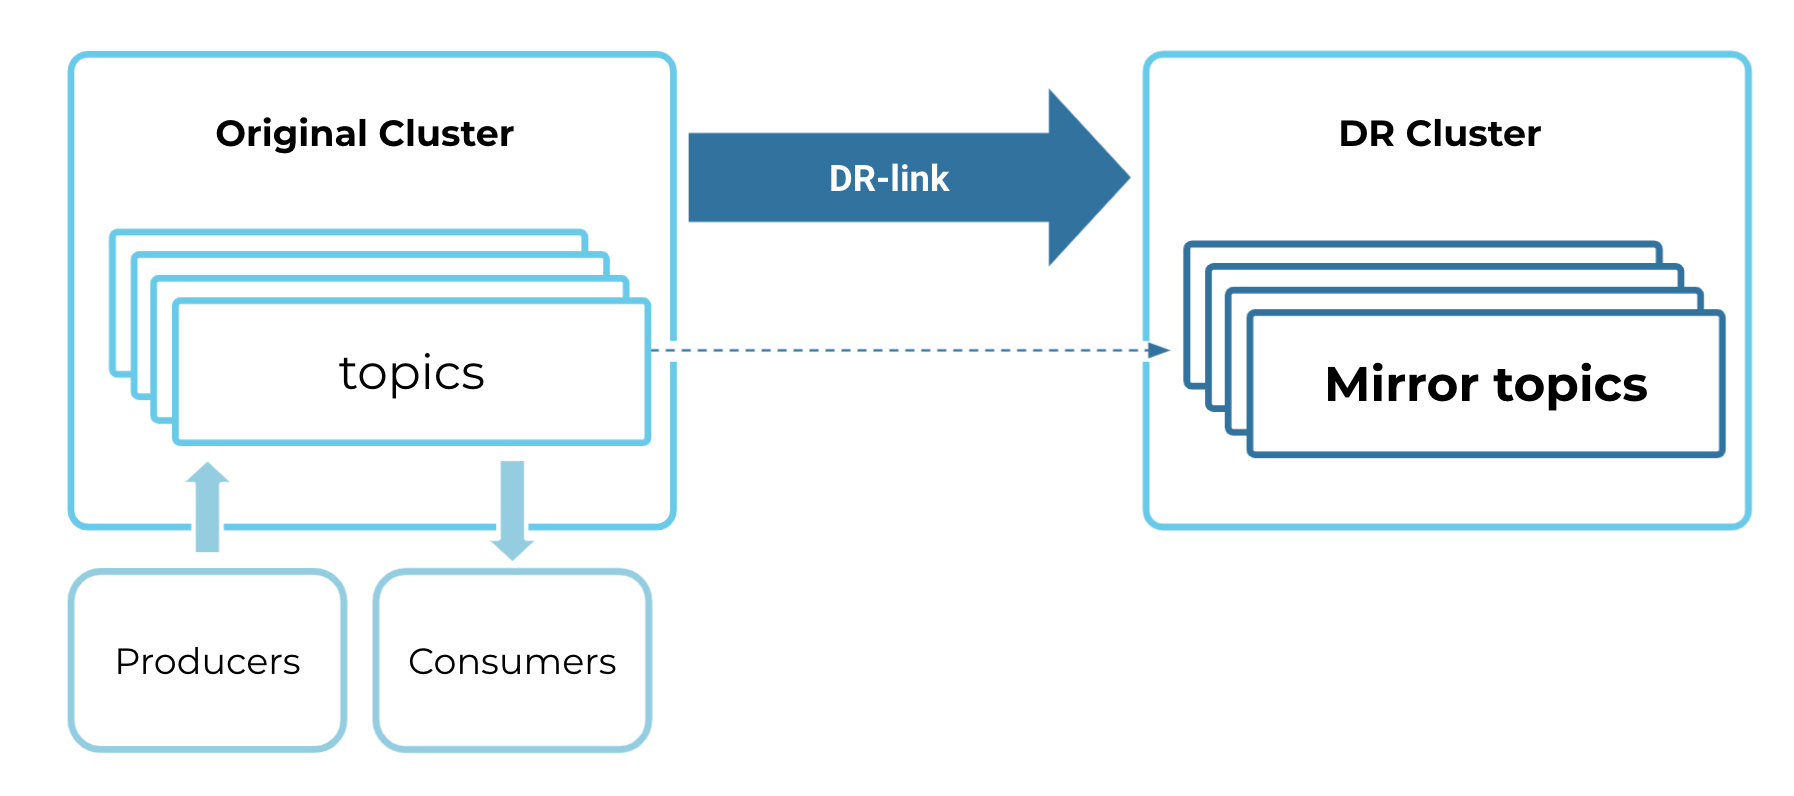
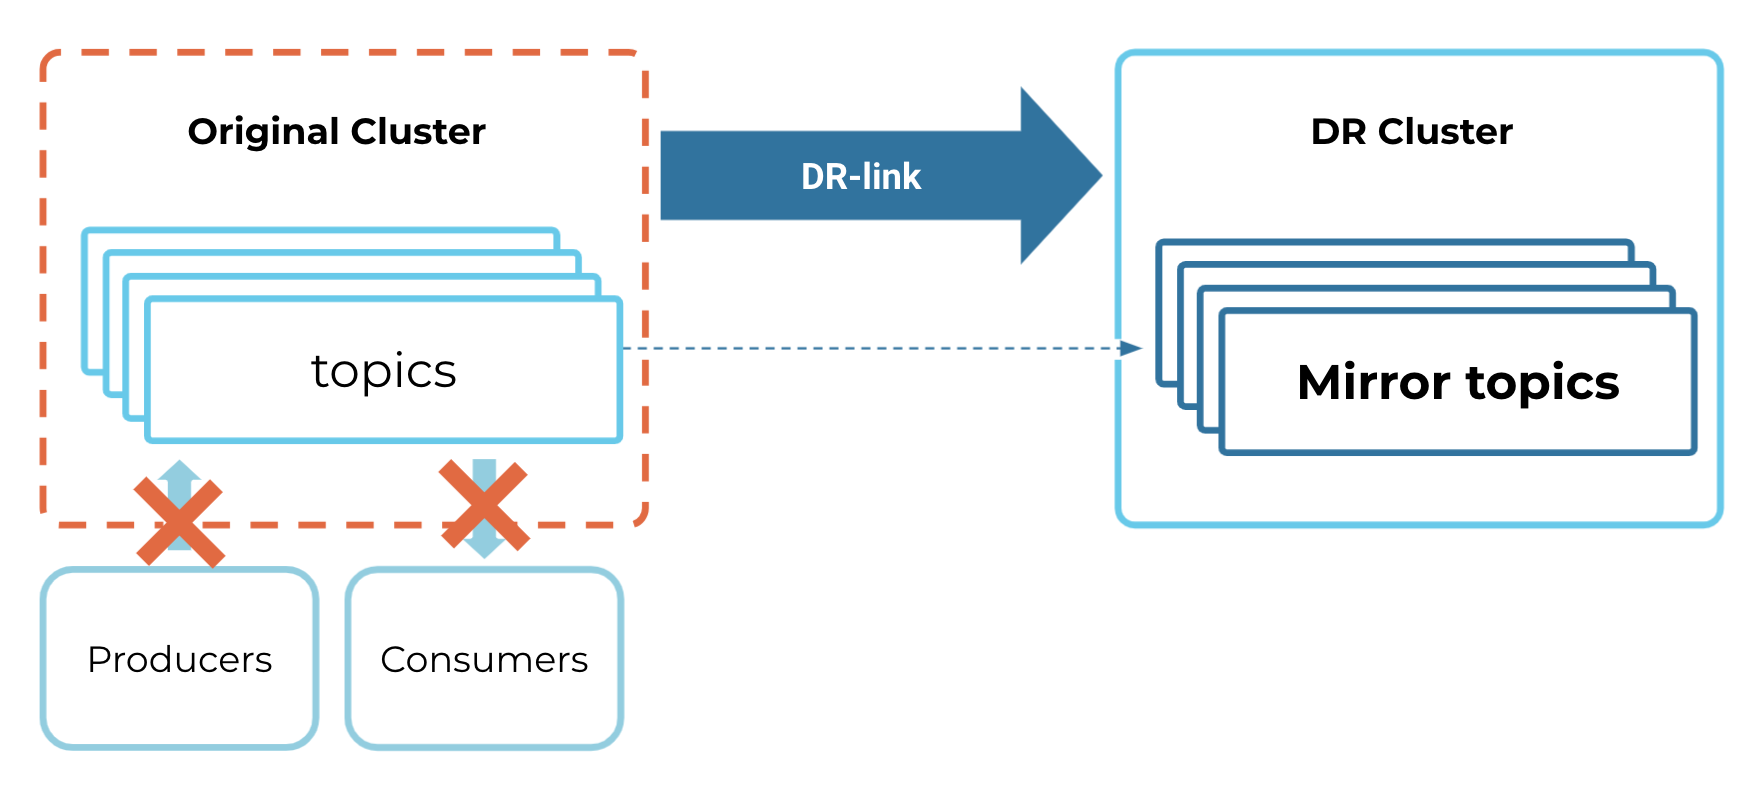
Then you incur a sample outage on the original (source) cluster. When this happens, the producers, consumers, and cluster link cannot interact with the original cluster.
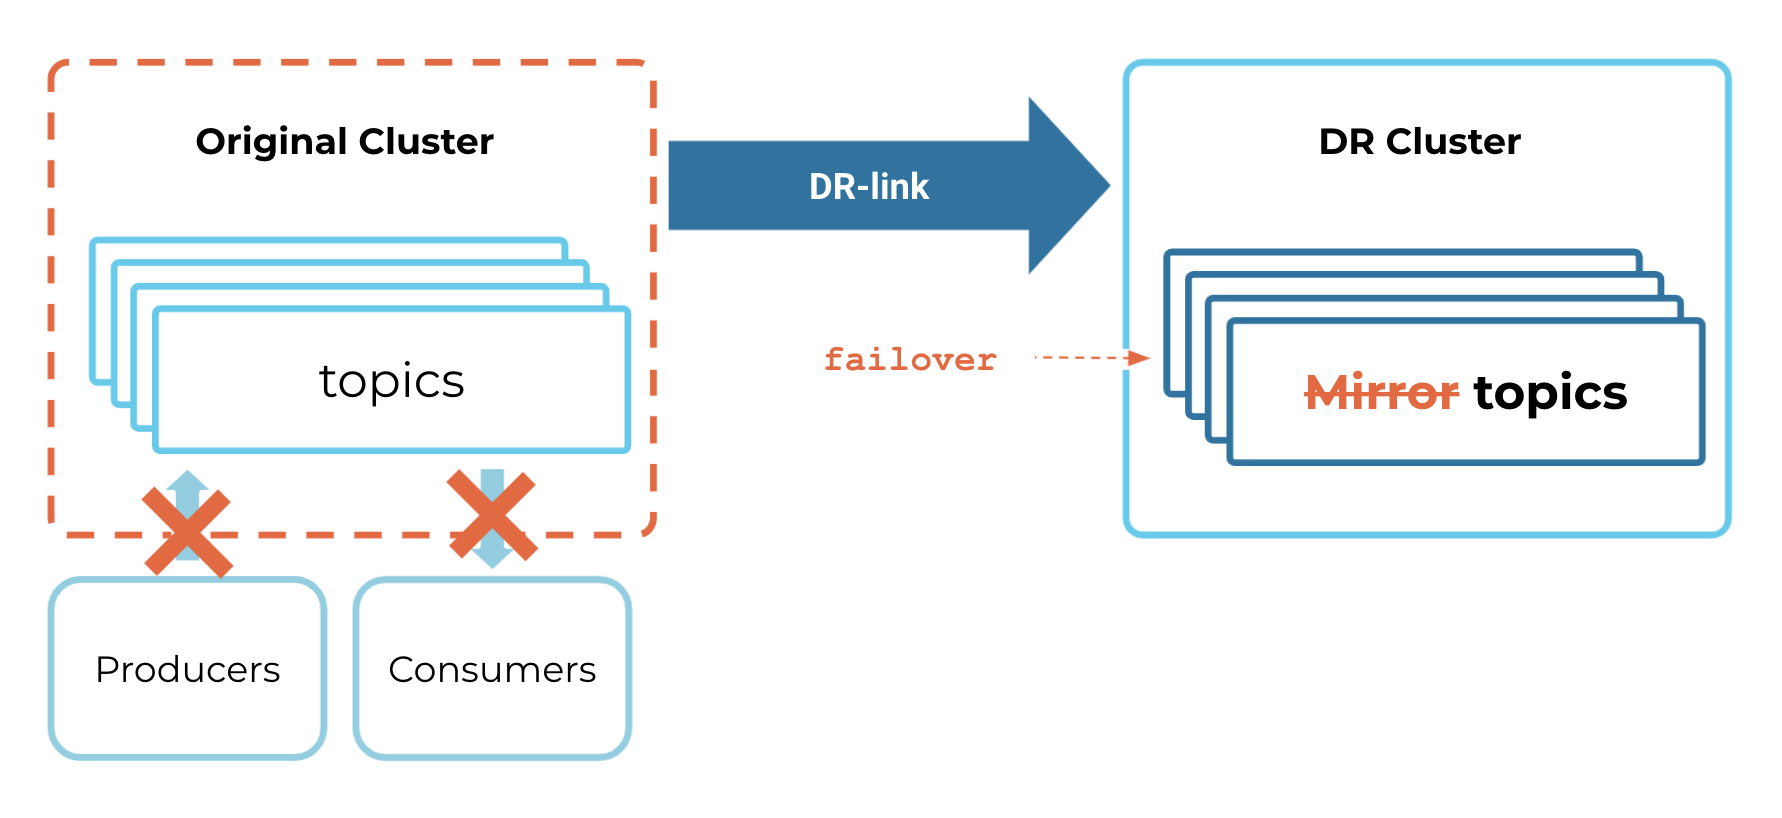
You then call a failover command that converts the mirror topics on the DR cluster into regular topics.
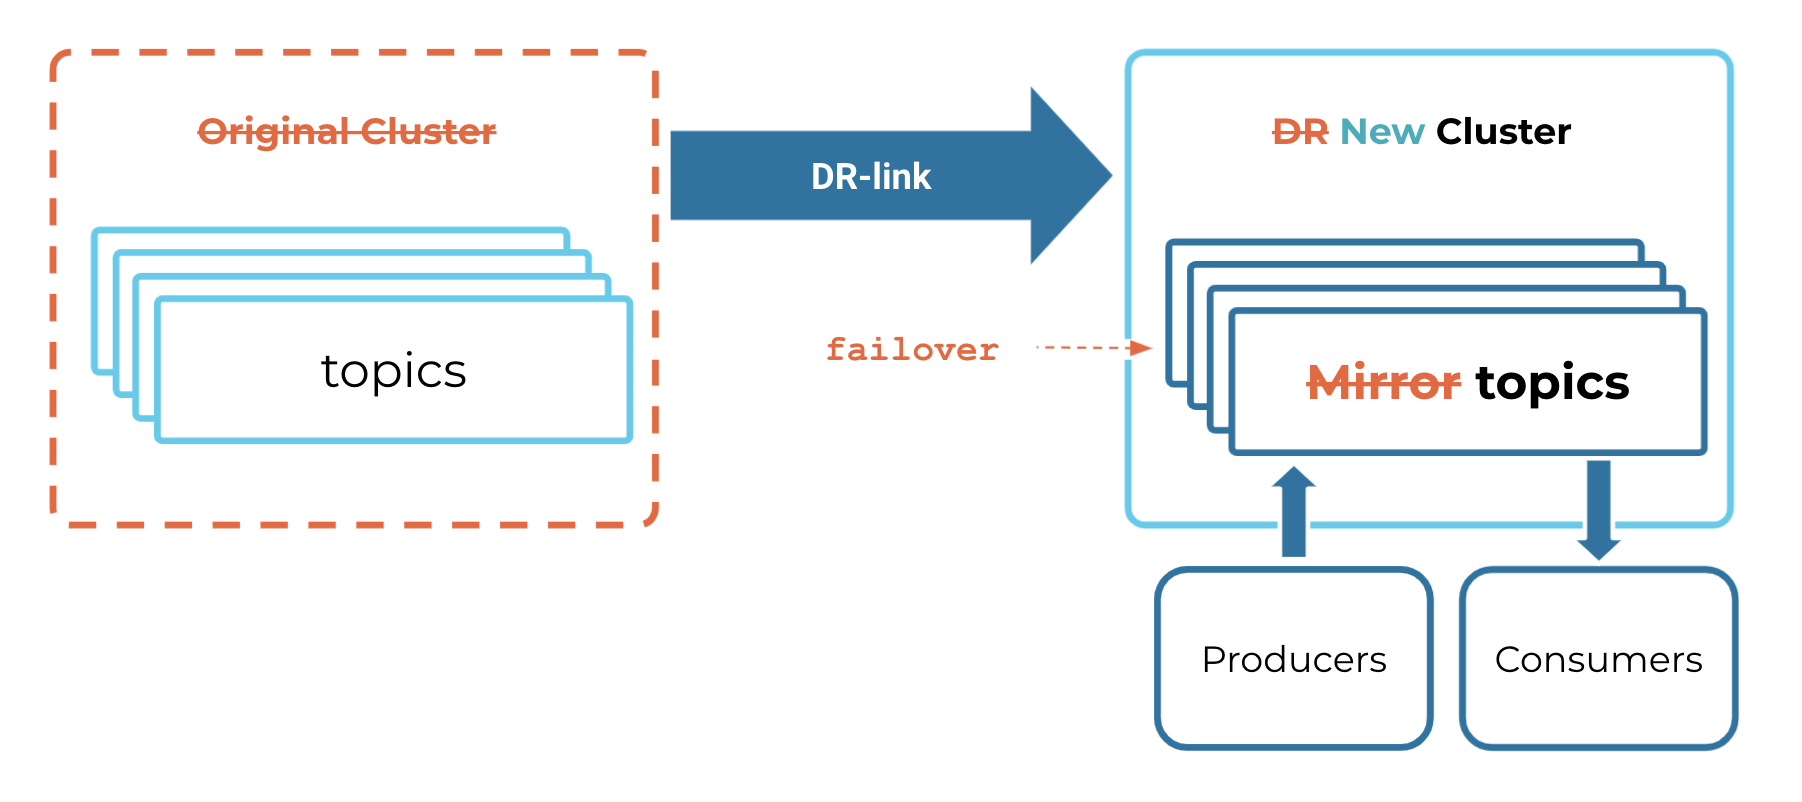
Finally, you move producers and consumers over to the DR cluster, and continue operations. The DR cluster has become the new source of truth.
Set up steady state
Create or choose the clusters you want to use
Log in to the Confluent Cloud Console.
If you do not already have clusters created, create two clusters as described in Create a Kafka Cluster.
Both clusters must be a Dedicated or Enterprise cluster (Basic, Standard, and Freight clusters are not supported).
Name these
originalanddr.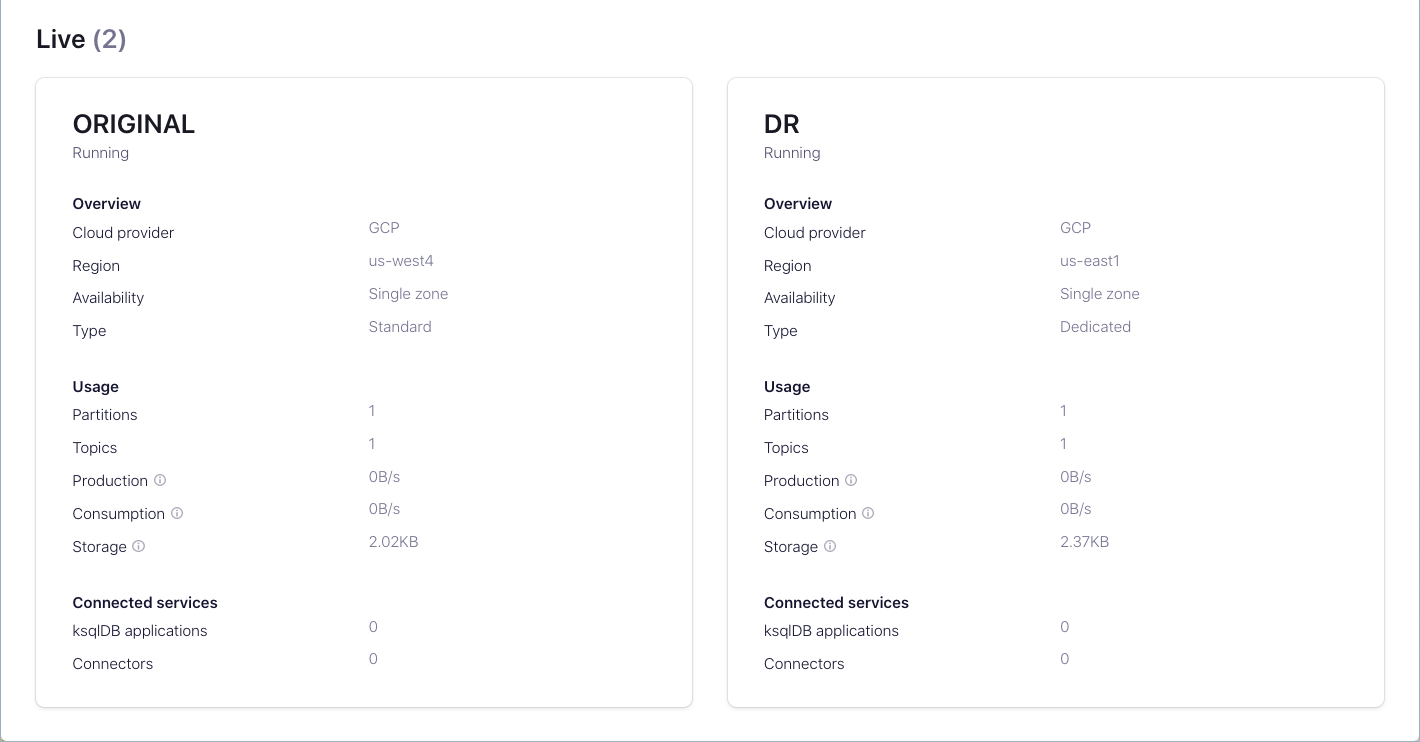
Tradeoffs between using the same or different environments
You can create the active cluster and DR cluster in either the same environment or in different environments. Each approach has tradeoffs.
Same environment
Following are advantages and disadvantages of placing the active cluster and DR cluster in the same environment.
Advantages
Simplified management with a single environment to administer.
Easier setup for Cluster Linking, API keys, and permissions.
Simpler cost tracking and billing within one environment.
Streamlined ACL and role-based access control (RBAC) management for security purposes.
Disadvantages
Both clusters could be affected by environment-level issues or misconfigurations.
Less organizational separation between production and DR resources.
Might be less suitable for multi-team scenarios where different teams manage different environments.
Different environments
Following are advantages and disadvantages of placing the active cluster and DR cluster in different environments.
Advantages
Better isolation and resilience to environment-level issues.
Stronger organizational separation: useful when different teams or departments manage production and DR.
More granular access controls at the environment level.
Reduced risk of accidental changes affecting both clusters.
Disadvantages
More complex management across multiple environments.
Additional overhead for managing API keys, service accounts, and permissions across environments.
Requires careful coordination of Cluster Linking configuration between environments.
Create a cluster link between the original and the DR cluster
Start by creating a cluster link that is mirroring topics, ACLs, and consumer group offsets from the source cluster to the destination cluster.
Set up privileges for the cluster link
Your cluster link needs privileges to read the appropriate topics on your source cluster. To give it these privileges, you create two mechanisms:
A service account for the cluster link. Service accounts are used in Confluent Cloud to group together applications and entities that need access to your Confluent Cloud resources.
An API key and secret that is associated with the cluster link’s service account and the source cluster. The link uses this API key to authenticate with the source cluster when it is fetching topic information and messages. A service account can have many API keys, but for this tutorial, you need only one.
To create these resources, do the following:
Create a service account for this cluster link.
confluent iam service-account create Cluster-Linking-Demo --description "For the cluster link created for the DR failover tutorial"
Your output should resemble the following.
+-------------+-----------+
| Id          |    254122 |
| Resource ID | sa-lqxn16 |
| Name        | ...       |
| Description | ...       |
+-------------+-----------+
Save the ID field (
<service_account_id>for the purposes of this tutorial).Create the API key and secret.
confluent api-key create --resource <original_cluster_id> --service-account <service_account_id>
Note
Store this key and secret somewhere safe. When you create the cluster link, you must supply it with this API key and secret, which is stored on the cluster link itself.
Allow the cluster link to read topics on the source cluster. Give the cluster link’s service account the ACLs to
READandDESCRIBE_CONFIGSfor all topics.confluent kafka acl create --allow --service-account <service_account_id> --operations read,describe-configs --topic "*" --cluster <original_cluster_id>
The preceding example allows read access to all topics by using the asterisk (
--topic "*") instead of specifying particular topics. If you wish, you can narrow this down to a specific set of topics to mirror. For example, to allow the cluster link to read all topics that begin with a “clicks” prefix, you can do this:confluent kafka acl create --allow --service-account <service_account_id> --operations read,describe-configs --topic clicks --prefix --cluster <original_cluster_id>
Provide the capability to sync ACLs from the source to the destination cluster.
This allows consumers, producers, and other services to continue running, even in the event of a failure.
To do this, you must give the cluster link’s service account an ACL to
DESCRIBEthe source cluster:confluent kafka acl create --allow --service-account <service_account_id> --operations describe --cluster-scope --cluster <original_cluster_id>
Provide the capability to sync consumer group offsets for mirror topics over this cluster link, so that consumers can pick up at the offset at which they left off.
Your clusters need two sets of ACLs for this.
Give the cluster link’s service account the appropriate ACLs to
DESCRIBEtopics, and toREADandDESCRIBEconsumer groups on the source (original) cluster.confluent kafka acl create --allow --service-account <service_account_id> --operations describe --topic "*" --cluster <original_cluster_id>
confluent kafka acl create --allow --service-account <service_account_id> --operations read,describe --consumer-group "*" --cluster <original_cluster_id>
Give the cluster link’s service account ACLs to
READandALTERtopics on the destination (DR) cluster, and ACLs toREADits consumer groups.confluent kafka acl create --allow --service-account <service_account_id> --operations read,alter --topic "*" --cluster <dr_cluster_id>
confluent kafka acl create --allow --service-account <service_account_id> --operations read --consumer-group "*" --cluster <dr_cluster_id>
Create the cluster link
Create a configuration file that turns on ACL sync, consumer group offset sync, and includes the security credentials for the link.
To do this, copy the following lines into a new file called
dr-link.config, and then replace<api_key>and<api_secret>with the key and secret you just created.consumer.offset.sync.enable=true consumer.offset.group.filters={"groupFilters": [{"name": "*","patternType": "LITERAL","filterType": "INCLUDE"}]} consumer.offset.sync.ms=1000 acl.sync.enable=true acl.sync.ms=1000 acl.filters={ "aclFilters": [ { "resourceFilter": { "resourceType": "any", "patternType": "any" }, "accessFilter": { "operation": "any", "permissionType": "any" } } ] } topic.config.sync.ms=1000 link.mode=BIDIRECTIONAL security.protocol=SASL_SSL sasl.mechanism=PLAIN sasl.jaas.config=org.apache.kafka.common.security.plain.PlainLoginModule required username="<api_key>" password="<api_secret>";
A few notes on this configuration, which does the following:
Syncs offsets for all consumer groups (
*) for these mirror topics. You can filter these down by passing in either exact topic names ("patternType": "LITERAL") or prefixes ("patternType": "PREFIX") to either include ("filterType": "INCLUDE") or exclude ("filterType": "EXCLUDE").Syncs all ACLs that are on the original cluster (
*) so that consumers, producers, and other services can access the topics on the DR cluster. Unlike the consumer group offset sync, this is not limited to mirror topics, and might sync ACLs for other topics. You can filter these down by passing in either exact topic names ("patternType": "LITERAL") or prefixes ("patternType": "PREFIX") to either include ("filterType": "INCLUDE") or exclude ("filterType": "EXCLUDE").Syncs consumer offsets, ACLs, and topic configurations every 1000 milliseconds. This gives the link more up-to-date values for these. It comes at the expense of higher data throughput over the link, and potentially lower maximum throughput for the topic data. As a best practice, try different values to see what works best for your specific cluster link.
The last line in the file starts with
sasl.jaas.configand ends with a semicolon (;). This must be all on one line, as shown.
Create the cluster link as shown in the following example, with the command
confluent kafka link create <flags>.In this example, the cluster link is called
dr-link.confluent kafka link create dr-link \ --cluster <dr_cluster_id> \ --source-cluster <original_cluster_id> \ --source-bootstrap-server <original-bootstrap-server> \ --config dr-link.config
If this is successful, you should get this message:
Created cluster link "dr-link".Also, you can verify that the link was created by listing existing links:
confluent kafka link list --cluster <dr_cluster_id>
Tip
--source-cluster-idwas replaced with--source-clusterin version 3 of confluent CLI, as described in the command reference for confluent kafka link create.
Configure the source and mirror topics
Create a topic called
dr-topicon the original cluster.For the sake of this demo, create this topic with only one partition (
--partitions 1). Having only one partition makes it easier to notice how the consumer offsets are synced from original cluster to DR cluster.confluent kafka topic create dr-topic --partitions 1 --cluster <original_cluster_id>
You should see the message
Created topic "dr-topic", as shown in the following example.confluent kafka topic create dr-topic --partitions 1 --cluster lkc-xkd1g
Your output should resemble the following.
Created topic "dr-topic".
You can verify this by listing topics.
confluent kafka topic list --cluster <original_cluster_id>
Create a mirror topic of
dr-topicon the DR cluster.confluent kafka mirror create dr-topic --link <link-name> --cluster <dr_cluster_id>
You should see the message
Created mirror topic "dr-topic", as shown in the following example.confluent kafka mirror create dr-topic --link dr-link --cluster lkc-r68yp
Your output should resemble the following.
Created mirror topic "dr-topic".
At this point, you have a topic on your original cluster that is mirroring all of its data, ACLs, and consumer group offsets to a mirror topic on your DR cluster.
Produce and consume some data on the original cluster
In this section, you simulate an application that is producing data to and consuming data from your original cluster. You use the Confluent CLI produce and consume commands to do so.
Create a service account to represent your CLI based demo clients.
confluent iam service-account create CLI --description "From CLI"
Your output should resemble:
+-------------+-----------+
| Id          |    254262 |
| Resource ID | sa-ldr3w1 |
| Name        | CLI       |
| Description | From CLI  |
+-------------+-----------+
In the preceding example, the
<cli_service-account_id>issa-ldr3w1.Create an API key and secret for this service account on your original cluster, and save these as
<original_cli_api_key>and<original_cli_api_secret>.confluent api-key create --resource <original_cluster_id> --service-account <cli_service-account_id>
Create an API key and secret for this service account on your DR cluster, and save these as
<DR_CLI_api_key>and<DR_CLI_api_secret>.confluent api-key create --resource <dr_cluster_id> --service-account <cli_service-account_id>
Give your CLI service account enough ACLs to produce and consume messages on your original cluster.
confluent kafka acl create --service-account <cli_service-account_id> --allow --operations read,describe,write --topic "*" --cluster <original_cluster_id>
confluent kafka acl create --service-account <cli_service-account_id> --allow --operations describe,read --consumer-group "*" --cluster <original_cluster_id>
Now you can produce and consume some data on the original cluster.
Tell your CLI to use your original API key on your original cluster.
confluent api-key use <original_cli_api_key> --resource <original_cluster_id>
Produce the numbers 1-5 to your topic.
seq 1 5 | confluent kafka topic produce dr-topic --cluster <original_cluster_id>
You should see this output, but the command should complete without needing you to press ^C or ^D.
Starting Kafka Producer. ^C or ^D to exit
Tip
If you get an error message indicating
unable to connect to Kafka cluster, wait for a minute or two, then try again. For recently created Kafka clusters and API keys, it might take a few minutes before the resources are ready.Start a CLI consumer to read from the
dr-topictopic, and give it the namecli-consumer.As a part of this command, pass in the flag
--from-beginningto tell the consumer to start from offset0.confluent kafka topic consume dr-topic --group cli-consumer --from-beginning
After the consumer reads all five messages, press Ctrl+C to stop the consumer.
To observe how consumers pick up from the correct offset on a failover, artificially force some consumer lag on your consumer.
Produce numbers 6-10 to your topic.
seq 6 10 | confluent kafka topic produce dr-topic
You should see the following output, but the command should complete without needing you to press ^C or ^D.
Starting Kafka Producer. ^C or ^D to exit
Now, you have produced 10 messages to your topic on your original cluster, but your cli-consumer has consumed only five.
Monitor mirroring lag
Because Cluster Linking is an asynchronous process, there might be mirroring lag between the source cluster and the destination cluster.
You can see what your mirroring lag is on a per-partition basis for your DR topic with this command:
confluent kafka mirror describe dr-topic --link dr-link --cluster <dr_cluster_id>
  LinkName  | MirrorTopicName | Partition | PartitionMirrorLag | SourceTopicName | MirrorStatus | StatusTimeMs
+-----------+-----------------+-----------+--------------------+-----------------+--------------+---------------+
   dr-link |  dr-topic        |         0 |                  0 |  dr-topic       | ACTIVE       | 1624030963587
You can also monitor your lag and your mirroring metrics through the Confluent Cloud Metrics. These two metrics are exposed:
MaxLag shows the maximum lag (in number of messages) among the partitions that are being mirrored. It is available on a per-topic and a per-link basis. This gives you a sense of how much data is on the original cluster only at the point of failover.
Mirroring Throughput shows on a per-link or per-topic basis how much data is being mirrored.
Active-passive failover and failback process
An active-passive DR plan is designed for cases where you have producers only on one side. In these cases, you can have consumer groups on both sides, as long as they use different consumer group names.
Cluster Linking enables fast failover to the DR region and fast failback to the original region, so you can test your DR workflow with minimal risk.

Using the Cluster Linking truncate-and-restore command, a DR workflow can be completed with:
Minimal downtime when performing the failover or failback operations.
Option to fail back as soon as the failover is complete, or to stay running in the DR region for as long as desired, with no added cost from Confluent Cloud.
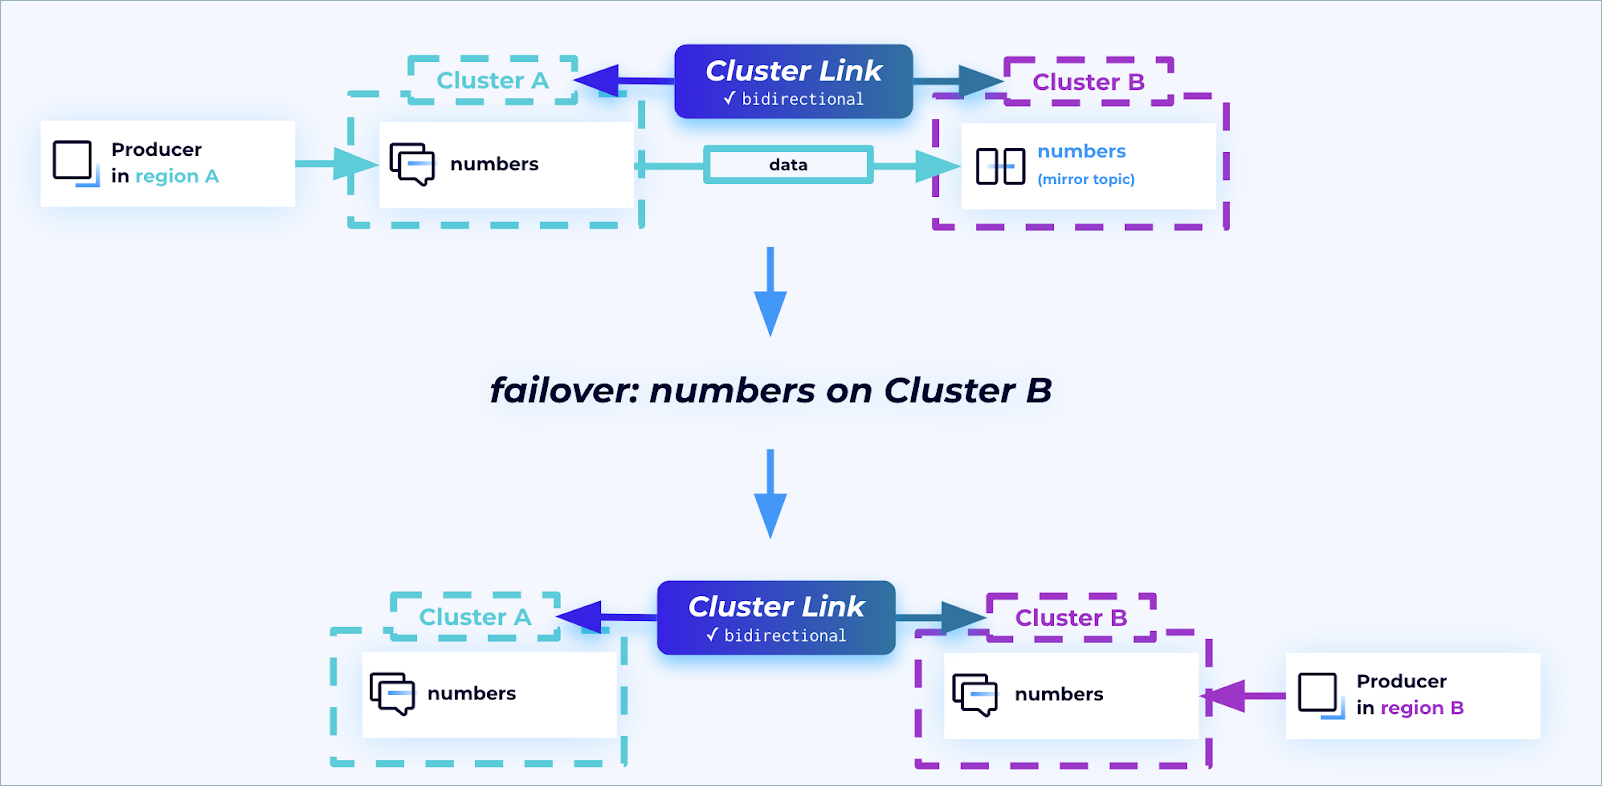
Fail over
When a disaster strikes, you can use the failover command to quickly and
safely fail-forward to your secondary region so your clients can continue
processing data and reduce downtime as much as possible.
After the disaster is over, you can reinstate the original primary region to ensure
redundancy is built into your systems. The truncate-and-restore command makes
this possible. After an outage has occurred, and the primary
cluster is back up and running, run truncate-and-restore on the primary topics.
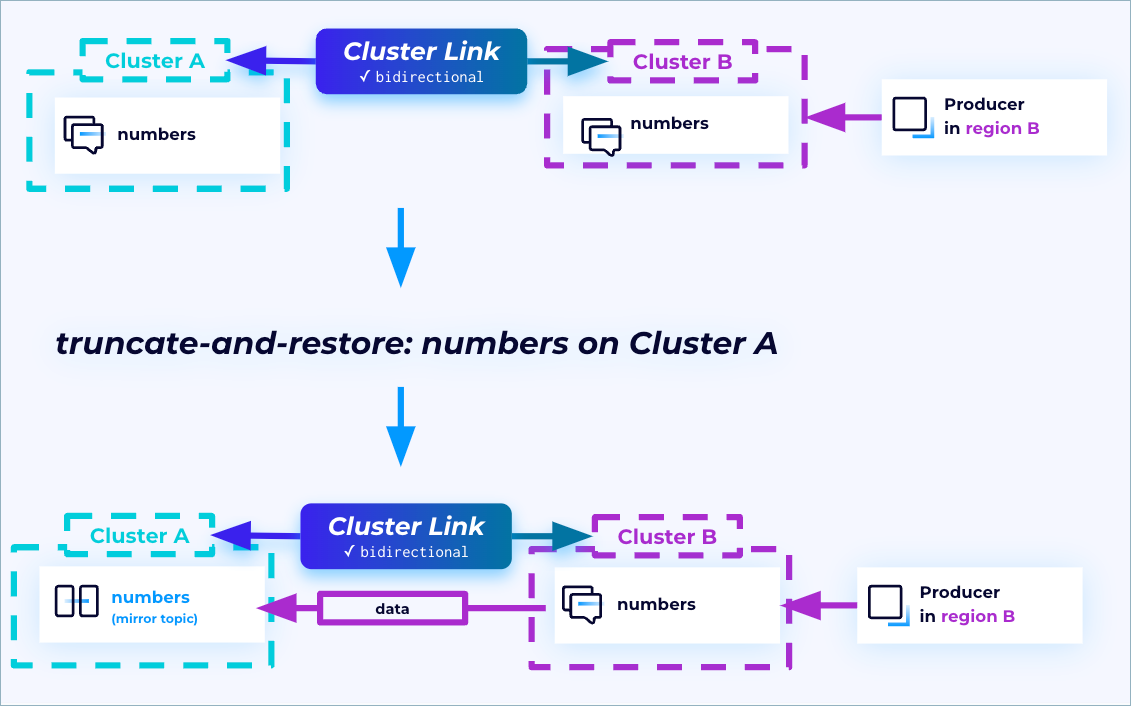
During this process, the primary and secondary clusters and topics essentially switch places. The original primary topics become mirror topics and start fetching from the original secondary topics (treating them now as primary). This reinstates the secondary region to ensure redundancy.
Note
The truncate-and-restore process truncates any divergent records written
after the failover point on the primary topic and starts fetching records from
the other cluster to become a read-only mirror topic, so it’s important to note
that any records that were written to the original primary cluster after the
failover point are lost with the use of this command.
Fail back
After failover, you can go back to the original steady state (“fail back”) if desired.
To fail back, run the reverse-and-start command on the new mirror topic
on the original primary cluster, so that the original primary cluster becomes the writable topic,
and the original secondary cluster becomes the mirror topic. Note that you must also shut down your clients and restart them at your original primary cluster.
List cluster links and mirror topics
At various points in a workflow, it may be useful to get lists of cluster linking resources such as links or mirror topics. You might want to do this for the purposes of monitoring, or before starting a failover or migration.
To list the cluster links on the active cluster:
confluent kafka link list
You can get a list mirror topics on a link, or on a cluster.
To list the mirror topics on a specified cluster link:
confluent kafka mirror list --link <link-name> --cluster <cluster-id>
To list all mirror topics on a particular cluster:
confluent kafka mirror list --cluster <cluster-id>
Simulate a failover to the DR cluster
In a disaster event, your original cluster is usually unreachable.
In this section, you go through the steps you follow on the DR cluster to resume operations.
Perform a dry run of a failover to preview the results without actually executing the command. To do this, add the
--dry-runflag to the end of the command.confluent kafka mirror failover <mirror-topic-name> --link <link-name> --cluster <dr_cluster_id> --dry-run
For example:
confluent kafka mirror failover dr-topic --link dr-link --cluster <dr_cluster_id> --dry-run
Stop the mirror topic to convert it to a normal, writable topic.
confluent kafka mirror failover <mirror-topic-name> --link <link-name> --cluster <dr_cluster_id>
For this example, the mirror topic name and link name are as follows.
confluent kafka mirror failover dr-topic --link dr-link --cluster <dr_cluster_id>
Expected output:
MirrorTopicName | Partition | PartitionMirrorLag | ErrorMessage | ErrorCode
-------------------------------------------------------------------------
dr-topic        |         0 |                  0 |              |
The failover command is irreversible and converts the mirror topic to a regular topic. To restore mirroring, you can use the
truncate-and-restorecommand on the original source topic. For the full restore and failback procedure, see Active-passive failover and failback process.Now you can produce and consume data on the DR cluster.
Set your CLI to use the DR cluster’s API key:
confluent api-key use <DR-CLI-api-key> --resource <dr_cluster_id>
Produce numbers 11-15 on the topic, to show that it is a writable topic.
seq 11 15 | confluent kafka topic produce dr-topic --cluster <dr_cluster_id>
You should see this output, but the command should complete without needing you to press ^C or ^D.
Starting Kafka Producer. ^C or ^D to exit
Move your consumer group to the DR cluster, and consume from
dr-topicon the DR cluster.confluent kafka topic consume dr-topic --group cli-consumer --cluster <dr_cluster_id>
You should expect the consumer to start consuming at number 6, because that’s where it left off on the original cluster. If it does, that shows that its consumer offset was correctly synced. It should consume through number 15, which is the last message you produced on the DR cluster.
After you see number 15, press Ctrl+C to stop the consumer.
Expected output:
Starting Kafka Consumer. ^C or ^D to exit
6
7
8
9
10
11
12
13
14
15
^CStopping Consumer.
You have now failed over your CLI producer and consumer to the DR cluster, where they continued operations smoothly.